
00059-Hugging Face-学习笔记-windows10
前言
Hugging Face 的官网地址为:https://huggingface.co/ 。
The AI community building the future.
Build, train and deploy state of the art models powered by the reference open source in machine learning.
Tasks: Problems solvers: https://huggingface.co/tasks .
Thousands of creators work as a community to solve Audio, Vision, and Language with AI.
Open Source: Transformers: https://huggingface.co/transformers .
Transformers is our natural language processing library and our hub is now open to all ML models, with support from libraries like Flair, Asteroid, ESPnet, Pyannote, and more to come.
操作系统:Windows 10 专业版
参考文档
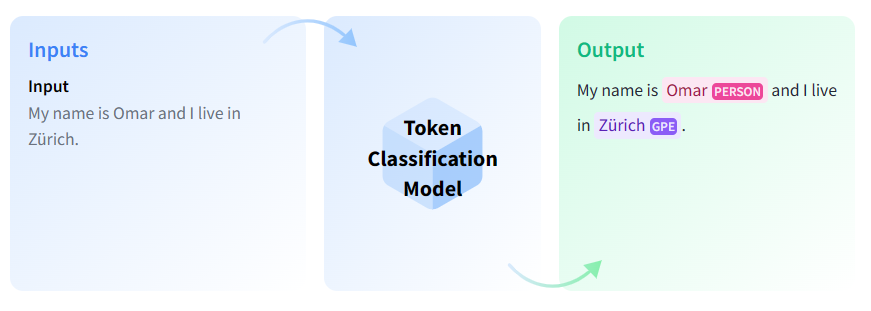
Token Classification
源教程链接: https://huggingface.co/tasks/token-classification .
Token classification is a natural language understanding task in which a label is assigned to some tokens in a text. Some popular token classification subtasks are Named Entity Recognition (NER) and Part-of-Speech (PoS) tagging. NER models could be trained to identify specific entities in a text, such as dates, individuals and places; and PoS tagging would identify, for example, which words in a text are verbs, nouns, and punctuation marks.
Use Cases
Information Extraction from Invoices
You can extract entities of interest from invoices automatically using Named Entity Recognition (NER) models. Invoices can be read with Optical Character Recognition models and the output can be used to do inference with NER models. In this way, important information such as date, company name, and other named entities can be extracted.
Task Variants
Named Entity Recognition (NER)
NER is the task of recognizing named entities in a text. These entities can be the names of people, locations, or organizations. The task is formulated as labeling each token with a class for each named entity and a class named “0” for tokens that do not contain any entities. The input for this task is text and the output is the annotated text with named entities.
Inference
You can use the 🤗 Transformers library ner pipeline to infer with NER models.
1 | from transformers import pipeline |
Part-of-Speech (PoS) Tagging
In PoS tagging, the model recognizes parts of speech, such as nouns, pronouns, adjectives, or verbs, in a given text. The task is formulated as labeling each word with a part of the speech.
Inference
You can use the 🤗 Transformers library token-classification pipeline with a POS tagging model of your choice. The model will return a json with PoS tags for each token.
1 | from transformers import pipeline |
This is not limited to transformers! You can also use other libraries such as Stanza, spaCy, and Flair to do inference! Here is an example using a canonical spaCy model.
1 | !pip install https://huggingface.co/spacy/en_core_web_sm/resolve/main/en_core_web_sm-any-py3-none-any.whl |
Useful Resources
Would you like to learn more about token classification? Great! Here you can find some curated resources that you may find helpful!
Course Chapter on Token Classification
Blog post: Welcome spaCy to the Hugging Face Hub
Notebooks
TensorFlow
Scripts for training
TensorFlow
Flax
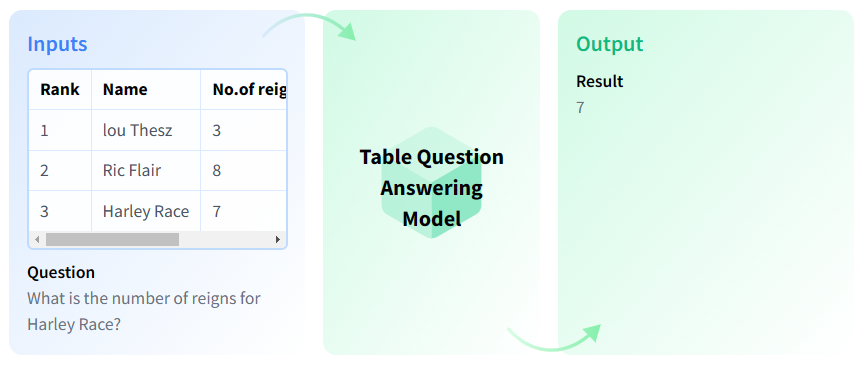
Table Question Answering
源教程地址: https://huggingface.co/tasks/table-question-answering .
Table Question Answering (Table QA) is the answering a question about an information on a given table.
Use Cases
SQL execution
You can use the Table Question Answering models to simulate SQL execution by inputting a table.
Table Question Answering
Table Question Answering models are capable of answering questions based on a table.
Task Variants
This place can be filled with variants of this task if there’s any.
Inference
You can infer with TableQA models using the 🤗 Transformers library.
1 | from transformers import pipeline |
Useful Resources
In this area, you can insert useful resources about how to train or use a model for this task.
This task page is complete thanks to the efforts of Hao Kim Tieu. 🦸
Question Answering
源教程地址: https://huggingface.co/tasks/question-answering .
Question Answering models can retrieve the answer to a question from a given text, which is useful for searching for an answer in a document. Some question answering models can generate answers without context!

Use Cases
Frequently Asked Questions
You can use Question Answering (QA) models to automate the response to frequently asked questions by using a knowledge base (documents) as context. Answers to customer questions can be drawn from those documents.
⚡⚡ If you’d like to save inference time, you can first use passage ranking models to see which document might contain the answer to the question and iterate over that document with the QA model instead.
Task Variants
There are different QA variants based on the inputs and outputs:
Extractive QA: The model extracts the answer from a context. The context here could be a provided text, a table or even HTML! This is usually solved with BERT-like models.
Open Generative QA: The model generates free text directly based on the context. You can learn more about the Text Generation task in its page.
Closed Generative QA: In this case, no context is provided. The answer is completely generated by a model.
The schema above illustrates extractive, open book QA. The model takes a context and the question and extracts the answer from the given context.
You can also differentiate QA models depending on whether they are open-domain or closed-domain. Open-domain models are not restricted to a specific domain, while closed-domain models are restricted to a specific domain (e.g. legal, medical documents).
Inference
You can infer with QA models with the 🤗 Transformers library using the question-answering pipeline. If no model checkpoint is given, the pipeline will be initialized with distilbert-base-cased-distilled-squad. This pipeline takes a question and a context from which the answer will be extracted and returned.
1 | from transformers import pipeline |
Useful Resources
Would you like to learn more about QA? Awesome! Here are some curated resources that you may find helpful!
Course Chapter on Question Answering
Question Answering Workshop
How to Build an Open-Domain Question Answering System?
Blog Post: ELI5 A Model for Open Domain Long Form Question Answering
Notebooks
TensorFlow
Scripts for training
TensorFlow
Flax
GET STARTED - 🤗 Transformers
源教程地址: https://huggingface.co/docs/transformers/index .
State-of-the-art Machine Learning for PyTorch, TensorFlow, and JAX.
🤗 Transformers provides APIs and tools to easily download and train state-of-the-art pretrained models. Using pretrained models can reduce your compute costs, carbon footprint, and save you the time and resources required to train a model from scratch. These models support common tasks in different modalities, such as:
📝 Natural Language Processing: text classification, named entity recognition, question answering, language modeling, summarization, translation, multiple choice, and text generation.
🖼️ Computer Vision: image classification, object detection, and segmentation.
🗣️ Audio: automatic speech recognition and audio classification.
🐙 Multimodal: table question answering, optical character recognition, information extraction from scanned documents, video classification, and visual question answering.
🤗 Transformers support framework interoperability between PyTorch, TensorFlow, and JAX. This provides the flexibility to use a different framework at each stage of a model’s life; train a model in three lines of code in one framework, and load it for inference in another. Models can also be exported to a format like ONNX and TorchScript for deployment in production environments.
Contents
The documentation is organized into five sections:
GET STARTED provides a quick tour of the library and installation instructions to get up and running.
TUTORIALS are a great place to start if you’re a beginner. This section will help you gain the basic skills you need to start using the library.
HOW-TO GUIDES show you how to achieve a specific goal, like finetuning a pretrained model for language modeling or how to write and share a custom model.
CONCEPTUAL GUIDES offers more discussion and explanation of the underlying concepts and ideas behind models, tasks, and the design philosophy of 🤗 Transformers.
API describes all classes and functions:
MAIN CLASSES details the most important classes like configuration, model, tokenizer, and pipeline.
MODELS details the classes and functions related to each model implemented in the library.
INTERNAL HELPERS details utility classes and functions used internally.
GET STARTED - Quick tour
源教程地址: https://huggingface.co/docs/transformers/quicktour .
Get up and running with 🤗 Transformers! Whether you’re a developer or an everyday user, this quick tour will help you get started and show you how to use the pipeline() for inference, load a pretrained model and preprocessor with an AutoClass, and quickly train a model with PyTorch or TensorFlow. If you’re a beginner, we recommend checking out our tutorials or course next for more in-depth explanations of the concepts introduced here.
Before you begin, make sure you have all the necessary libraries installed:
1 | !pip install transformers datasets |
You’ll also need to install your preferred machine learning framework:
1 | pip install torch |
Pipeline
The pipeline() is the easiest and fastest way to use a pretrained model for inference. You can use the pipeline() out-of-the-box for many tasks across different modalities, some of which are shown in the table below:
For a complete list of available tasks, check out the pipeline API reference.
| Task | Description | Modality | Pipeline identifier |
|---|---|---|---|
| Text classification | assign a label to a given sequence of text | NLP | pipeline(task=“sentiment-analysis”) |
| Text generation | generate text given a prompt | NLP | pipeline(task=“text-generation”) |
| Summarization | generate a summary of a sequence of text or document | NLP | pipeline(task=“summarization”) |
| Image classification | assign a label to an image | Computer vision | pipeline(task=“image-classification”) |
| Image segmentation | assign a label to each individual pixel of an image (supports semantic, panoptic, and instance segmentation) | Computer vision | pipeline(task=“image-segmentation”) |
| Object detection | predict the bounding boxes and classes of objects in an image | Computer vision | pipeline(task=“object-detection”) |
| Audio classification | assign a label to some audio data | Audio | pipeline(task=“audio-classification”) |
| Automatic speech recognition | transcribe speech into text | Audio | pipeline(task=“automatic-speech-recognition”) |
| Visual question answering | answer a question about the image, given an image and a question | Multimodal | pipeline(task=“vqa”) |
| Document question answering | answer a question about a document, given an image and a question | Multimodal | pipeline(task=“document-question-answering”) |
| Image captioning | generate a caption for a given image | Multimodal | pipeline(task=“image-to-text”) |
Start by creating an instance of pipeline() and specifying a task you want to use it for. In this guide, you’ll use the pipeline() for sentiment analysis as an example:
1 | from transformers import pipeline |
The pipeline() downloads and caches a default pretrained model and tokenizer for sentiment analysis. Now you can use the classifier on your target text:
1 | classifier("We are very happy to show you the 🤗 Transformers library.") |
If you have more than one input, pass your inputs as a list to the pipeline() to return a list of dictionaries:
1 | results = classifier(["We are very happy to show you the 🤗 Transformers library.", "We hope you don't hate it."]) |
The pipeline() can also iterate over an entire dataset for any task you like. For this example, let’s choose automatic speech recognition as our task:
1 | import torch |
Load an audio dataset (see the 🤗 Datasets Quick Start for more details) you’d like to iterate over. For example, load the MInDS-14 dataset:
1 | from datasets import load_dataset, Audio |
You need to make sure the sampling rate of the dataset matches the sampling rate
facebook/wav2vec2-base-960hwas trained on:
1 | dataset = dataset.cast_column("audio", Audio(sampling_rate=speech_recognizer.feature_extractor.sampling_rate)) |
The audio files are automatically loaded and resampled when calling the “audio” column. Extract the raw waveform arrays from the first 4 samples and pass it as a list to the pipeline:
1 | result = speech_recognizer(dataset[:4]["audio"]) |
For larger datasets where the inputs are big (like in speech or vision), you’ll want to pass a generator instead of a list to load all the inputs in memory. Take a look at the pipeline API reference for more information.
Use another model and tokenizer in the pipeline
The pipeline() can accommodate any model from the Hub, making it easy to adapt the pipeline() for other use-cases. For example, if you’d like a model capable of handling French text, use the tags on the Hub to filter for an appropriate model. The top filtered result returns a multilingual BERT model finetuned for sentiment analysis you can use for French text:
1 | model_name = "nlptown/bert-base-multilingual-uncased-sentiment" |
Use
AutoModelForSequenceClassificationandAutoTokenizerto load the pretrained model and it’s associated tokenizer (more on an AutoClass in the next section):
1 | from transformers import AutoTokenizer, AutoModelForSequenceClassification |
Specify the model and tokenizer in the pipeline(), and now you can apply the classifier on French text:
1 | classifier = pipeline("sentiment-analysis", model=model, tokenizer=tokenizer) |
If you can’t find a model for your use-case, you’ll need to finetune a pretrained model on your data. Take a look at our finetuning tutorial to learn how. Finally, after you’ve finetuned your pretrained model, please consider sharing the model with the community on the Hub to democratize machine learning for everyone! 🤗
AutoClass
Under the hood, the
AutoModelForSequenceClassificationandAutoTokenizerclasses work together to power the pipeline() you used above. AnAutoClassis a shortcut that automatically retrieves the architecture of a pretrained model from its name or path. You only need to select the appropriate AutoClass for your task and it’s associated preprocessing class.Let’s return to the example from the previous section and see how you can use the AutoClass to replicate the results of the pipeline().
AutoTokenizer
A tokenizer is responsible for preprocessing text into an array of numbers as inputs to a model. There are multiple rules that govern the tokenization process, including how to split a word and at what level words should be split (learn more about tokenization in the tokenizer summary). The most important thing to remember is you need to instantiate a tokenizer with the same model name to ensure you’re using the same tokenization rules a model was pretrained with.
Load a tokenizer with AutoTokenizer:
1 | from transformers import AutoTokenizer |
Pass your text to the tokenizer:
1 | encoding = tokenizer("We are very happy to show you the 🤗 Transformers library.") |
The tokenizer returns a dictionary containing:
input_ids: numerical representations of your tokens.
attention_mask: indicates which tokens should be attended to.
A tokenizer can also accept a list of inputs, and pad and truncate the text to return a batch with uniform length:
1 | pt_batch = tokenizer( |
Check out the preprocess tutorial for more details about tokenization, and how to use an AutoImageProcessor, AutoFeatureExtractor and AutoProcessor to preprocess image, audio, and multimodal inputs.
AutoModel
Transformers provides a simple and unified way to load pretrained instances. This means you can load an AutoModel like you would load an AutoTokenizer. The only difference is selecting the correct AutoModel for the task. For text (or sequence) classification, you should load
AutoModelForSequenceClassification:
1 | from transformers import AutoModelForSequenceClassification |
See the task summary for tasks supported by an AutoModel class.
Now pass your preprocessed batch of inputs directly to the model. You just have to unpack the dictionary by adding
**:
1 | pt_outputs = pt_model(**pt_batch) |
The model outputs the final activations in the
logitsattribute. Apply the softmax function to the logits to retrieve the probabilities:
1 | from torch import nn |
All 🤗 Transformers models (PyTorch or TensorFlow) output the tensors before the final activation function (like softmax) because the final activation function is often fused with the loss. Model outputs are special dataclasses so their attributes are autocompleted in an IDE. The model outputs behave like a tuple or a dictionary (you can index with an integer, a slice or a string) in which case, attributes that are None are ignored.
Save a model
Once your model is fine-tuned, you can save it with its tokenizer using
PreTrainedModel.save_pretrained():
1 | pt_save_directory = "./pt_save_pretrained" |
When you are ready to use the model again, reload it with
PreTrainedModel.from_pretrained():
1 | pt_model = AutoModelForSequenceClassification.from_pretrained("./pt_save_pretrained") |
One particularly cool 🤗 Transformers feature is the ability to save a model and reload it as either a PyTorch or TensorFlow model. The
from_ptorfrom_tfparameter can convert the model from one framework to the other:
1 | from transformers import AutoModel |
Custom model builds
You can modify the model’s configuration class to change how a model is built. The configuration specifies a model’s attributes, such as the number of hidden layers or attention heads. You start from scratch when you initialize a model from a custom configuration class. The model attributes are randomly initialized, and you’ll need to train the model before you can use it to get meaningful results.
Start by importing AutoConfig, and then load the pretrained model you want to modify. Within AutoConfig.from_pretrained(), you can specify the attribute you want to change, such as the number of attention heads:
1 | from transformers import AutoConfig |
Create a model from your custom configuration with
AutoModel.from_config():
1 | from transformers import AutoModel |
Take a look at the Create a custom architecture guide for more information about building custom configurations.
Trainer - a PyTorch optimized training loop
All models are a standard
torch.nn.Moduleso you can use them in any typical training loop. While you can write your own training loop, 🤗 Transformers provides a Trainer class for PyTorch, which contains the basic training loop and adds additional functionality for features likedistributed training,mixed precision, and more.Depending on your task, you’ll typically pass the following parameters to Trainer:
- A
PreTrainedModelor atorch.nn.Module:
1 | from transformers import AutoModelForSequenceClassification |
- TrainingArguments contains the model hyperparameters you can change like learning rate, batch size, and the number of epochs to train for. The default values are used if you don’t specify any training arguments:
1 | from transformers import TrainingArguments |
- A preprocessing class like a
tokenizer,image processor,feature extractor, or processor:
1 | from transformers import AutoTokenizer |
- Load a dataset:
1 | from datasets import load_dataset |
- Create a function to tokenize the dataset:
1 | def tokenize_dataset(dataset): |
Then apply it over the entire dataset with map:
1 | dataset = dataset.map(tokenize_dataset, batched=True) |
- A DataCollatorWithPadding to create a batch of examples from your dataset:
1 | from transformers import DataCollatorWithPadding |
Now gather all these classes in Trainer:
1 | from transformers import Trainer |
When you’re ready, call
train()to start training:
1 | trainer.train() |
For tasks - like translation or summarization - that use a sequence-to-sequence model, use the
Seq2SeqTrainerandSeq2SeqTrainingArgumentsclasses instead.
You can customize the training loop behavior by subclassing the methods inside Trainer. This allows you to customize features such as the loss function, optimizer, and scheduler. Take a look at the Trainer reference for which methods can be subclassed.
The other way to customize the training loop is by using Callbacks. You can use callbacks to integrate with other libraries and inspect the training loop to report on progress or stop the training early. Callbacks do not modify anything in the training loop itself. To customize something like the loss function, you need to subclass the Trainer instead.
What’s next?
Now that you’ve completed the 🤗 Transformers quick tour, check out our guides and learn how to do more specific things like writing a custom model, fine-tuning a model for a task, and how to train a model with a script. If you’re interested in learning more about 🤗 Transformers core concepts, grab a cup of coffee and take a look at our Conceptual Guides!
GET STARTED - Installation
源教程地址: https://huggingface.co/docs/transformers/installation .
Install 🤗 Transformers for whichever deep learning library you’re working with, setup your cache, and optionally configure 🤗 Transformers to run offline.
🤗 Transformers is tested on Python 3.6+, PyTorch 1.1.0+, TensorFlow 2.0+, and Flax. Follow the installation instructions below for the deep learning library you are using:
PyTorch installation instructions.
TensorFlow 2.0 installation instructions.
Flax installation instructions.
Install with pip
You should install 🤗 Transformers in a virtual environment. If you’re unfamiliar with Python virtual environments, take a look at this guide. A virtual environment makes it easier to manage different projects, and avoid compatibility issues between dependencies.
Start by creating a virtual environment in your project directory:
1 | python -m venv .env |
Activate the virtual environment. On Linux and MacOs:
1 | source .env/bin/activate |
Activate Virtual environment on Windows:
1 | .env/Scripts/activate |
Now you’re ready to install 🤗 Transformers with the following command:
1 | pip install transformers |
For CPU-support only, you can conveniently install 🤗 Transformers and a deep learning library in one line. For example, install 🤗 Transformers and PyTorch with:
1 | pip install 'transformers[torch]' |
🤗 Transformers and TensorFlow 2.0:
1 | pip install 'transformers[tf-cpu]' |
M1 / ARM Users
You will need to install the following before installing TensorFLow 2.0
1 | brew install cmake |
🤗 Transformers and Flax:
1 | pip install 'transformers[flax]' |
Finally, check if 🤗 Transformers has been properly installed by running the following command. It will download a pretrained model:
1 | python -c "from transformers import pipeline; print(pipeline('sentiment-analysis')('we love you'))" |
Then print out the label and score:
1 | [{'label': 'POSITIVE', 'score': 0.9998704791069031}] |
Install from source
Install 🤗 Transformers from source with the following command:
1 | pip install git+https://github.com/huggingface/transformers |
This command installs the bleeding edge main version rather than the latest stable version. The main version is useful for staying up-to-date with the latest developments. For instance, if a bug has been fixed since the last official release but a new release hasn’t been rolled out yet. However, this means the main version may not always be stable. We strive to keep the main version operational, and most issues are usually resolved within a few hours or a day. If you run into a problem, please open an Issue so we can fix it even sooner!
Check if 🤗 Transformers has been properly installed by running the following command:
1 | python -c "from transformers import pipeline; print(pipeline('sentiment-analysis')('I love you'))" |
Editable install
You will need an editable install if you’d like to:
Use the main version of the source code.
Contribute to 🤗 Transformers and need to test changes in the code.
Clone the repository and install 🤗 Transformers with the following commands:
1 | git clone https://github.com/huggingface/transformers.git |
These commands will link the folder you cloned the repository to and your Python library paths. Python will now look inside the folder you cloned to in addition to the normal library paths. For example, if your Python packages are typically installed in
~/anaconda3/envs/main/lib/python3.7/site-packages/, Python will also search the folder you cloned to:~/transformers/.
You must keep the transformers folder if you want to keep using the library.
Now you can easily update your clone to the latest version of 🤗 Transformers with the following command:
1 | cd ~/transformers/ |
Your Python environment will find the main version of 🤗 Transformers on the next run.
Install with conda
Install from the conda channel huggingface:
1 | conda install -c huggingface transformers |
Cache setup
Pretrained models are downloaded and locally cached at: ~/.cache/huggingface/hub. This is the default directory given by the shell environment variable TRANSFORMERS_CACHE. On Windows, the default directory is given by C:\Users\username.cache\huggingface\hub. You can change the shell environment variables shown below - in order of priority - to specify a different cache directory:
Shell environment variable (default): HUGGINGFACE_HUB_CACHE or TRANSFORMERS_CACHE.
Shell environment variable: HF_HOME.
Shell environment variable: XDG_CACHE_HOME + /huggingface.
🤗 Transformers will use the shell environment variables PYTORCH_TRANSFORMERS_CACHE or PYTORCH_PRETRAINED_BERT_CACHE if you are coming from an earlier iteration of this library and have set those environment variables, unless you specify the shell environment variable TRANSFORMERS_CACHE.
Offline mode
🤗 Transformers is able to run in a firewalled or offline environment by only using local files. Set the environment variable TRANSFORMERS_OFFLINE=1 to enable this behavior.
Add 🤗 Datasets to your offline training workflow by setting the environment variable HF_DATASETS_OFFLINE=1.
For example, you would typically run a program on a normal network firewalled to external instances with the following command:
1 | python examples/pytorch/translation/run_translation.py --model_name_or_path t5-small --dataset_name wmt16 --dataset_config ro-en ... |
Run this same program in an offline instance with:
1 | HF_DATASETS_OFFLINE=1 TRANSFORMERS_OFFLINE=1 \ |
The script should now run without hanging or waiting to timeout because it knows it should only look for local files.
Fetch models and tokenizers to use offline
Another option for using 🤗 Transformers offline is to download the files ahead of time, and then point to their local path when you need to use them offline. There are three ways to do this:
- Download a file through the user interface on the Model Hub by clicking on the ↓ icon.
Use the
PreTrainedModel.from_pretrained()andPreTrainedModel.save_pretrained()workflow:
- Download your files ahead of time with PreTrainedModel.from_pretrained():
2
3
4
tokenizer = AutoTokenizer.from_pretrained("bigscience/T0_3B")
model = AutoModelForSeq2SeqLM.from_pretrained("bigscience/T0_3B")
- Save your files to a specified directory with PreTrainedModel.save_pretrained():
2
model.save_pretrained("./your/path/bigscience_t0")
- Now when you’re offline, reload your files with PreTrainedModel.from_pretrained() from the specified directory:
2
model = AutoModel.from_pretrained("./your/path/bigscience_t0")Programmatically download files with the huggingface_hub library:
- Install the huggingface_hub library in your virtual environment:
- Use the hf_hub_download function to download a file to a specific path. For example, the following command downloads the config.json file from the T0 model to your desired path:
2
3
hf_hub_download(repo_id="bigscience/T0_3B", filename="config.json", cache_dir="./your/path/bigscience_t0")
Once your file is downloaded and locally cached, specify it’s local path to load and use it:
1 | from transformers import AutoConfig |
See the How to download files from the Hub section for more details on downloading files stored on the Hub.
TUTORIALS - Pipelines for inference
源教程地址: https://huggingface.co/docs/transformers/pipeline_tutorial .
The pipeline() makes it simple to use any model from the Hub for inference on any language, computer vision, speech, and multimodal tasks. Even if you don’t have experience with a specific modality or aren’t familiar with the underlying code behind the models, you can still use them for inference with the pipeline()! This tutorial will teach you to:
Use a pipeline() for inference.
Use a specific tokenizer or model.
Use a pipeline() for audio, vision, and multimodal tasks.
Take a look at the pipeline() documentation for a complete list of supported tasks and available parameters.
Pipeline usage
While each task has an associated pipeline(), it is simpler to use the general pipeline() abstraction which contains all the task-specific pipelines. The pipeline() automatically loads a default model and a preprocessing class capable of inference for your task.
- Start by creating a pipeline() and specify an inference task:
1 | from transformers import pipeline |
- Pass your input text to the pipeline():
1 | generator("https://huggingface.co/datasets/Narsil/asr_dummy/resolve/main/mlk.flac") |
Not the result you had in mind? Check out some of the most downloaded automatic speech recognition models on the Hub to see if you can get a better transcription. Let’s try openai/whisper-large:
1 | generator = pipeline(model="openai/whisper-large") |
Now this result looks more accurate! We really encourage you to check out the Hub for models in different languages, models specialized in your field, and more. You can check out and compare model results directly from your browser on the Hub to see if it fits or handles corner cases better than other ones. And if you don’t find a model for your use case, you can always start training your own!
If you have several inputs, you can pass your input as a list:
1 | generator( |
If you want to iterate over a whole dataset, or want to use it for inference in a webserver, check out dedicated parts
Using pipelines on a dataset
Using pipelines for a webserver
Parameters
pipeline() supports many parameters; some are task specific, and some are general to all pipelines. In general you can specify parameters anywhere you want:
1 | generator(model="openai/whisper-large", my_parameter=1) |
Let’s check out 3 important ones:
Device
If you use device=n, the pipeline automatically puts the model on the specified device. This will work regardless of whether you are using PyTorch or Tensorflow.
1 | generator(model="openai/whisper-large", device=0) |
If the model is too large for a single GPU, you can set device_map=“auto” to allow 🤗
Accelerateto automatically determine how to load and store the model weights.
1 | #!pip install accelerate |
Note that if device_map=“auto” is passed, there is no need to add the argument device=device when instantiating your pipeline as you may encounter some unexpected behavior!
Batch size
By default, pipelines will not batch inference for reasons explained in detail here. The reason is that batching is not necessarily faster, and can actually be quite slower in some cases.
But if it works in your use case, you can use:
1 | generator(model="openai/whisper-large", device=0, batch_size=2) |
This runs the pipeline on the 10 provided audio files, but it will pass them in batches of 2 to the model (which is on a GPU, where batching is more likely to help) without requiring any further code from you. The output should always match what you would have received without batching. It is only meant as a way to help you get more speed out of a pipeline.
Pipelines can also alleviate some of the complexities of batching because, for some pipelines, a single item (like a long audio file) needs to be chunked into multiple parts to be processed by a model. The pipeline performs this chunk batching for you.
Task specific parameters
All tasks provide task specific parameters which allow for additional flexibility and options to help you get your job done. For instance, the transformers.AutomaticSpeechRecognitionPipeline.call() method has a
return_timestampsparameter which sounds promising for subtitling videos:
1 | # Not using whisper, as it cannot provide timestamps. |
As you can see, the model inferred the text and also outputted when the various words were pronounced in the sentence.
There are many parameters available for each task, so check out each task’s API reference to see what you can tinker with! For instance, the AutomaticSpeechRecognitionPipeline has a chunk_length_s parameter which is helpful for working on really long audio files (for example, subtitling entire movies or hour-long videos) that a model typically cannot handle on its own.
If you can’t find a parameter that would really help you out, feel free to request it!
Using pipelines on a dataset
The pipeline can also run inference on a large dataset. The easiest way we recommend doing this is by using an
iterator:
1 | def data(): |
The iterator data() yields each result, and the pipeline automatically recognizes the input is iterable and will start fetching the data while it continues to process it on the GPU (this uses DataLoader under the hood). This is important because you don’t have to allocate memory for the whole dataset and you can feed the GPU as fast as possible.
Since batching could speed things up, it may be useful to try tuning the batch_size parameter here.
The simplest way to iterate over a dataset is to just load one from 🤗 Datasets:
1 | # KeyDataset is a util that will just output the item we're interested in. |
Using pipelines for a webserver
Creating an inference engine is a complex topic which deserves it’s own page.
https://huggingface.co/docs/transformers/pipeline_webserver .
Vision pipeline
Using a pipeline() for vision tasks is practically identical.
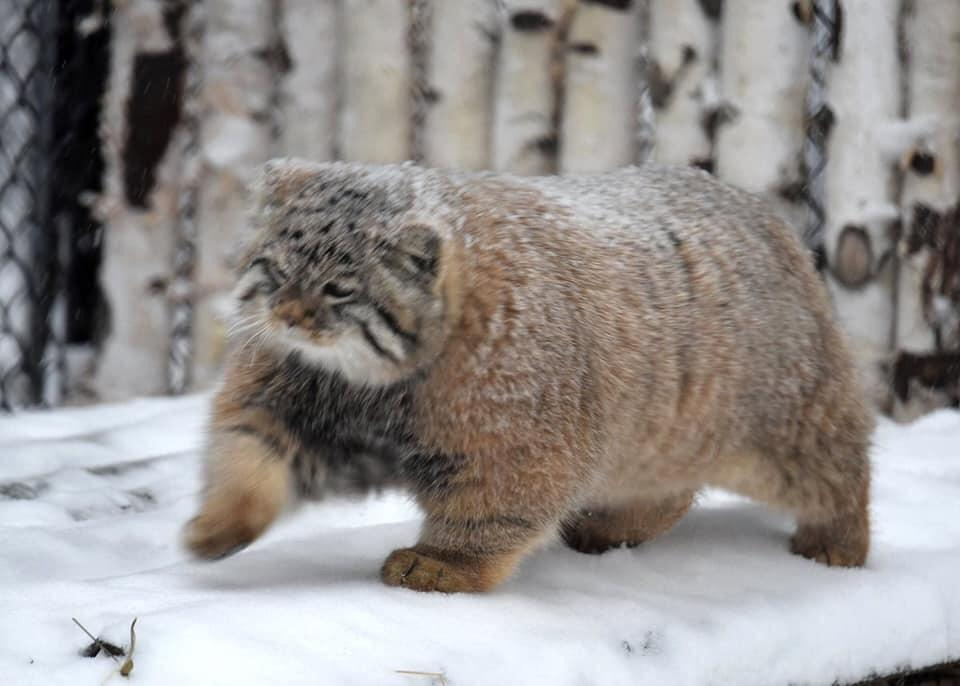
Specify your task and pass your image to the classifier. The image can be a link or a local path to the image. For example, what species of cat is shown below?
1 | from transformers import pipeline |
Text pipeline
Using a pipeline() for NLP tasks is practically identical.
1 | from transformers import pipeline |
Multimodal pipeline
The pipeline() supports more than one modality. For example, a visual question answering (VQA) task combines text and image. Feel free to use any image link you like and a question you want to ask about the image. The image can be a URL or a local path to the image.
For example, if you use this invoice image:
1 | from transformers import pipeline |
To run the example above you need to have pytesseract installed in addition to 🤗 Transformers:
2
pip install pytesseract
Using pipeline on large models with 🤗 accelerate
You can easily run pipeline on large models using 🤗 accelerate! First make sure you have installed accelerate with
pip install accelerate.First load your model using device_map=“auto”! We will use facebook/opt-1.3b for our example.
1 | # pip install accelerate |
You can also pass 8-bit loaded models if you install bitsandbytes and add the argument load_in_8bit=True
1 | # pip install accelerate bitsandbytes |
Note that you can replace the checkpoint with any of the Hugging Face model that supports large model loading such as BLOOM!
TUTORIALS - Load pretrained instances with an AutoClass
源教程地址: https://huggingface.co/docs/transformers/autoclass_tutorial .
With so many different Transformer architectures, it can be challenging to create one for your checkpoint. As a part of 🤗 Transformers core philosophy to make the library easy, simple and flexible to use, an AutoClass automatically infer and load the correct architecture from a given checkpoint. The from_pretrained() method lets you quickly load a pretrained model for any architecture so you don’t have to devote time and resources to train a model from scratch. Producing this type of checkpoint-agnostic code means if your code works for one checkpoint, it will work with another checkpoint - as long as it was trained for a similar task - even if the architecture is different.
Remember, architecture refers to the skeleton of the model and checkpoints are the weights for a given architecture. For example, BERT is an architecture, while bert-base-uncased is a checkpoint. Model is a general term that can mean either architecture or checkpoint.
In this tutorial, learn to:
Load a pretrained tokenizer.
Load a pretrained image processor
Load a pretrained feature extractor.
Load a pretrained processor.
Load a pretrained model.
AutoTokenizer
Nearly every NLP task begins with a tokenizer. A tokenizer converts your input into a format that can be processed by the model.
Load a tokenizer with AutoTokenizer.from_pretrained():
1 | from transformers import AutoTokenizer |
Then tokenize your input as shown below:
1 | sequence = "In a hole in the ground there lived a hobbit." |
AutoImageProcessor
For vision tasks, an image processor processes the image into the correct input format.
1 | from transformers import AutoImageProcessor |
AutoFeatureExtractor
For audio tasks, a feature extractor processes the audio signal the correct input format.
Load a feature extractor with AutoFeatureExtractor.from_pretrained():
1 | from transformers import AutoFeatureExtractor |
AutoProcessor
Multimodal tasks require a processor that combines two types of preprocessing tools. For example, the LayoutLMV2 model requires an image processor to handle images and a tokenizer to handle text; a processor combines both of them.
Load a processor with AutoProcessor.from_pretrained():
1 | from transformers import AutoProcessor |
AutoModel
Finally, the AutoModelFor classes let you load a pretrained model for a given task (see here for a complete list of available tasks). For example, load a model for sequence classification with AutoModelForSequenceClassification.from_pretrained():
1 | from transformers import AutoModelForSequenceClassification |
Easily reuse the same checkpoint to load an architecture for a different task:
1 | from transformers import AutoModelForTokenClassification |
For PyTorch models, the from_pretrained() method uses torch.load() which internally uses pickle and is known to be insecure. In general, never load a model that could have come from an untrusted source, or that could have been tampered with. This security risk is partially mitigated for public models hosted on the Hugging Face Hub, which are scanned for malware at each commit. See the Hub documentation for best practices like signed commit verification with GPG.
TensorFlow and Flax checkpoints are not affected, and can be loaded within PyTorch architectures using the from_tf and from_flax kwargs for the from_pretrained method to circumvent this issue.
Generally, we recommend using the AutoTokenizer class and the AutoModelFor class to load pretrained instances of models. This will ensure you load the correct architecture every time. In the next tutorial, learn how to use your newly loaded tokenizer, image processor, feature extractor and processor to preprocess a dataset for fine-tuning.
TUTORIALS - Preprocess
源教程地址: https://huggingface.co/docs/transformers/preprocessing .
Before you can train a model on a dataset, it needs to be preprocessed into the expected model input format. Whether your data is text, images, or audio, they need to be converted and assembled into batches of tensors. 🤗 Transformers provides a set of preprocessing classes to help prepare your data for the model. In this tutorial, you’ll learn that for:
Text, use a Tokenizer to convert text into a sequence of tokens, create a numerical representation of the tokens, and assemble them into tensors.
Speech and audio, use a Feature extractor to extract sequential features from audio waveforms and convert them into tensors.
Image inputs use a ImageProcessor to convert images into tensors.
Multimodal inputs, use a Processor to combine a tokenizer and a feature extractor or image processor.
AutoProcessor always works and automatically chooses the correct class for the model you’re using, whether you’re using a tokenizer, image processor, feature extractor or processor.
Before you begin, install 🤗 Datasets so you can load some datasets to experiment with:
1 | pip install datasets |
Natural Language Processing
The main tool for preprocessing textual data is a tokenizer. A tokenizer splits text into tokens according to a set of rules. The tokens are converted into numbers and then tensors, which become the model inputs. Any additional inputs required by the model are added by the tokenizer.
If you plan on using a pretrained model, it’s important to use the associated pretrained tokenizer. This ensures the text is split the same way as the pretraining corpus, and uses the same corresponding tokens-to-index (usually referrred to as the vocab) during pretraining.
Get started by loading a pretrained tokenizer with the
AutoTokenizer.from_pretrained()method. This downloads the vocab a model was pretrained with:
1 | from transformers import AutoTokenizer |
Then pass your text to the tokenizer:
1 | encoded_input = tokenizer("Do not meddle in the affairs of wizards, for they are subtle and quick to anger.") |
The tokenizer returns a dictionary with three important items:
input_ids are the indices corresponding to each token in the sentence.
attention_mask indicates whether a token should be attended to or not.
token_type_ids identifies which sequence a token belongs to when there is more than one sequence.
Return your input by decoding the input_ids:
1 | tokenizer.decode(encoded_input["input_ids"]) |
As you can see, the tokenizer added two special tokens - CLS and SEP (classifier and separator) - to the sentence. Not all models need special tokens, but if they do, the tokenizer automatically adds them for you.
If there are several sentences you want to preprocess, pass them as a list to the tokenizer:
1 | batch_sentences = [ |
Pad
Sentences aren’t always the same length which can be an issue because tensors, the model inputs, need to have a uniform shape. Padding is a strategy for ensuring tensors are rectangular by adding a special padding token to shorter sentences.
Set the padding parameter to True to pad the shorter sequences in the batch to match the longest sequence:
1 | batch_sentences = [ |
The first and third sentences are now padded with 0’s because they are shorter.
Truncation
On the other end of the spectrum, sometimes a sequence may be too long for a model to handle. In this case, you’ll need to truncate the sequence to a shorter length.
Set the truncation parameter to True to truncate a sequence to the maximum length accepted by the model:
1 | batch_sentences = [ |
Check out the Padding and truncation concept guide to learn more different padding and truncation arguments.
Build tensors
Finally, you want the tokenizer to return the actual tensors that get fed to the model.
Set the return_tensors parameter to either pt for PyTorch, or tf for TensorFlow:
1 | batch_sentences = [ |
Audio
For audio tasks, you’ll need a feature extractor to prepare your dataset for the model. The feature extractor is designed to extract features from raw audio data, and convert them into tensors.
Load the MInDS-14 dataset (see the 🤗 Datasets tutorial for more details on how to load a dataset) to see how you can use a feature extractor with audio datasets:
1 | from datasets import load_dataset, Audio |
Access the first element of the audio column to take a look at the input. Calling the audio column automatically loads and resamples the audio file:
1 | dataset[0]["audio"] |
This returns three items:
array is the speech signal loaded - and potentially resampled - as a 1D array.
path points to the location of the audio file.
sampling_rate refers to how many data points in the speech signal are measured per second.
For this tutorial, you’ll use the Wav2Vec2 model. Take a look at the model card, and you’ll learn Wav2Vec2 is pretrained on 16kHz sampled speech audio. It is important your audio data’s sampling rate matches the sampling rate of the dataset used to pretrain the model. If your data’s sampling rate isn’t the same, then you need to resample your data.
- Use 🤗 Datasets’ cast_column method to upsample the sampling rate to 16kHz:
1 | dataset = dataset.cast_column("audio", Audio(sampling_rate=16_000)) |
- Call the audio column again to resample the audio file:
1 | dataset[0]["audio"] |
Next, load a feature extractor to normalize and pad the input. When padding textual data, a 0 is added for shorter sequences. The same idea applies to audio data. The feature extractor adds a 0 - interpreted as silence - to array.
Load the feature extractor with
AutoFeatureExtractor.from_pretrained():
1 | from transformers import AutoFeatureExtractor |
Pass the audio array to the feature extractor. We also recommend adding the sampling_rate argument in the feature extractor in order to better debug any silent errors that may occur.
1 | audio_input = [dataset[0]["audio"]["array"]] |
Just like the tokenizer, you can apply padding or truncation to handle variable sequences in a batch. Take a look at the sequence length of these two audio samples:
1 | dataset[0]["audio"]["array"].shape |
Create a function to preprocess the dataset so the audio samples are the same lengths. Specify a maximum sample length, and the feature extractor will either pad or truncate the sequences to match it:
1 | def preprocess_function(examples): |
Apply the preprocess_function to the the first few examples in the dataset:
1 | processed_dataset = preprocess_function(dataset[:5]) |
The sample lengths are now the same and match the specified maximum length. You can pass your processed dataset to the model now!
1 | processed_dataset["input_values"][0].shape |
Computer vision
For computer vision tasks, you’ll need an image processor to prepare your dataset for the model. Image preprocessing consists of several steps that convert images into the input expected by the model. These steps include but are not limited to resizing, normalizing, color channel correction, and converting images to tensors.
Image preprocessing often follows some form of image augmentation. Both image preprocessing and image augmentation transform image data, but they serve different purposes:
Image augmentation alters images in a way that can help prevent overfitting and increase the robustness of the model. You can get creative in how you augment your data - adjust brightness and colors, crop, rotate, resize, zoom, etc. However, be mindful not to change the meaning of the images with your augmentations.
Image preprocessing guarantees that the images match the model’s expected input format. When fine-tuning a computer vision model, images must be preprocessed exactly as when the model was initially trained.
You can use any library you like for image augmentation. For image preprocessing, use the ImageProcessor associated with the model.
Load the food101 dataset (see the 🤗 Datasets tutorial for more details on how to load a dataset) to see how you can use an image processor with computer vision datasets:
Use 🤗 Datasets split parameter to only load a small sample from the training split since the dataset is quite large!
1 | from datasets import load_dataset |
Next, take a look at the image with 🤗 Datasets Image feature:
1 | dataset[0]["image"] |

Load the image processor with
AutoImageProcessor.from_pretrained():
1 | from transformers import AutoImageProcessor |
First, let’s add some image augmentation. You can use any library you prefer, but in this tutorial, we’ll use torchvision’s transforms module. If you’re interested in using another data augmentation library, learn how in the Albumentations or Kornia notebooks.
- Here we use Compose to chain together a couple of transforms - RandomResizedCrop and ColorJitter. Note that for resizing, we can get the image size requirements from the image_processor. For some models, an exact height and width are expected, for others only the shortest_edge is defined.
1 | from torchvision.transforms import RandomResizedCrop, ColorJitter, Compose |
- The model accepts pixel_values as its input. ImageProcessor can take care of normalizing the images, and generating appropriate tensors. Create a function that combines image augmentation and image preprocessing for a batch of images and generates pixel_values:
1 | def transforms(examples): |
In the example above we set do_resize=False because we have already resized the images in the image augmentation transformation, and leveraged the size attribute from the appropriate image_processor. If you do not resize images during image augmentation, leave this parameter out. By default, ImageProcessor will handle the resizing.
If you wish to normalize images as a part of the augmentation transformation, use the image_processor.image_mean, and image_processor.image_std values.
- Then use 🤗 Datasets set_transform to apply the transforms on the fly:
1 | dataset.set_transform(transforms) |
- Now when you access the image, you’ll notice the image processor has added pixel_values. You can pass your processed dataset to the model now!
1 | dataset[0].keys() |
Here is what the image looks like after the transforms are applied. The image has been randomly cropped and it’s color properties are different.
1 | import numpy as np |

For tasks like object detection, semantic segmentation, instance segmentation, and panoptic segmentation, ImageProcessor offers post processing methods. These methods convert model’s raw outputs into meaningful predictions such as bounding boxes, or segmentation maps.
Pad
In some cases, for instance, when fine-tuning DETR, the model applies scale augmentation at training time. This may cause images to be different sizes in a batch. You can use DetrImageProcessor.pad_and_create_pixel_mask() from DetrImageProcessor and define a custom collate_fn to batch images together.
1 | def collate_fn(batch): |
Multimodal
For tasks involving multimodal inputs, you’ll need a processor to prepare your dataset for the model. A processor couples together two processing objects such as as tokenizer and feature extractor.
Load the LJ Speech dataset (see the 🤗 Datasets tutorial for more details on how to load a dataset) to see how you can use a processor for automatic speech recognition (ASR):
1 | from datasets import load_dataset |
For ASR, you’re mainly focused on audio and text so you can remove the other columns:
1 | lj_speech = lj_speech.map(remove_columns=["file", "id", "normalized_text"]) |
Now take a look at the audio and text columns:
1 | lj_speech[0]["audio"] |
Remember you should always resample your audio dataset’s sampling rate to match the sampling rate of the dataset used to pretrain a model!
1 | lj_speech = lj_speech.cast_column("audio", Audio(sampling_rate=16_000)) |
Load a processor with
AutoProcessor.from_pretrained():
1 | from transformers import AutoProcessor |
- Create a function to process the audio data contained in array to input_values, and tokenize text to labels. These are the inputs to the model:
1 | def prepare_dataset(example): |
- Apply the prepare_dataset function to a sample:
1 | prepare_dataset(lj_speech[0]) |
The processor has now added input_values and labels, and the sampling rate has also been correctly downsampled to 16kHz. You can pass your processed dataset to the model now!
TUTORIALS - Fine-tune a pretrained model
源教程地址: https://huggingface.co/docs/transformers/training .
There are significant benefits to using a pretrained model. It reduces computation costs, your carbon footprint, and allows you to use state-of-the-art models without having to train one from scratch. 🤗 Transformers provides access to thousands of pretrained models for a wide range of tasks. When you use a pretrained model, you train it on a dataset specific to your task. This is known as fine-tuning, an incredibly powerful training technique. In this tutorial, you will fine-tune a pretrained model with a deep learning framework of your choice:
Fine-tune a pretrained model with 🤗 Transformers Trainer.
Fine-tune a pretrained model in TensorFlow with Keras.
Fine-tune a pretrained model in native PyTorch.
Prepare a dataset
Before you can fine-tune a pretrained model, download a dataset and prepare it for training. The previous tutorial showed you how to process data for training, and now you get an opportunity to put those skills to the test!
Begin by loading the Yelp Reviews dataset:
1 | from datasets import load_dataset |
As you now know, you need a tokenizer to process the text and include a padding and truncation strategy to handle any variable sequence lengths. To process your dataset in one step, use 🤗 Datasets map method to apply a preprocessing function over the entire dataset:
1 | from transformers import AutoTokenizer |
If you like, you can create a smaller subset of the full dataset to fine-tune on to reduce the time it takes:
1 | small_train_dataset = tokenized_datasets["train"].shuffle(seed=42).select(range(1000)) |
Train
At this point, you should follow the section corresponding to the framework you want to use. You can use the links in the right sidebar to jump to the one you want - and if you want to hide all of the content for a given framework, just use the button at the top-right of that framework’s block!
Train with PyTorch Trainer
🤗 Transformers provides a Trainer class optimized for training 🤗 Transformers models, making it easier to start training without manually writing your own training loop. The Trainer API supports a wide range of training options and features such as logging, gradient accumulation, and mixed precision.
Start by loading your model and specify the number of expected labels. From the Yelp Review dataset card, you know there are five labels:
1 | from transformers import AutoModelForSequenceClassification |
You will see a warning about some of the pretrained weights not being used and some weights being randomly initialized. Don’t worry, this is completely normal! The pretrained head of the BERT model is discarded, and replaced with a randomly initialized classification head. You will fine-tune this new model head on your sequence classification task, transferring the knowledge of the pretrained model to it.
Training hyperparameters
Next, create a TrainingArguments class which contains all the hyperparameters you can tune as well as flags for activating different training options. For this tutorial you can start with the default training hyperparameters, but feel free to experiment with these to find your optimal settings.
Specify where to save the checkpoints from your training:
1 | from transformers import TrainingArguments |
Evaluate
Trainer does not automatically evaluate model performance during training. You’ll need to pass Trainer a function to compute and report metrics. The 🤗 Evaluate library provides a simple accuracy function you can load with the evaluate.load (see this quicktour for more information) function:
1 | import numpy as np |
Call compute on metric to calculate the accuracy of your predictions. Before passing your predictions to compute, you need to convert the predictions to logits (remember all 🤗 Transformers models return logits):
1 | def compute_metrics(eval_pred): |
If you’d like to monitor your evaluation metrics during fine-tuning, specify the evaluation_strategy parameter in your training arguments to report the evaluation metric at the end of each epoch:
1 | from transformers import TrainingArguments, Trainer |
Trainer
Create a Trainer object with your model, training arguments, training and test datasets, and evaluation function:
1 | trainer = Trainer( |
Then fine-tune your model by calling train():
1 | trainer.train() |
Train in native PyTorch
Trainer takes care of the training loop and allows you to fine-tune a model in a single line of code. For users who prefer to write their own training loop, you can also fine-tune a 🤗 Transformers model in native PyTorch.
At this point, you may need to restart your notebook or execute the following code to free some memory:
1 | del model |
Next, manually postprocess tokenized_dataset to prepare it for training.
- Remove the text column because the model does not accept raw text as an input:
1 | tokenized_datasets = tokenized_datasets.remove_columns(["text"]) |
- Rename the label column to labels because the model expects the argument to be named labels:
1 | tokenized_datasets = tokenized_datasets.rename_column("label", "labels") |
- Set the format of the dataset to return PyTorch tensors instead of lists:
1 | tokenized_datasets.set_format("torch") |
Then create a smaller subset of the dataset as previously shown to speed up the fine-tuning:
1 | small_train_dataset = tokenized_datasets["train"].shuffle(seed=42).select(range(1000)) |
DataLoader
Create a DataLoader for your training and test datasets so you can iterate over batches of data:
1 | from torch.utils.data import DataLoader |
Load your model with the number of expected labels:
1 | from transformers import AutoModelForSequenceClassification |
Optimizer and learning rate scheduler
Create an optimizer and learning rate scheduler to fine-tune the model. Let’s use the AdamW optimizer from PyTorch:
1 | from torch.optim import AdamW |
Create the default learning rate scheduler from Trainer:
1 | from transformers import get_scheduler |
Lastly, specify device to use a GPU if you have access to one. Otherwise, training on a CPU may take several hours instead of a couple of minutes.
1 | import torch |
Get free access to a cloud GPU if you don’t have one with a hosted notebook like Colaboratory or SageMaker StudioLab.
Great, now you are ready to train! 🥳
Training loop
To keep track of your training progress, use the tqdm library to add a progress bar over the number of training steps:
1 | from tqdm.auto import tqdm |
Evaluate
Just like how you added an evaluation function to Trainer, you need to do the same when you write your own training loop. But instead of calculating and reporting the metric at the end of each epoch, this time you’ll accumulate all the batches with add_batch and calculate the metric at the very end.
1 | import evaluate |
Additional resources
For more fine-tuning examples, refer to:
-
🤗 Transformers Examples includes scripts to train common NLP tasks in PyTorch and TensorFlow.
-
🤗 Transformers Notebooks contains various notebooks on how to fine-tune a model for specific tasks in PyTorch and TensorFlow.
TUTORIALS - Distributed training with 🤗 Accelerate
源教程地址: https://huggingface.co/docs/transformers/accelerate .
As models get bigger, parallelism has emerged as a strategy for training larger models on limited hardware and accelerating training speed by several orders of magnitude. At Hugging Face, we created the 🤗 Accelerate library to help users easily train a 🤗 Transformers model on any type of distributed setup, whether it is multiple GPU’s on one machine or multiple GPU’s across several machines. In this tutorial, learn how to customize your native PyTorch training loop to enable training in a distributed environment.
Setup
Get started by installing 🤗 Accelerate:
1 | pip install accelerate |
Then import and create an Accelerator object. The Accelerator will automatically detect your type of distributed setup and initialize all the necessary components for training. You don’t need to explicitly place your model on a device.
1 | from accelerate import Accelerator |
Prepare to accelerate
The next step is to pass all the relevant training objects to the prepare method. This includes your training and evaluation DataLoaders, a model and an optimizer:
1 | train_dataloader, eval_dataloader, model, optimizer = accelerator.prepare( |
Backward
The last addition is to replace the typical loss.backward() in your training loop with 🤗 Accelerate’s backwardmethod:
1 | for epoch in range(num_epochs): |
As you can see in the following code, you only need to add four additional lines of code to your training loop to enable distributed training!
1 | + from accelerate import Accelerator |
Train
Once you’ve added the relevant lines of code, launch your training in a script or a notebook like Colaboratory.
Train with a script
If you are running your training from a script, run the following command to create and save a configuration file:
1 | accelerate config |
Then launch your training with:
1 | accelerate launch train.py |
Train with a notebook
🤗 Accelerate can also run in a notebook if you’re planning on using Colaboratory’s TPUs. Wrap all the code responsible for training in a function, and pass it to notebook_launcher:
1 | from accelerate import notebook_launcher |
For more information about 🤗 Accelerate and it’s rich features, refer to the documentation.
TUTORIALS - Share a model
源教程地址: https://huggingface.co/docs/transformers/model_sharing .
结语
第五十九篇博文写完,开心!!!!
今天,也是充满希望的一天。
 wechat
 alipay