前言
基于 Beamer,利用 LaTex 做 PPT。
Beamer 是一个功能强大且灵活的 LaTeX 类,用于创建精美的演示文稿。本文概述了制作 Beamer 幻灯片的基本步骤:创建标题页、添加徽标、突出显示重点、制作目录以及为幻灯片添加效果。
源教程地址:https://www.overleaf.com/learn/latex/Beamer
Overleaf: https://www.overleaf.com/
Write like a rocket scientist with Overleaf — the collaborative, online LaTeX editor that anyone can use.
操作系统:Ubuntu 22.04.2 LTS
介绍
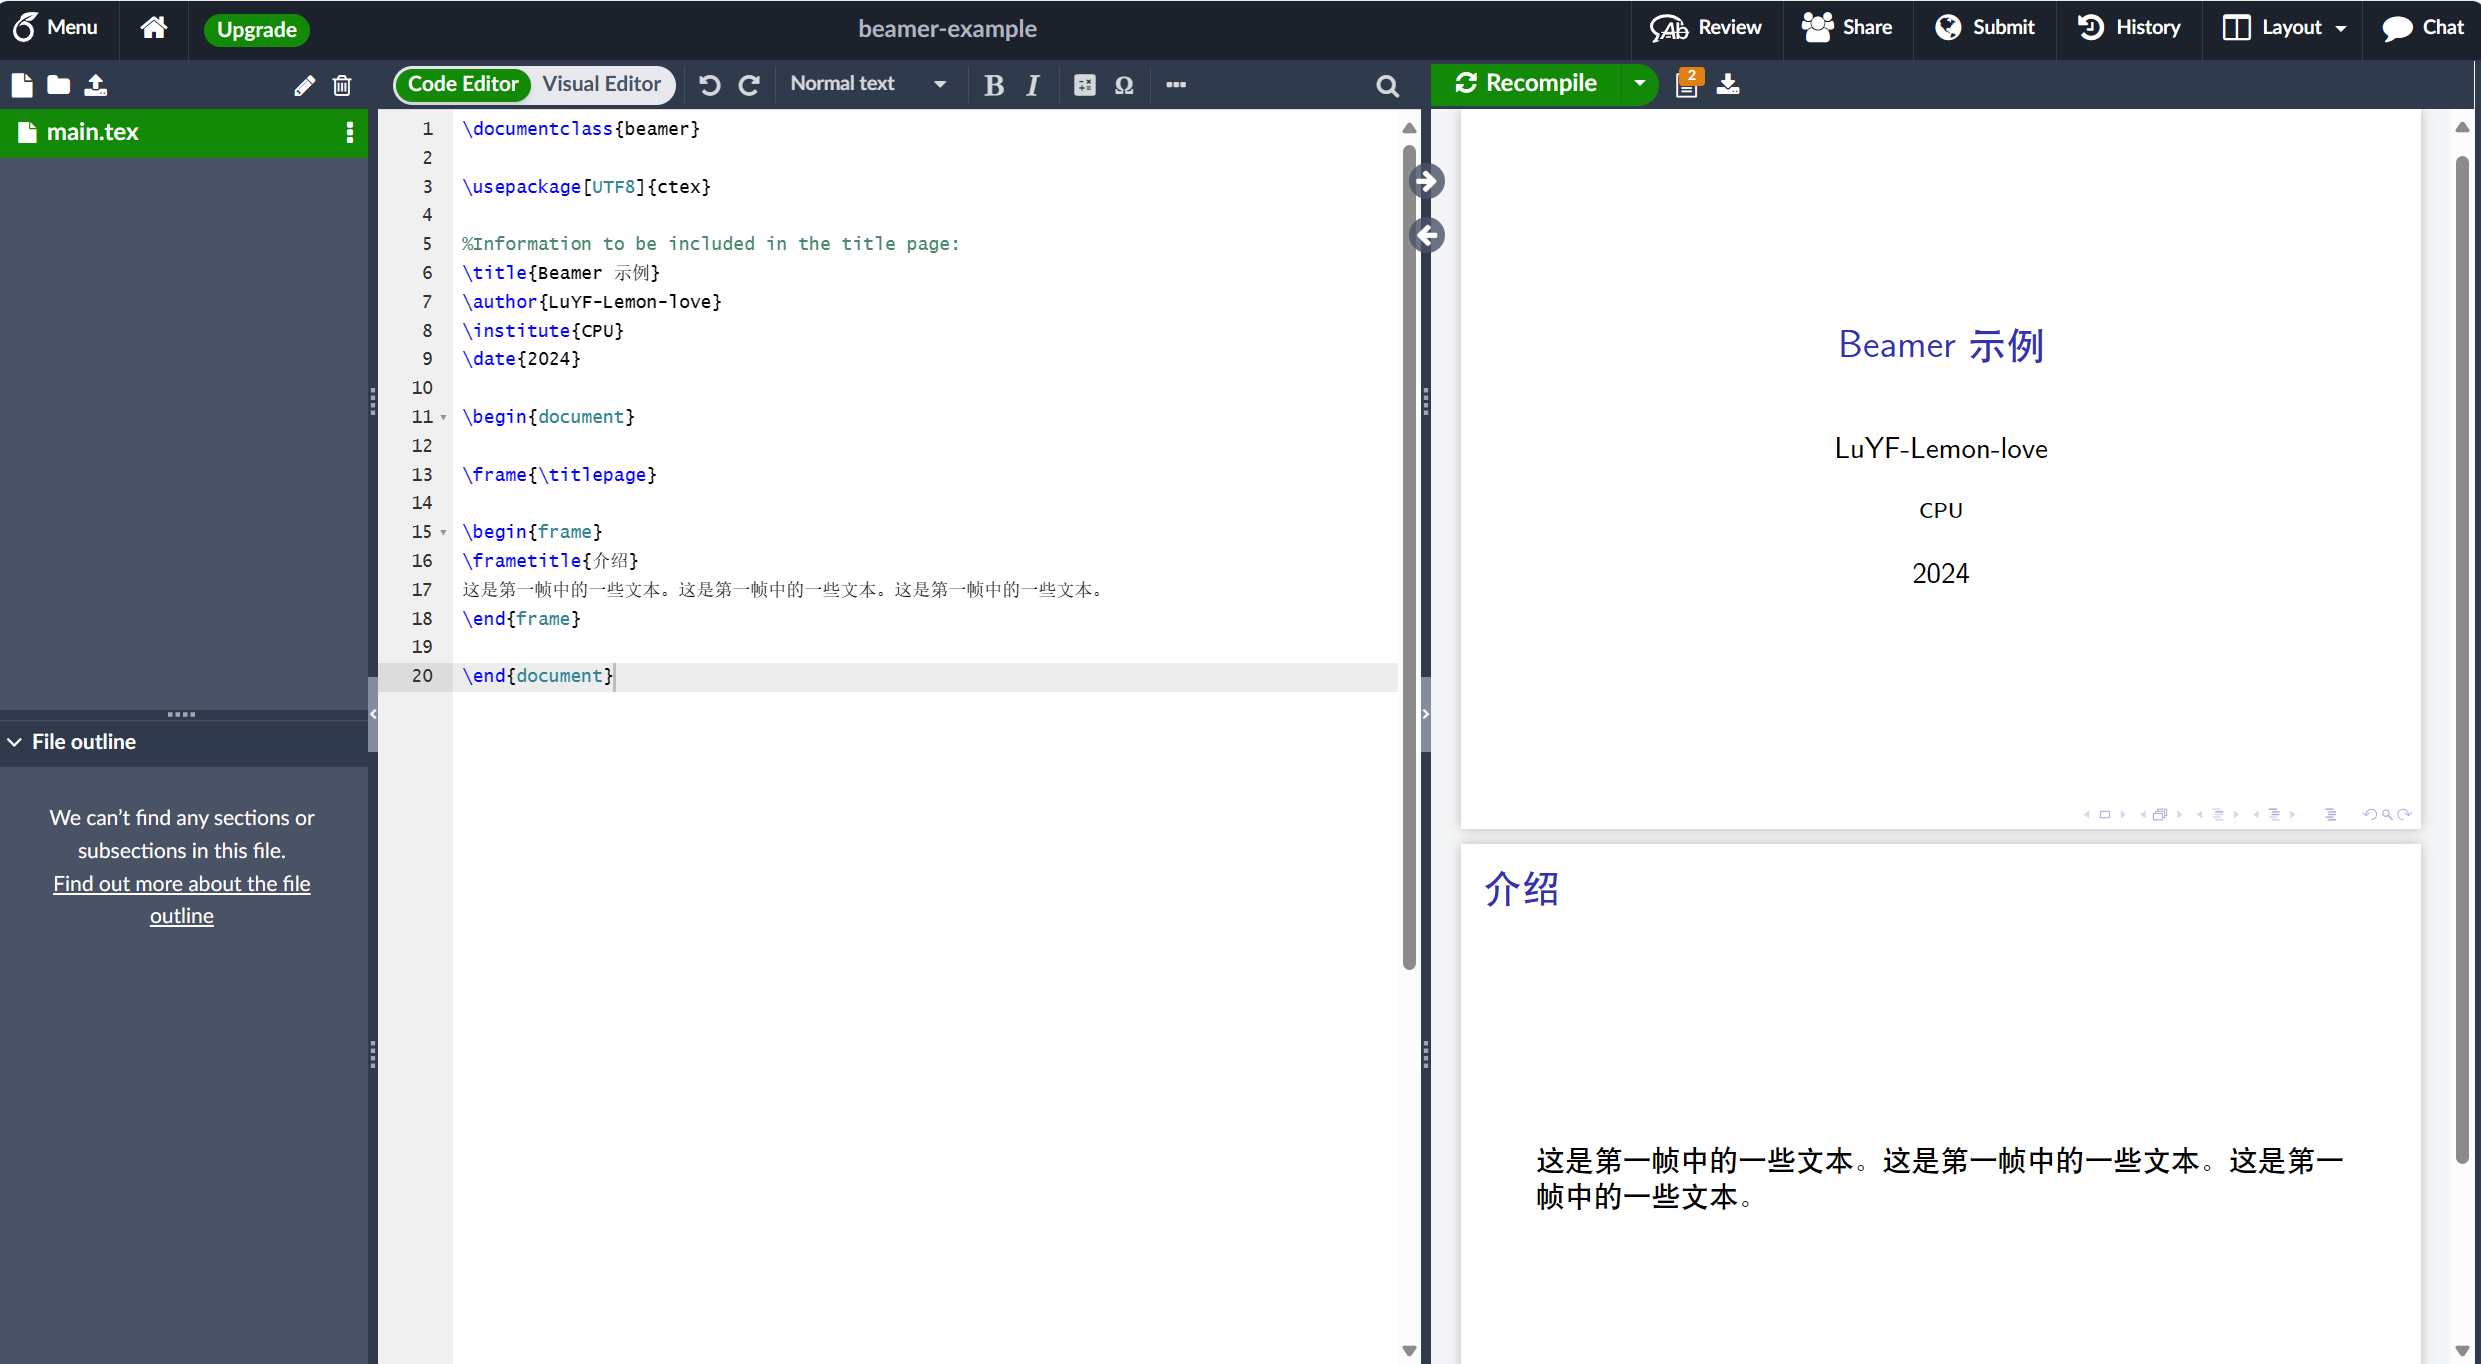
下面提供了一个简单 beamer 演示的最小工作示例。
1
2
3
4
5
6
7
8
9
10
11
12
13
14
15
16
17
18
19
20
\documentclass {beamer}\usepackage [UTF8]{ctex}\title {Beamer 示例}\author {LuYF-Lemon-love}\institute {CPU}\date {2024}\begin {document}\frame {\titlepage }\begin {frame}\frametitle {介绍}这是第一帧中的一些文本。这是第一帧中的一些文本。这是第一帧中的一些文本。 \end {frame}\end {document}
此示例生成以下输出:
编译后,将生成一个两页的 PDF 文件。第一页是标题页,第二页包含示例内容。
文档中的第一条语句声明这是一个 Beamer 幻灯片:\documentclass{beamer}
序言之后的第一个命令 \frame{\titlepage} 生成标题页。该页面可能包含有关作者、机构、事件、徽标等的信息。
frame 环境创建第二张幻灯片,自描述命令 \frametitle{介绍} 是可选的。
值得注意的是,beamer 基本容器是 frame,frame 并不完全等同于幻灯片,一个 frame 可能包含不止一张幻灯片,例如可以设置一个包含多个要点的 frame,生成一张新的幻灯片,以揭示每个连续的要点。
Beamer 主要特点
Beamer 类提供了一些有用的功能来使您的演示文稿栩栩如生,并使其更具吸引力。下面列出了最重要的几个。
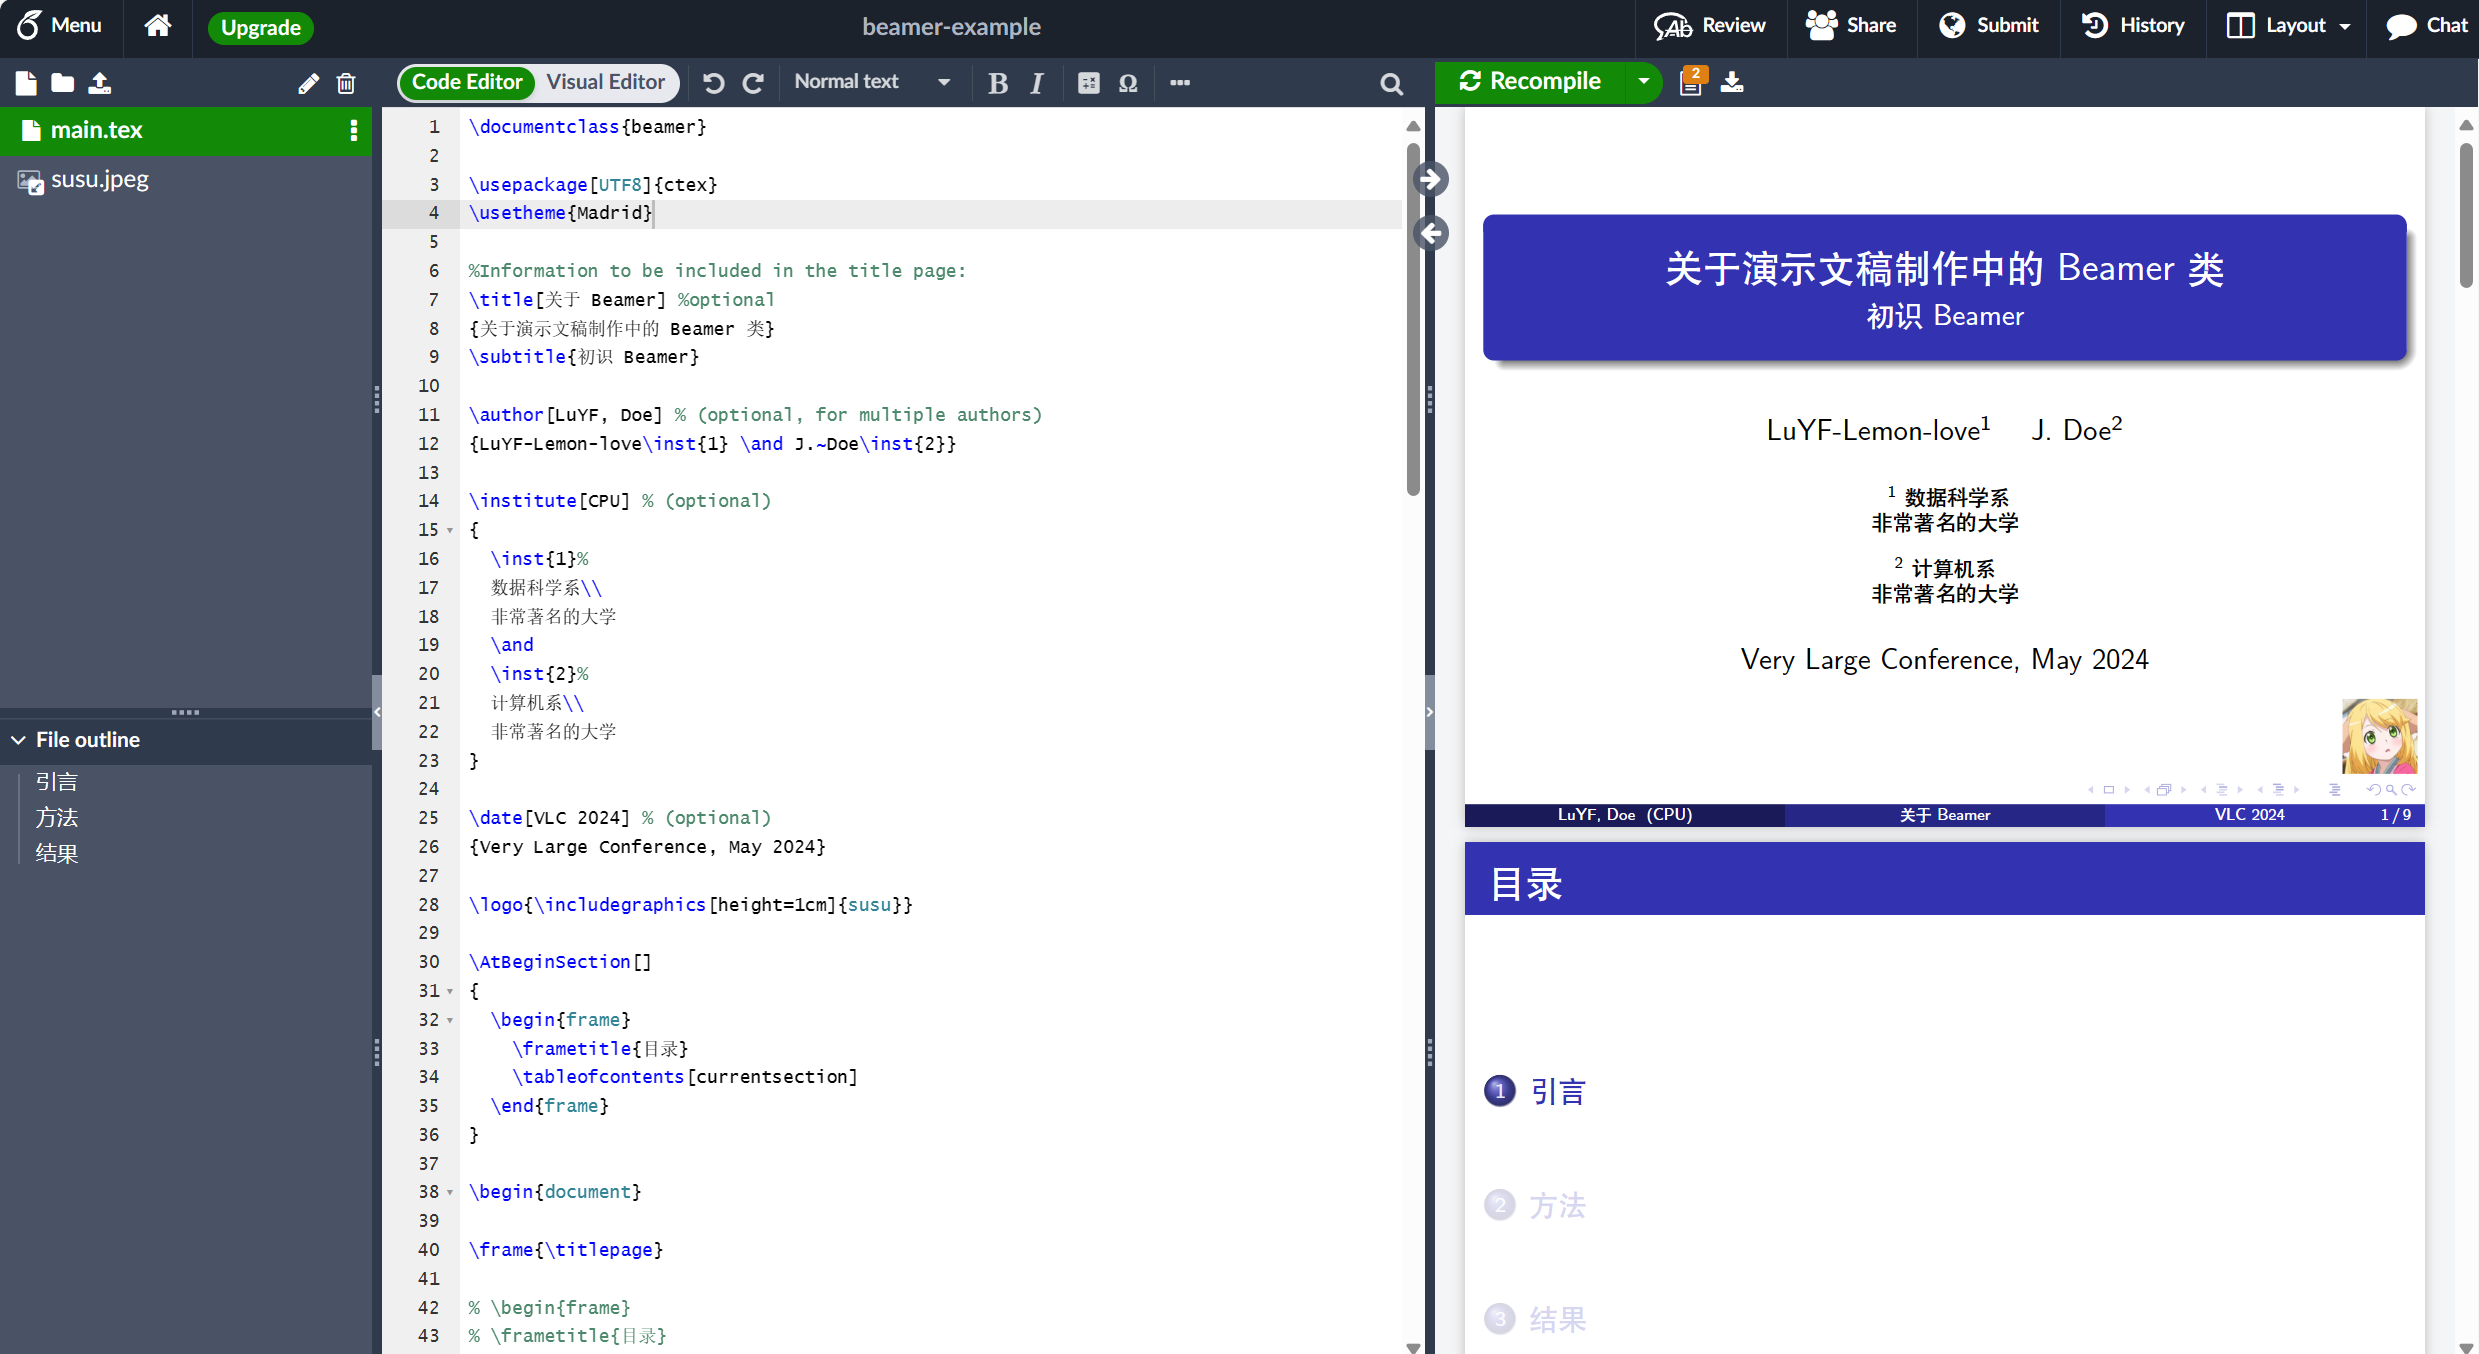
标题页
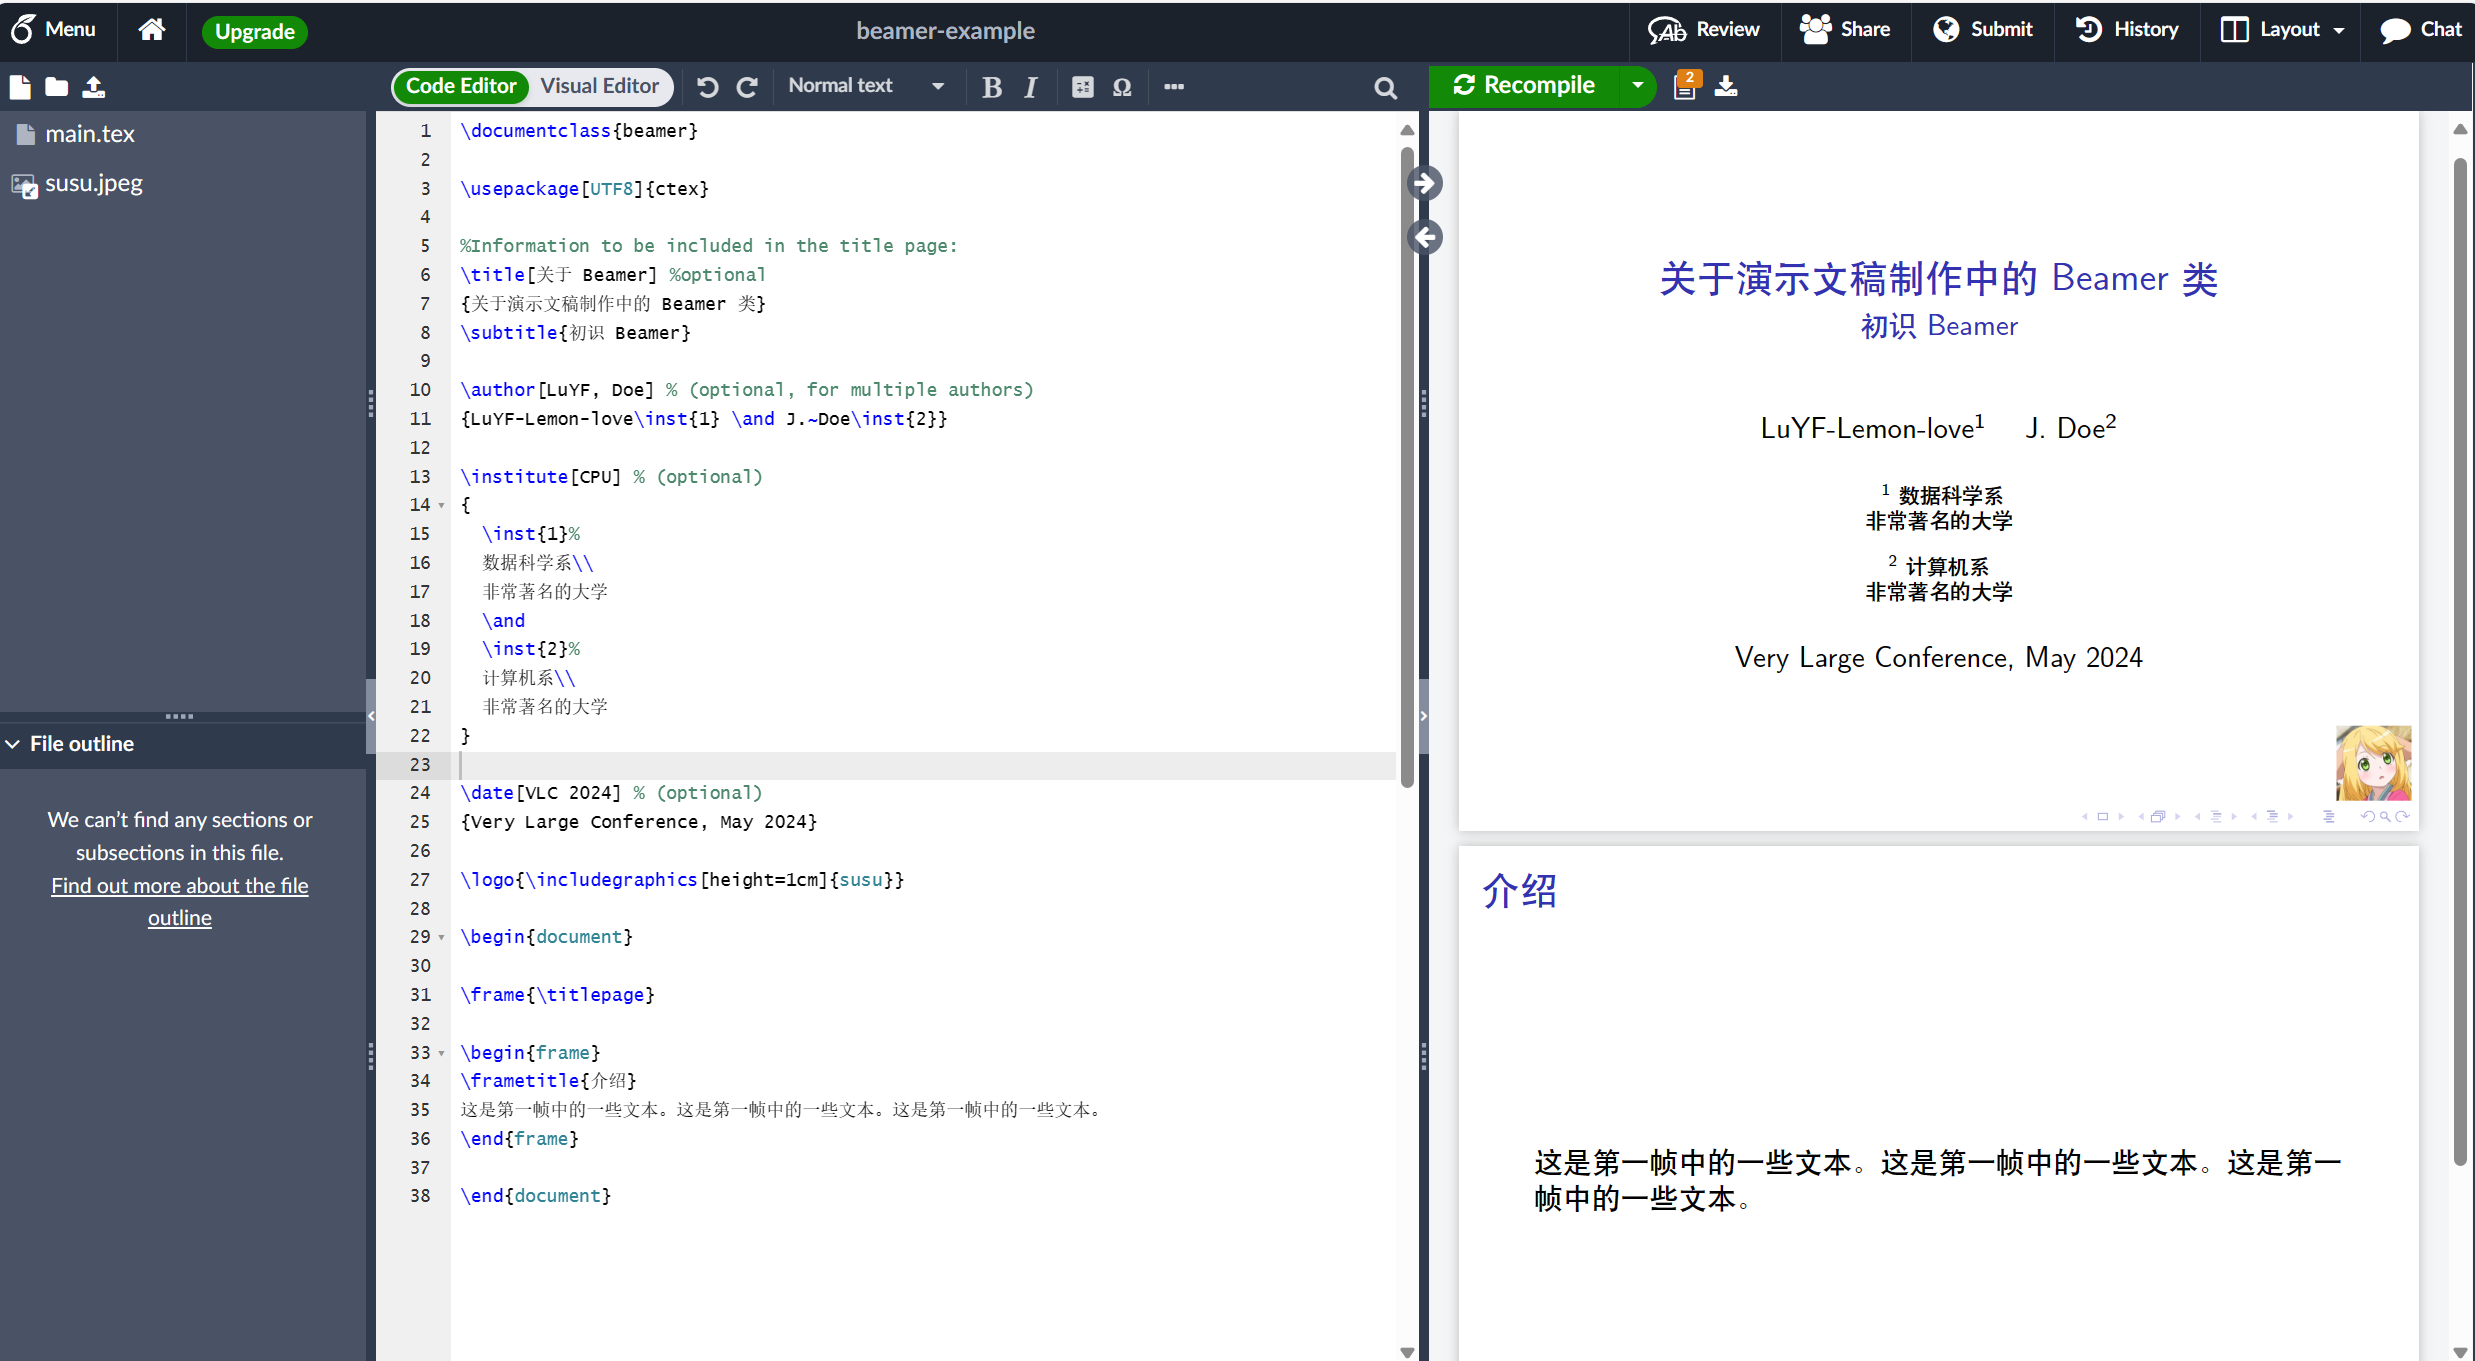
标题页的选项比介绍中提供的选项多。下一个示例是一个完整的示例,大多数命令是可选的。
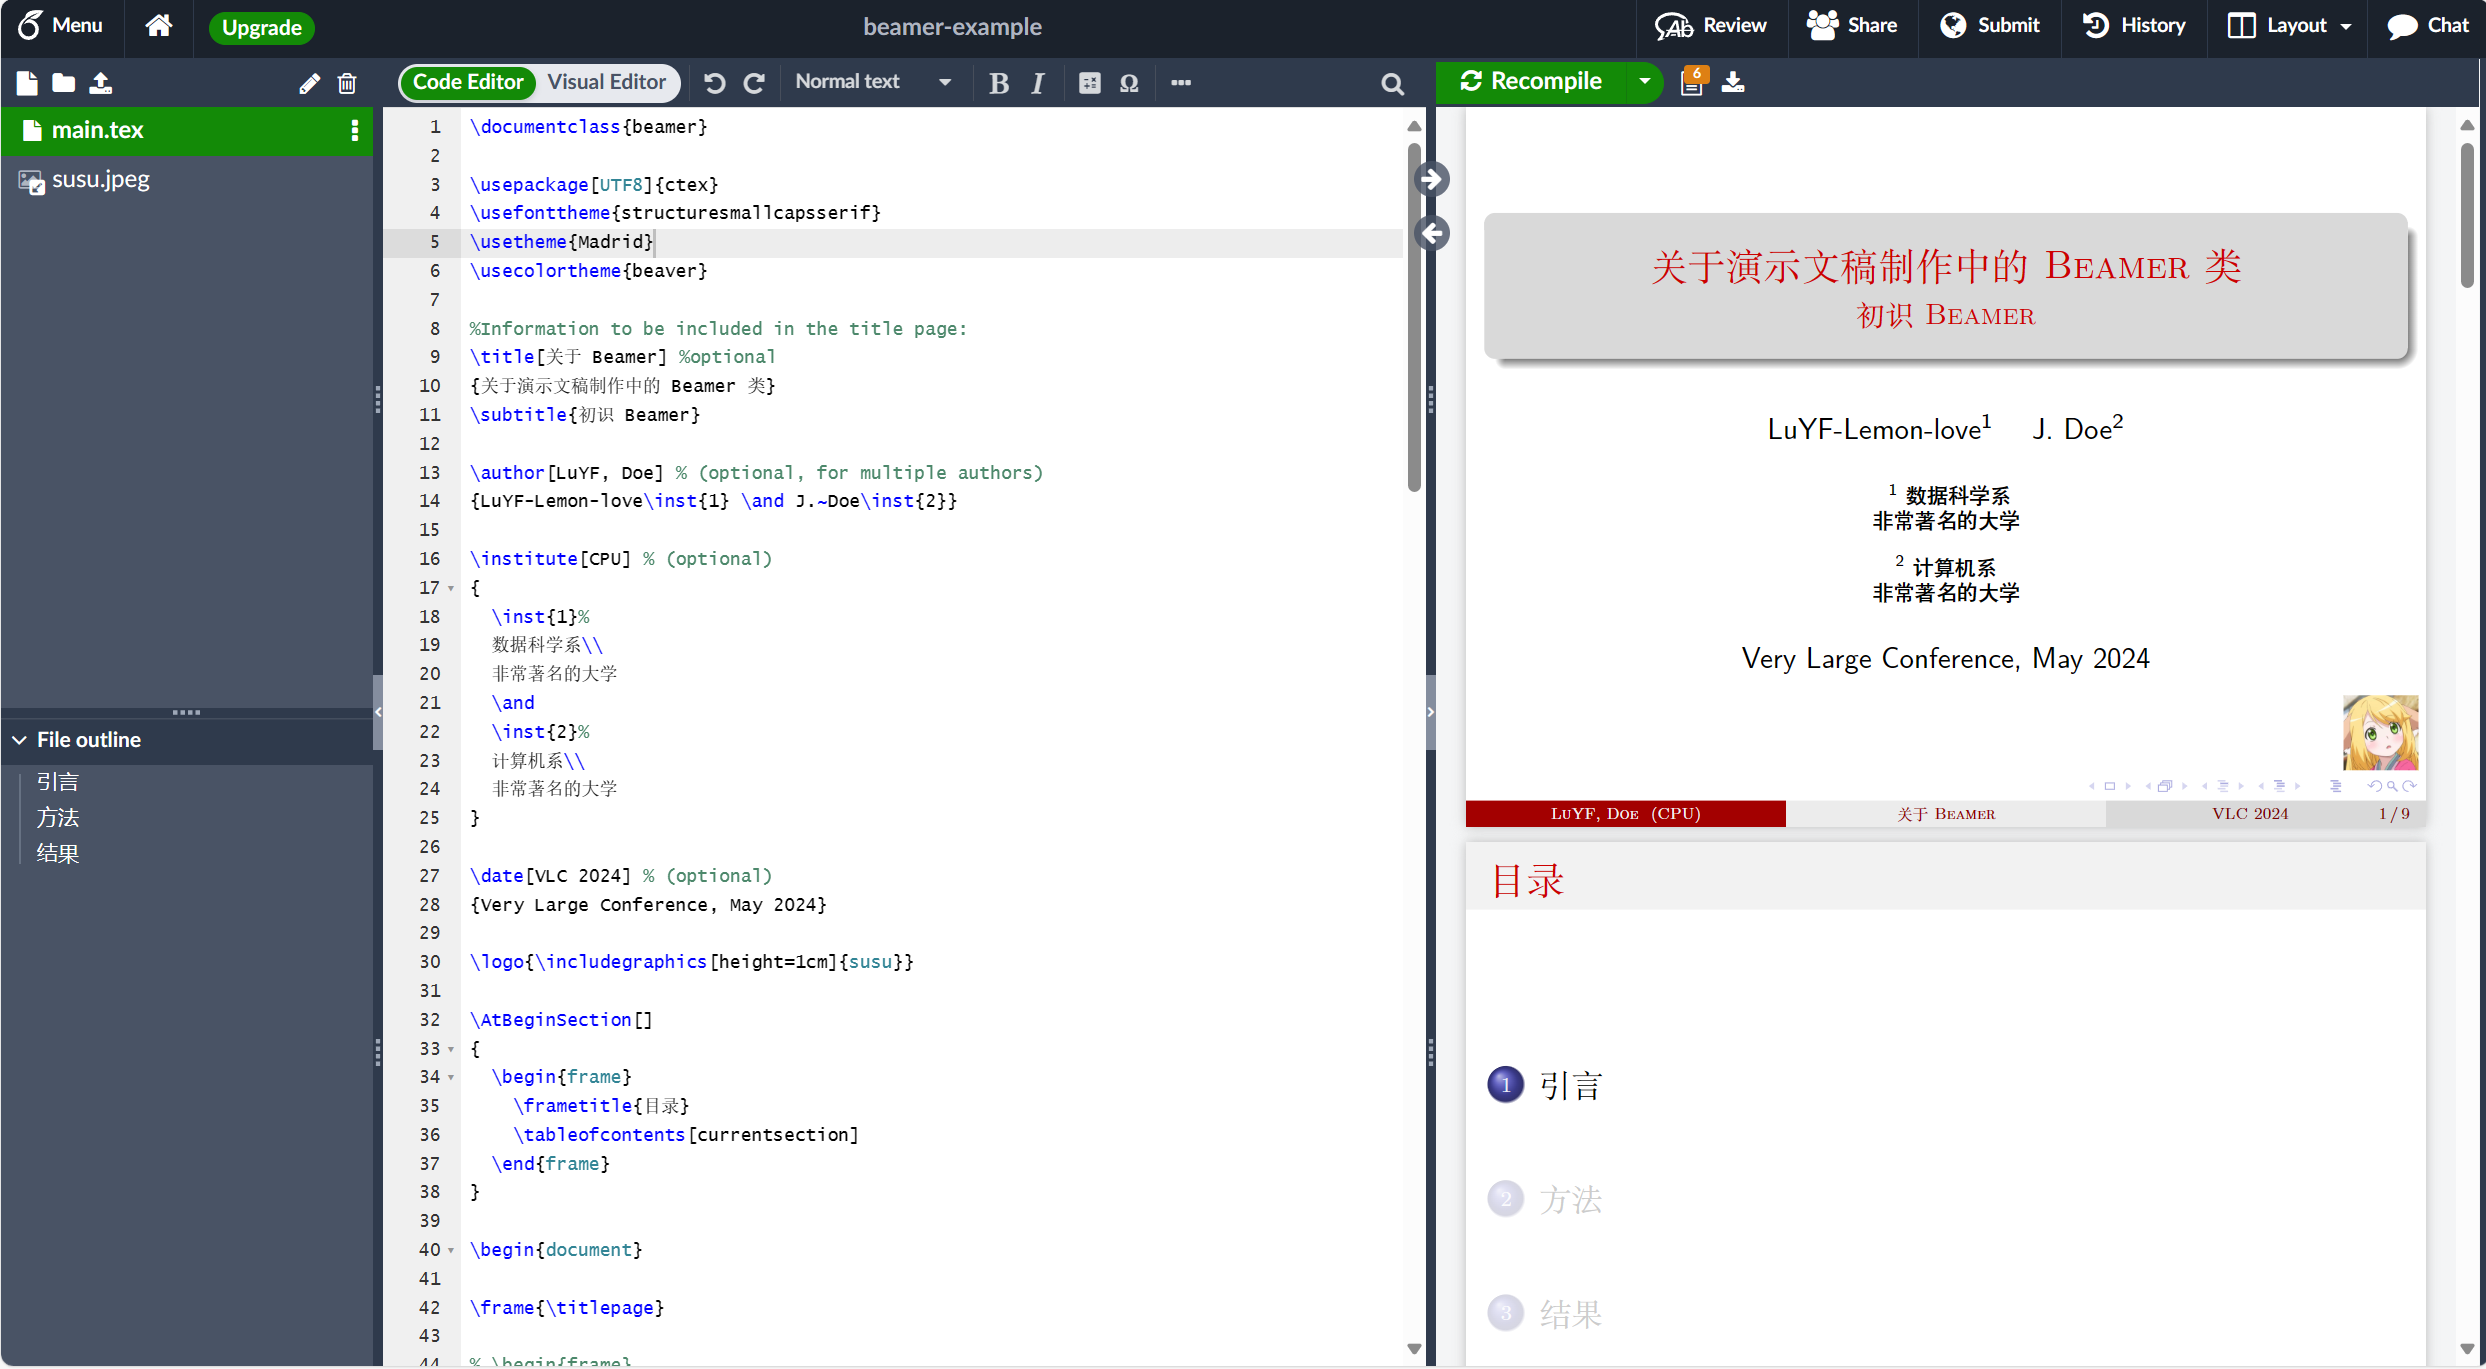
1
2
3
4
5
6
7
8
9
10
11
12
13
14
15
16
17
18
19
20
21
22
23
24
25
26
27
28
29
30
31
32
33
34
35
36
37
38
\documentclass{beamer} \usepackage[UTF8]{ctex} %Information to be included in the title page: + \title[关于 Beamer] %optional + {关于演示文稿制作中的 Beamer 类} + \subtitle{初识 Beamer} + + \author[LuYF, Doe] % (optional, for multiple authors) + {LuYF-Lemon-love\inst{1} \and J.~Doe\inst{2}} + + \institute[CPU] % (optional) + { + \inst{1}% + 数据科学系\\ + 非常著名的大学 + \and + \inst{2}% + 计算机系\\ + 非常著名的大学 + } + + \date[VLC 2024] % (optional) + {Very Large Conference, May 2024} + + \logo{\includegraphics[height=1cm]{susu}} \begin{document} \frame{\titlepage} \begin{frame} \frametitle{介绍} 这是第一帧中的一些文本。这是第一帧中的一些文本。这是第一帧中的一些文本。 \end{frame} \end{document}
此示例生成以下输出:
标题页中每个元素的分布取决于主题,有关详细信息,请参阅主题小节。以下是每个命令的描述:
\title[关于 Beamer]{关于演示文稿制作中的 Beamer 类}: 这一点很重要,您的演示文稿的标题必须在大括号内。您可以在方括号中设置一个可选的较短标题:在示例中,这是 关于 Beamer。\subtitle: 为您的演示文稿提供副标题。如果不必要,可以省略。\author[LuYF, Doe]{LuYF-Lemon-love\inst{1} \and J.~Doe\inst{2}}: 首先,可以在方括号内添加作者姓名的简短版本,逗号分隔。这是可选的,如果省略,则显示全名(在示例的标题页底部)。然后,在大括号内是作者的全名,由 \and 命令分隔。还有一个 \inst{1} 命令,它放一个上标来引用每个作者工作的机构;如果只有一个作者或列出的作者在同一个机构工作,它是可选的,可以省略。\institute[CPU]{\inst{1}...: 在此命令的参数中,您可以声明每个作者所属的研究所。括号内的参数(学院/大学的首字母缩略词)是可选的。然后在大括号内添加学院的名称;如果有多个学院,它们必须用 \and 命令分隔。\institute 命令是可选的,但对于前面代码中 \inst 命令插入的上标是必需的。\date[VLC 2024]{Very Large Conference, May 2024}: 在此声明中,您可以设置要展示幻灯片的活动的名称和日期。括号内的参数是一个可选的较短名称,在此示例中显示在标题页的底部。\logo{\includegraphics...}: 这将添加一个要显示的徽标。在此主题中,徽标设置在右下角。您可以使用文本或包含图像。
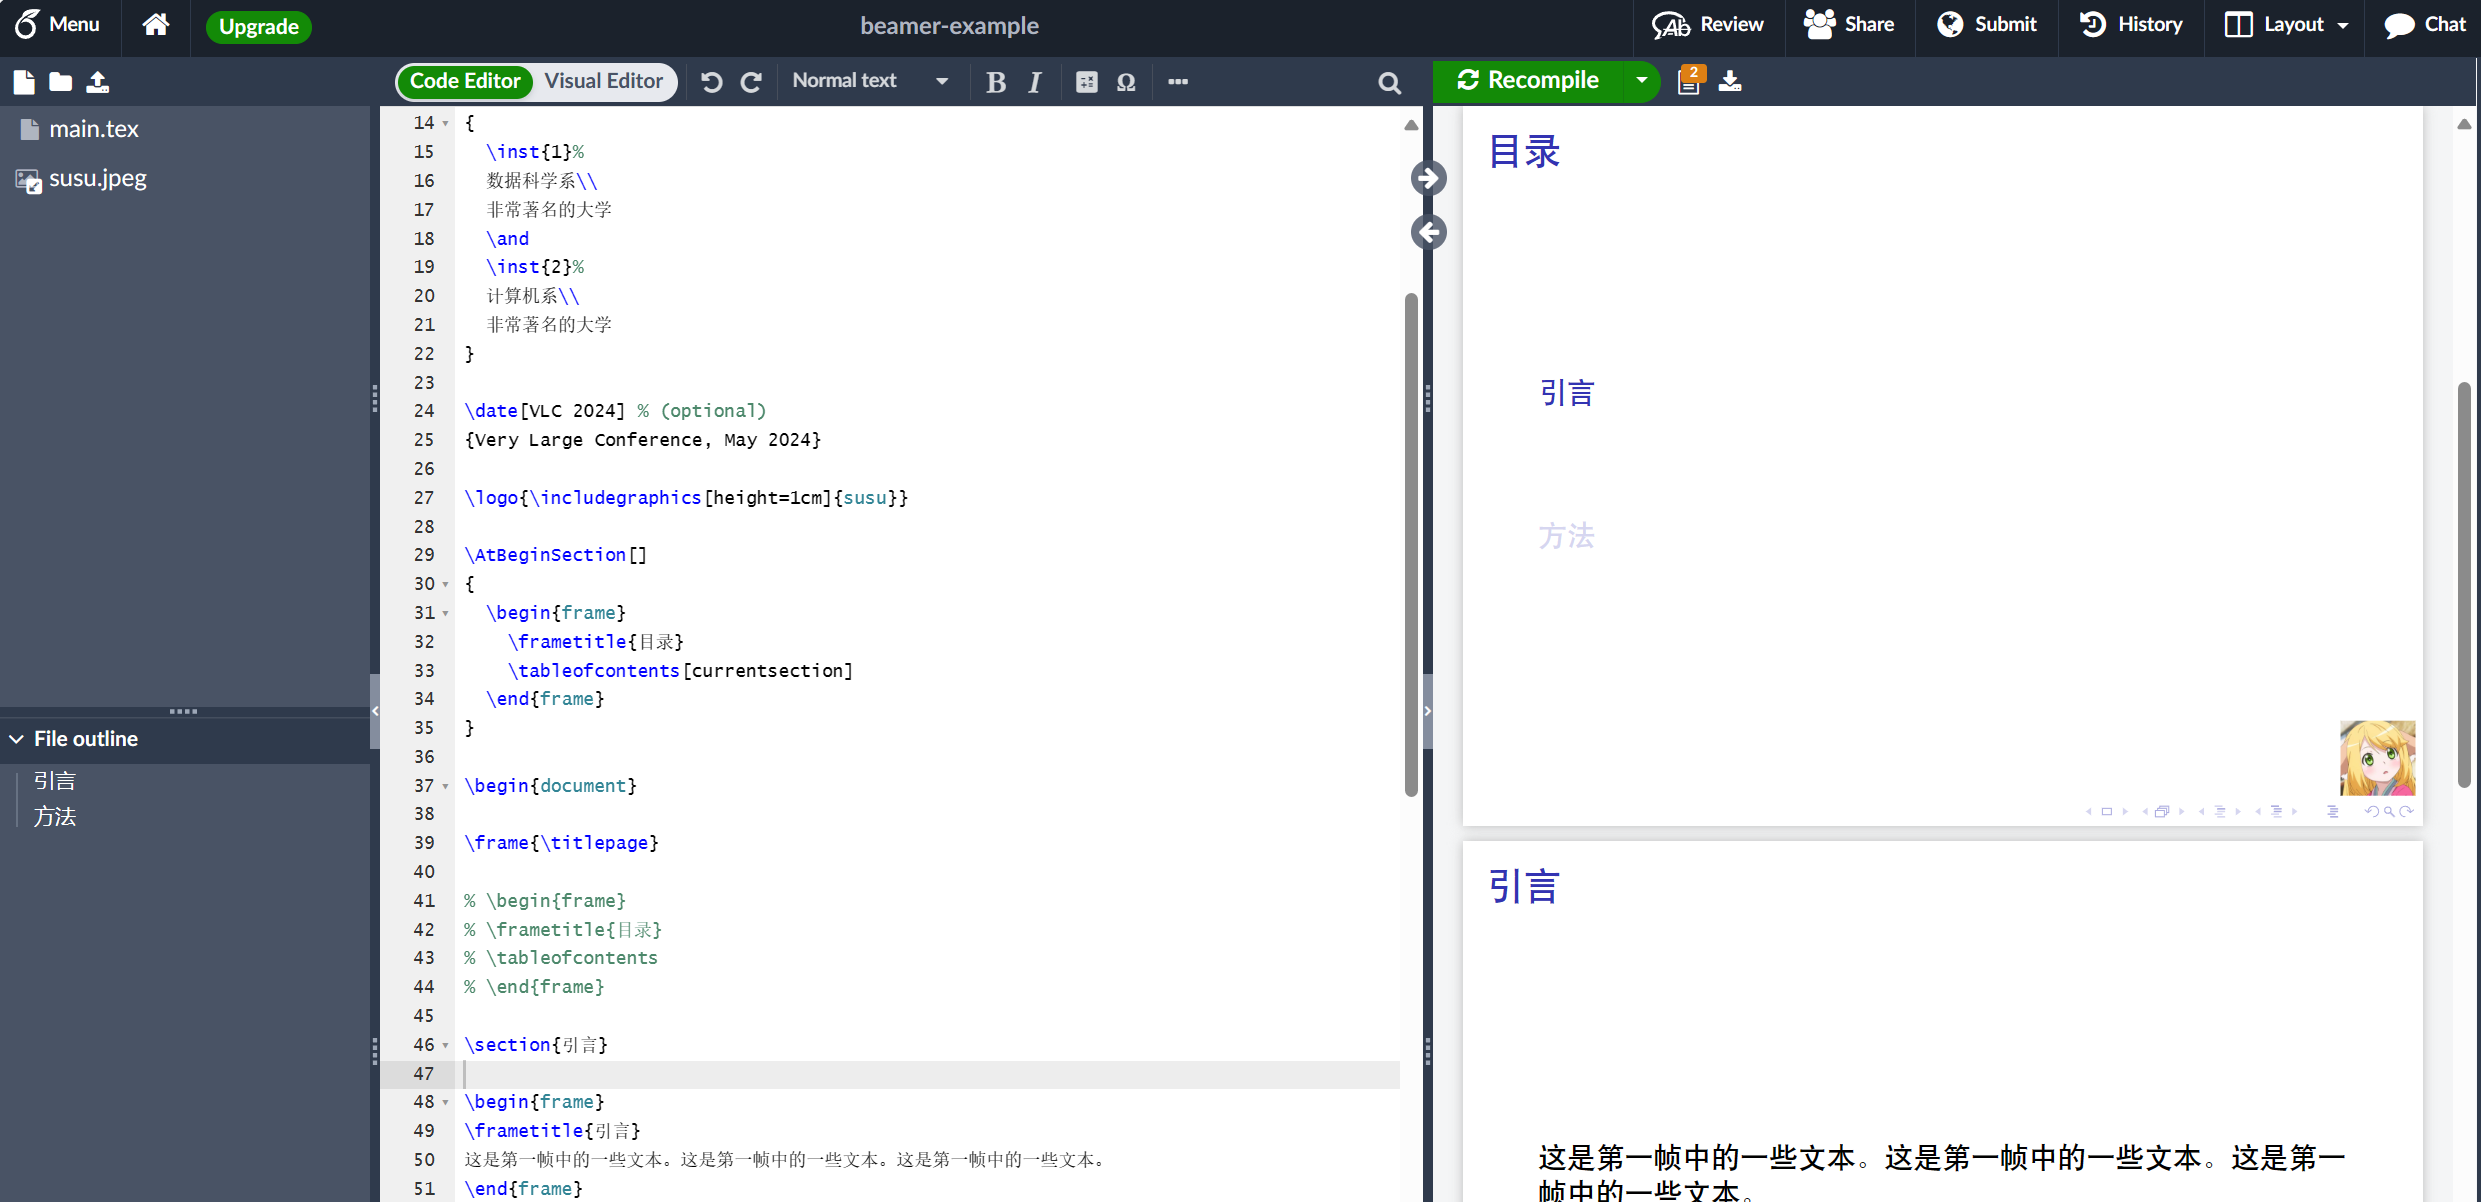
创建目录
通常,当您有一个长演示文稿时,将其划分为部分甚至子部分会很方便。在这种情况下,您可以在文档的开头添加一个目录。这是一个例子:
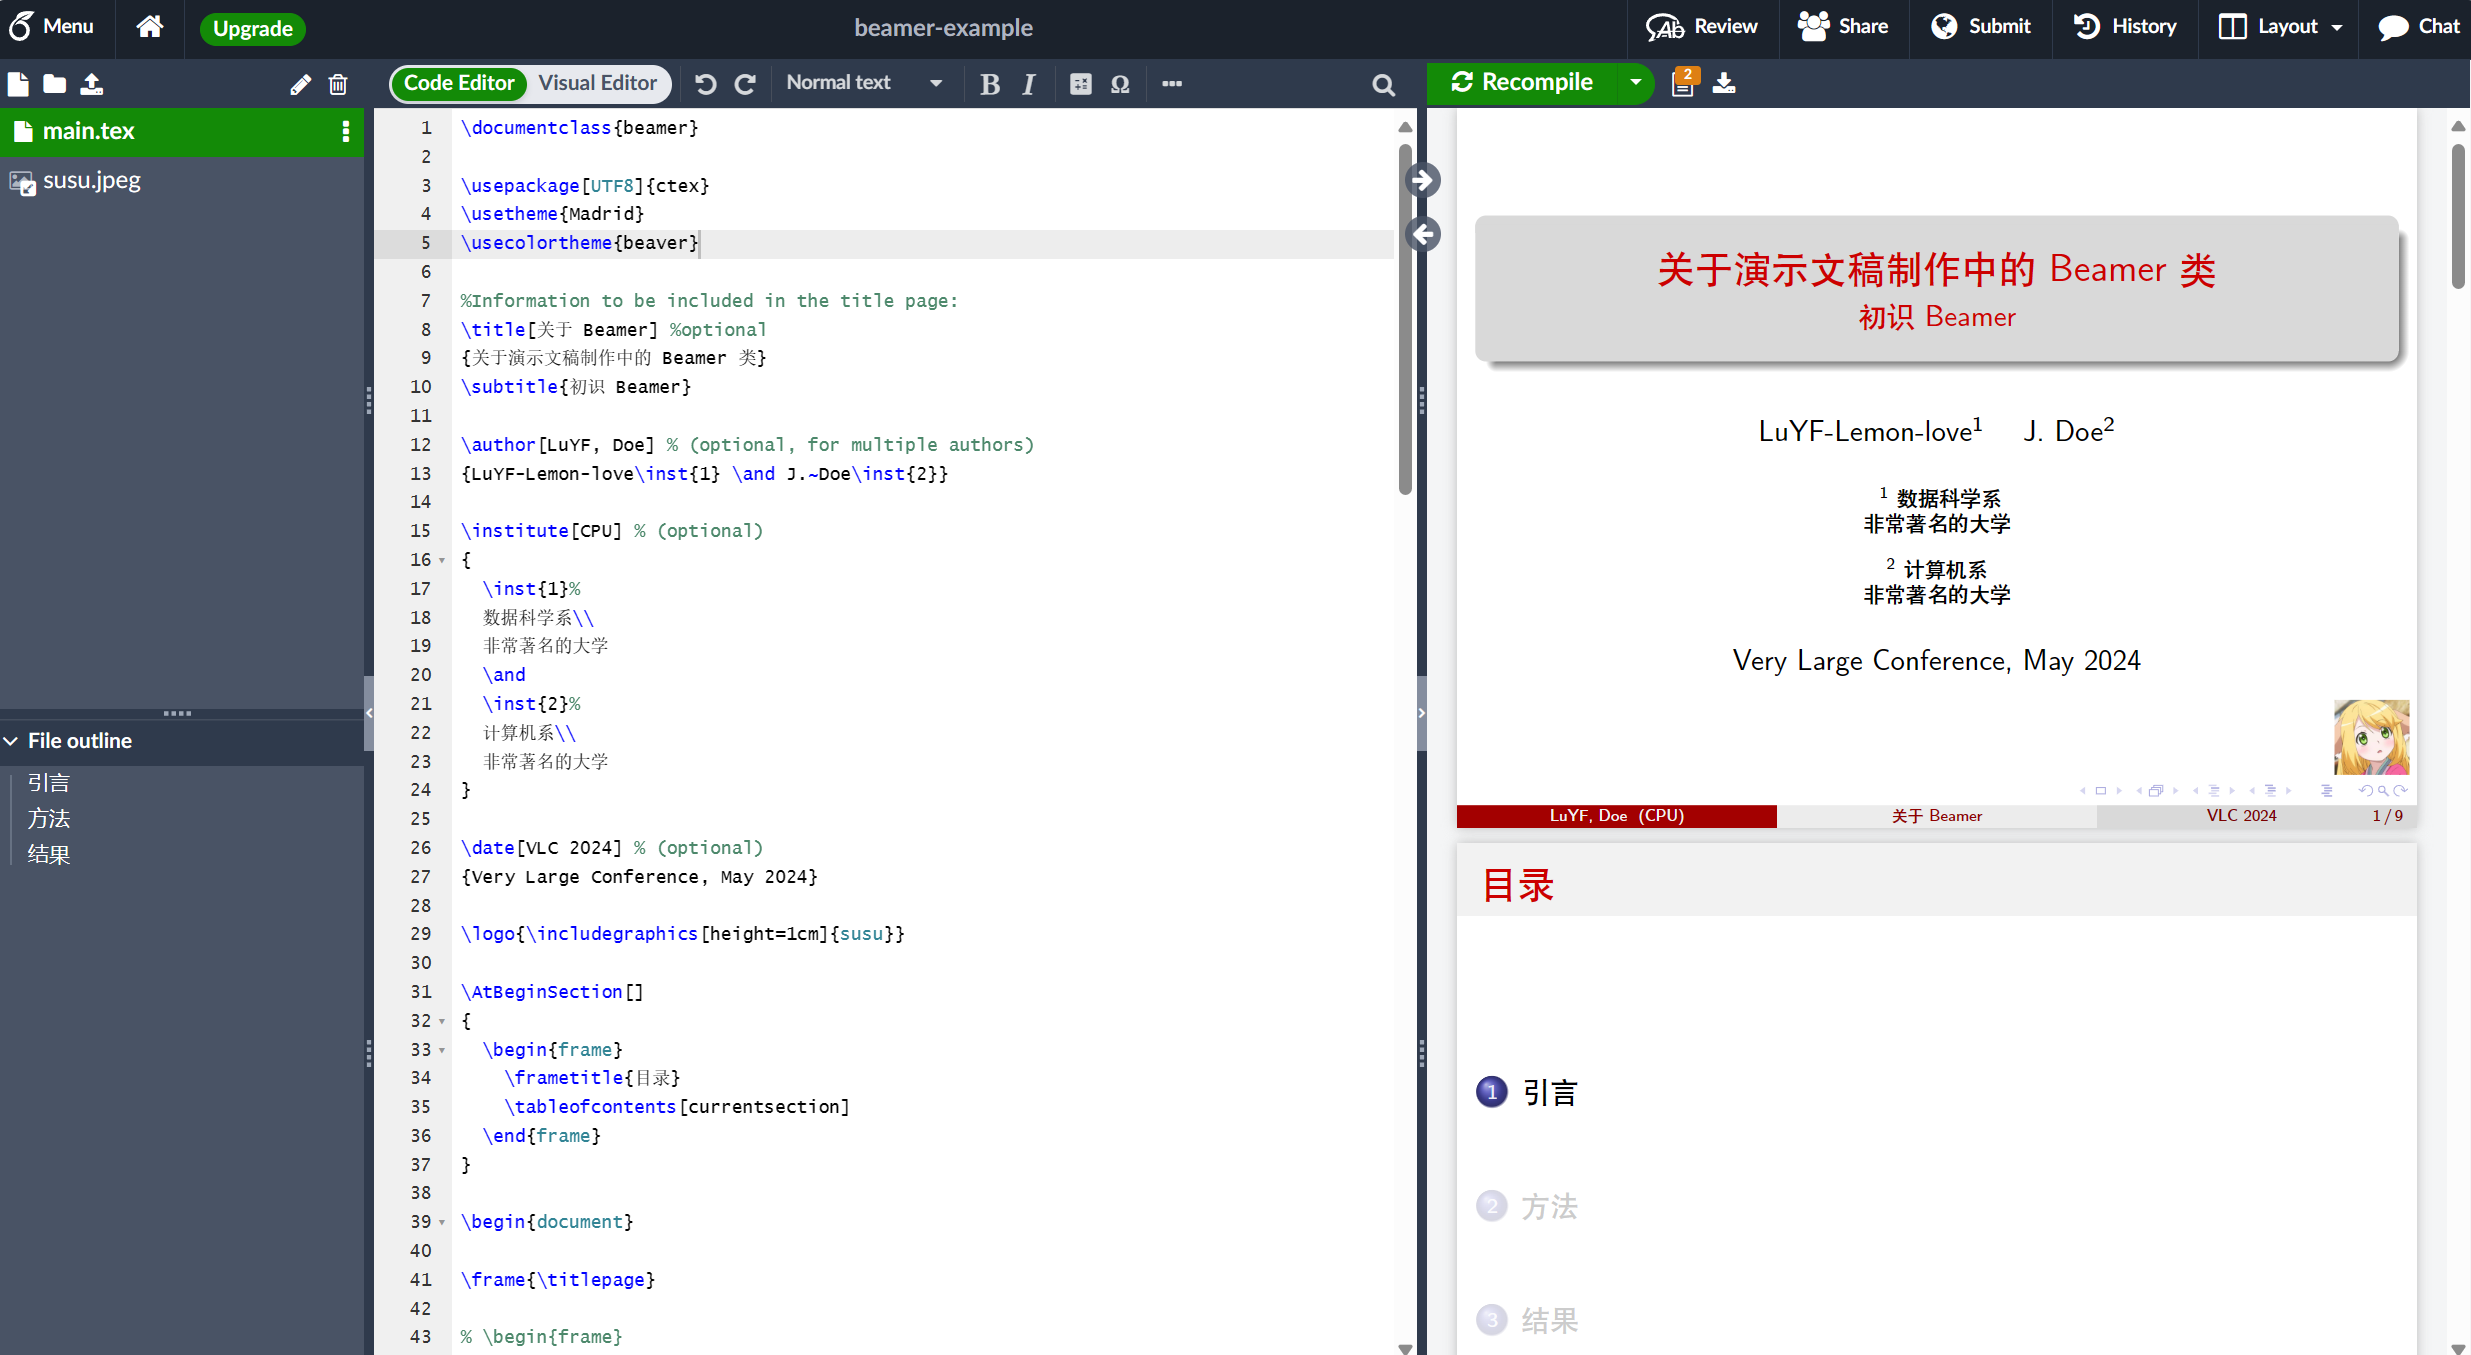
1
2
3
4
5
6
7
8
9
10
11
12
13
14
15
16
17
18
19
20
21
22
23
24
25
26
27
28
29
30
31
32
33
34
35
36
37
38
39
40
41
42
43
44
45
46
47
48
49
50
51
52
\documentclass{beamer} \usepackage[UTF8]{ctex} %Information to be included in the title page: \title[关于 Beamer] %optional {关于演示文稿制作中的 Beamer 类} \subtitle{初识 Beamer} \author[LuYF, Doe] % (optional, for multiple authors) {LuYF-Lemon-love\inst{1} \and J.~Doe\inst{2}} \institute[CPU] % (optional) { \inst{1}% 数据科学系\\ 非常著名的大学 \and \inst{2}% 计算机系\\ 非常著名的大学 } \date[VLC 2024] % (optional) {Very Large Conference, May 2024} \logo{\includegraphics[height=1cm]{susu}} \begin{document} \frame{\titlepage} + \begin{frame} + \frametitle{目录} + \tableofcontents + \end{frame} + \section{引言} \begin{frame} + \frametitle{引言} 这是第一帧中的一些文本。这是第一帧中的一些文本。这是第一帧中的一些文本。 \end{frame} + \section{方法} + \begin{frame} + \frametitle{方法} + 这是第二帧中的一些文本。这是第二帧中的一些文本。这是第二帧中的一些文本。 + \end{frame} \end{document}
此示例生成以下输出:
如您所见,很简单。在 frame 环境中,您可以设置标题并添加命令 \titlepage。
也可以将目录放在每个部分的开头并突出显示当前部分的标题。只需将以下代码添加到 LaTeX 文档的序言中:
1
2
3
4
5
6
7
\AtBeginSection []{ \begin {frame} \frametitle {目录} \tableofcontents [currentsection] \end {frame} }
此示例生成以下输出:
如果您使用 \AtBeginSubsection[] 而不是 \AtBeginSection[],目录将出现在每个小节的开头。
为演示文稿添加效果
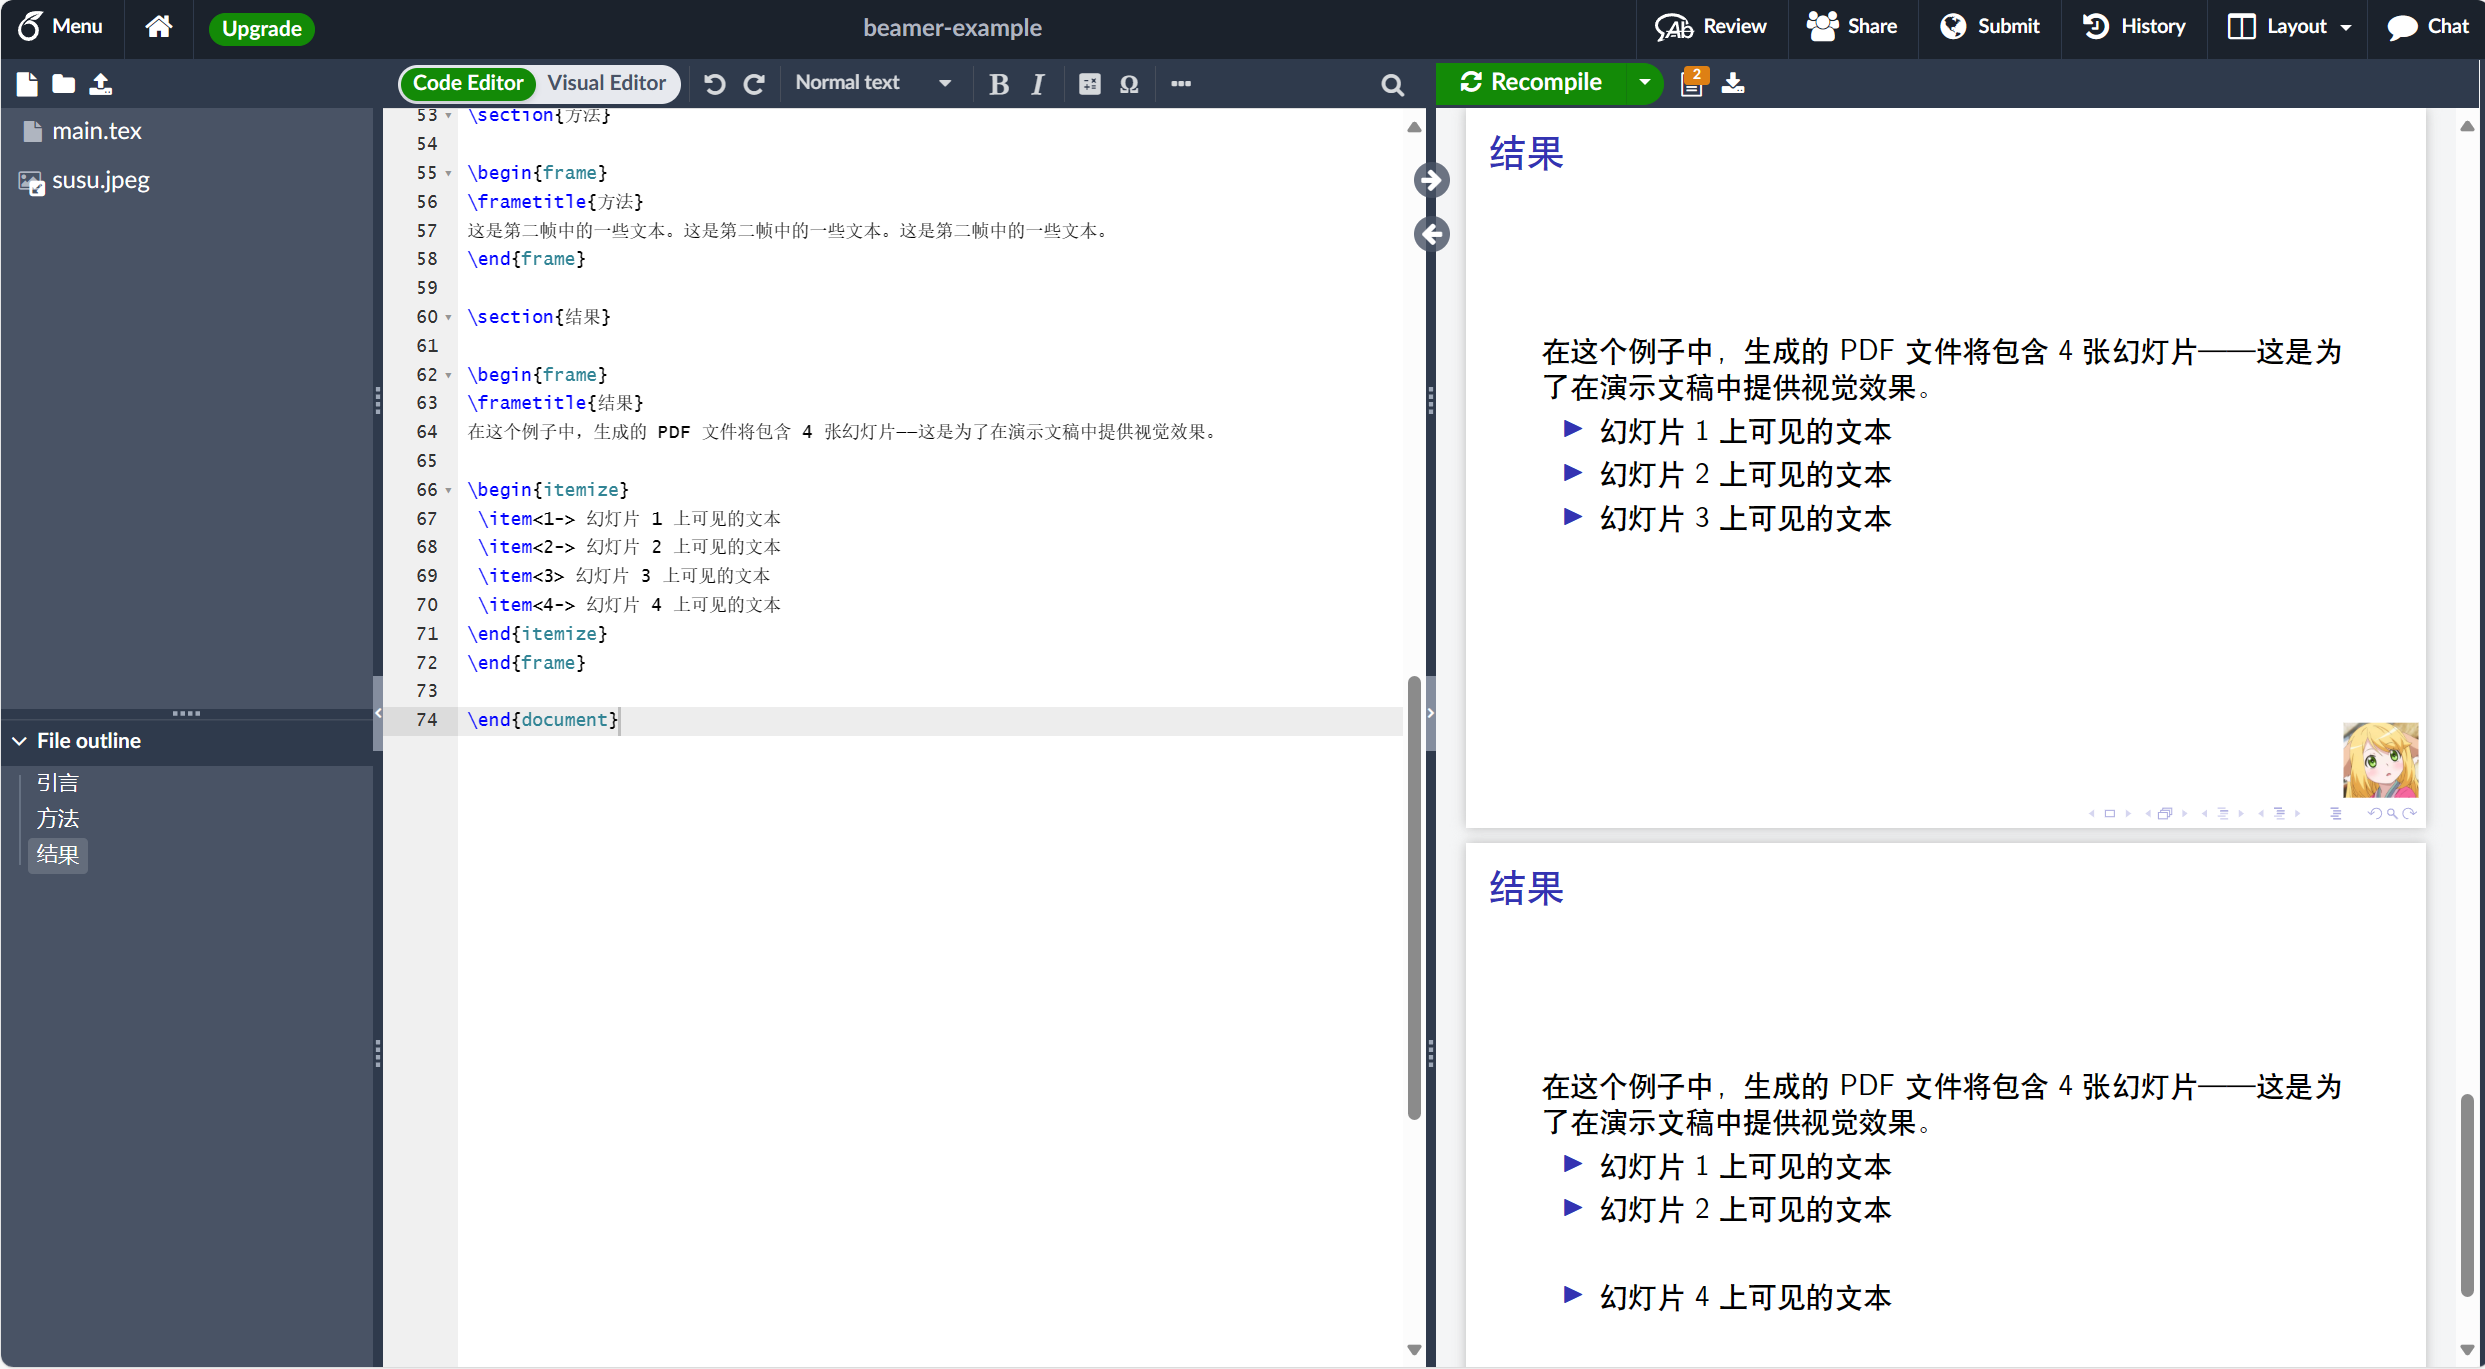
在介绍中,我们看到了一个使用 \begin{frame} \end{frame} 分隔符的简单幻灯片。有人提到 frame 不等同于 slide,下一个例子将通过在幻灯片中添加一些效果来说明原因。在这个例子中,生成的 PDF 文件将包含 4 张幻灯片——这是为了在演示文稿中提供视觉效果。
1
2
3
4
5
6
7
8
9
10
11
12
13
14
15
16
17
18
19
20
21
22
23
24
25
26
27
28
29
30
31
32
33
34
35
36
37
38
39
40
41
42
43
44
45
46
47
48
49
50
51
52
53
54
55
56
57
58
59
60
61
62
63
64
65
66
67
68
69
70
71
72
73
74
\documentclass{beamer} \usepackage[UTF8]{ctex} %Information to be included in the title page: \title[关于 Beamer] %optional {关于演示文稿制作中的 Beamer 类} \subtitle{初识 Beamer} \author[LuYF, Doe] % (optional, for multiple authors) {LuYF-Lemon-love\inst{1} \and J.~Doe\inst{2}} \institute[CPU] % (optional) { \inst{1}% 数据科学系\\ 非常著名的大学 \and \inst{2}% 计算机系\\ 非常著名的大学 } \date[VLC 2024] % (optional) {Very Large Conference, May 2024} \logo{\includegraphics[height=1cm]{susu}} \AtBeginSection[] { \begin{frame} \frametitle{目录} \tableofcontents[currentsection] \end{frame} } \begin{document} \frame{\titlepage} % \begin{frame} % \frametitle{目录} % \tableofcontents % \end{frame} \section{引言} \begin{frame} \frametitle{引言} 这是第一帧中的一些文本。这是第一帧中的一些文本。这是第一帧中的一些文本。 \end{frame} \section{方法} \begin{frame} \frametitle{方法} 这是第二帧中的一些文本。这是第二帧中的一些文本。这是第二帧中的一些文本。 \end{frame} + \section{结果} + + \begin{frame} + \frametitle{结果} + 在这个例子中,生成的 PDF 文件将包含 4 张幻灯片——这是为了在演示文稿中提供视觉效果。 + + \begin{itemize} + \item<1-> 幻灯片 1 上可见的文本 + \item<2-> 幻灯片 2 上可见的文本 + \item<3> 幻灯片 3 上可见的文本 + \item<4-> 幻灯片 4 上可见的文本 + \end{itemize} + \end{frame} \end{document}
此示例生成以下输出:
在代码中,有一个由 \begin{itemize} \end{itemize} 命令声明的列表,每个 item 旁边都有一个用两个特殊字符括起来的数字:< >。这将决定元素将出现在哪张幻灯片中,如果您在数字的末尾附加一个 -,该项目将显示在该幻灯片中以及当前 frame 的后续幻灯片中,否则它将仅出现在该幻灯片中。
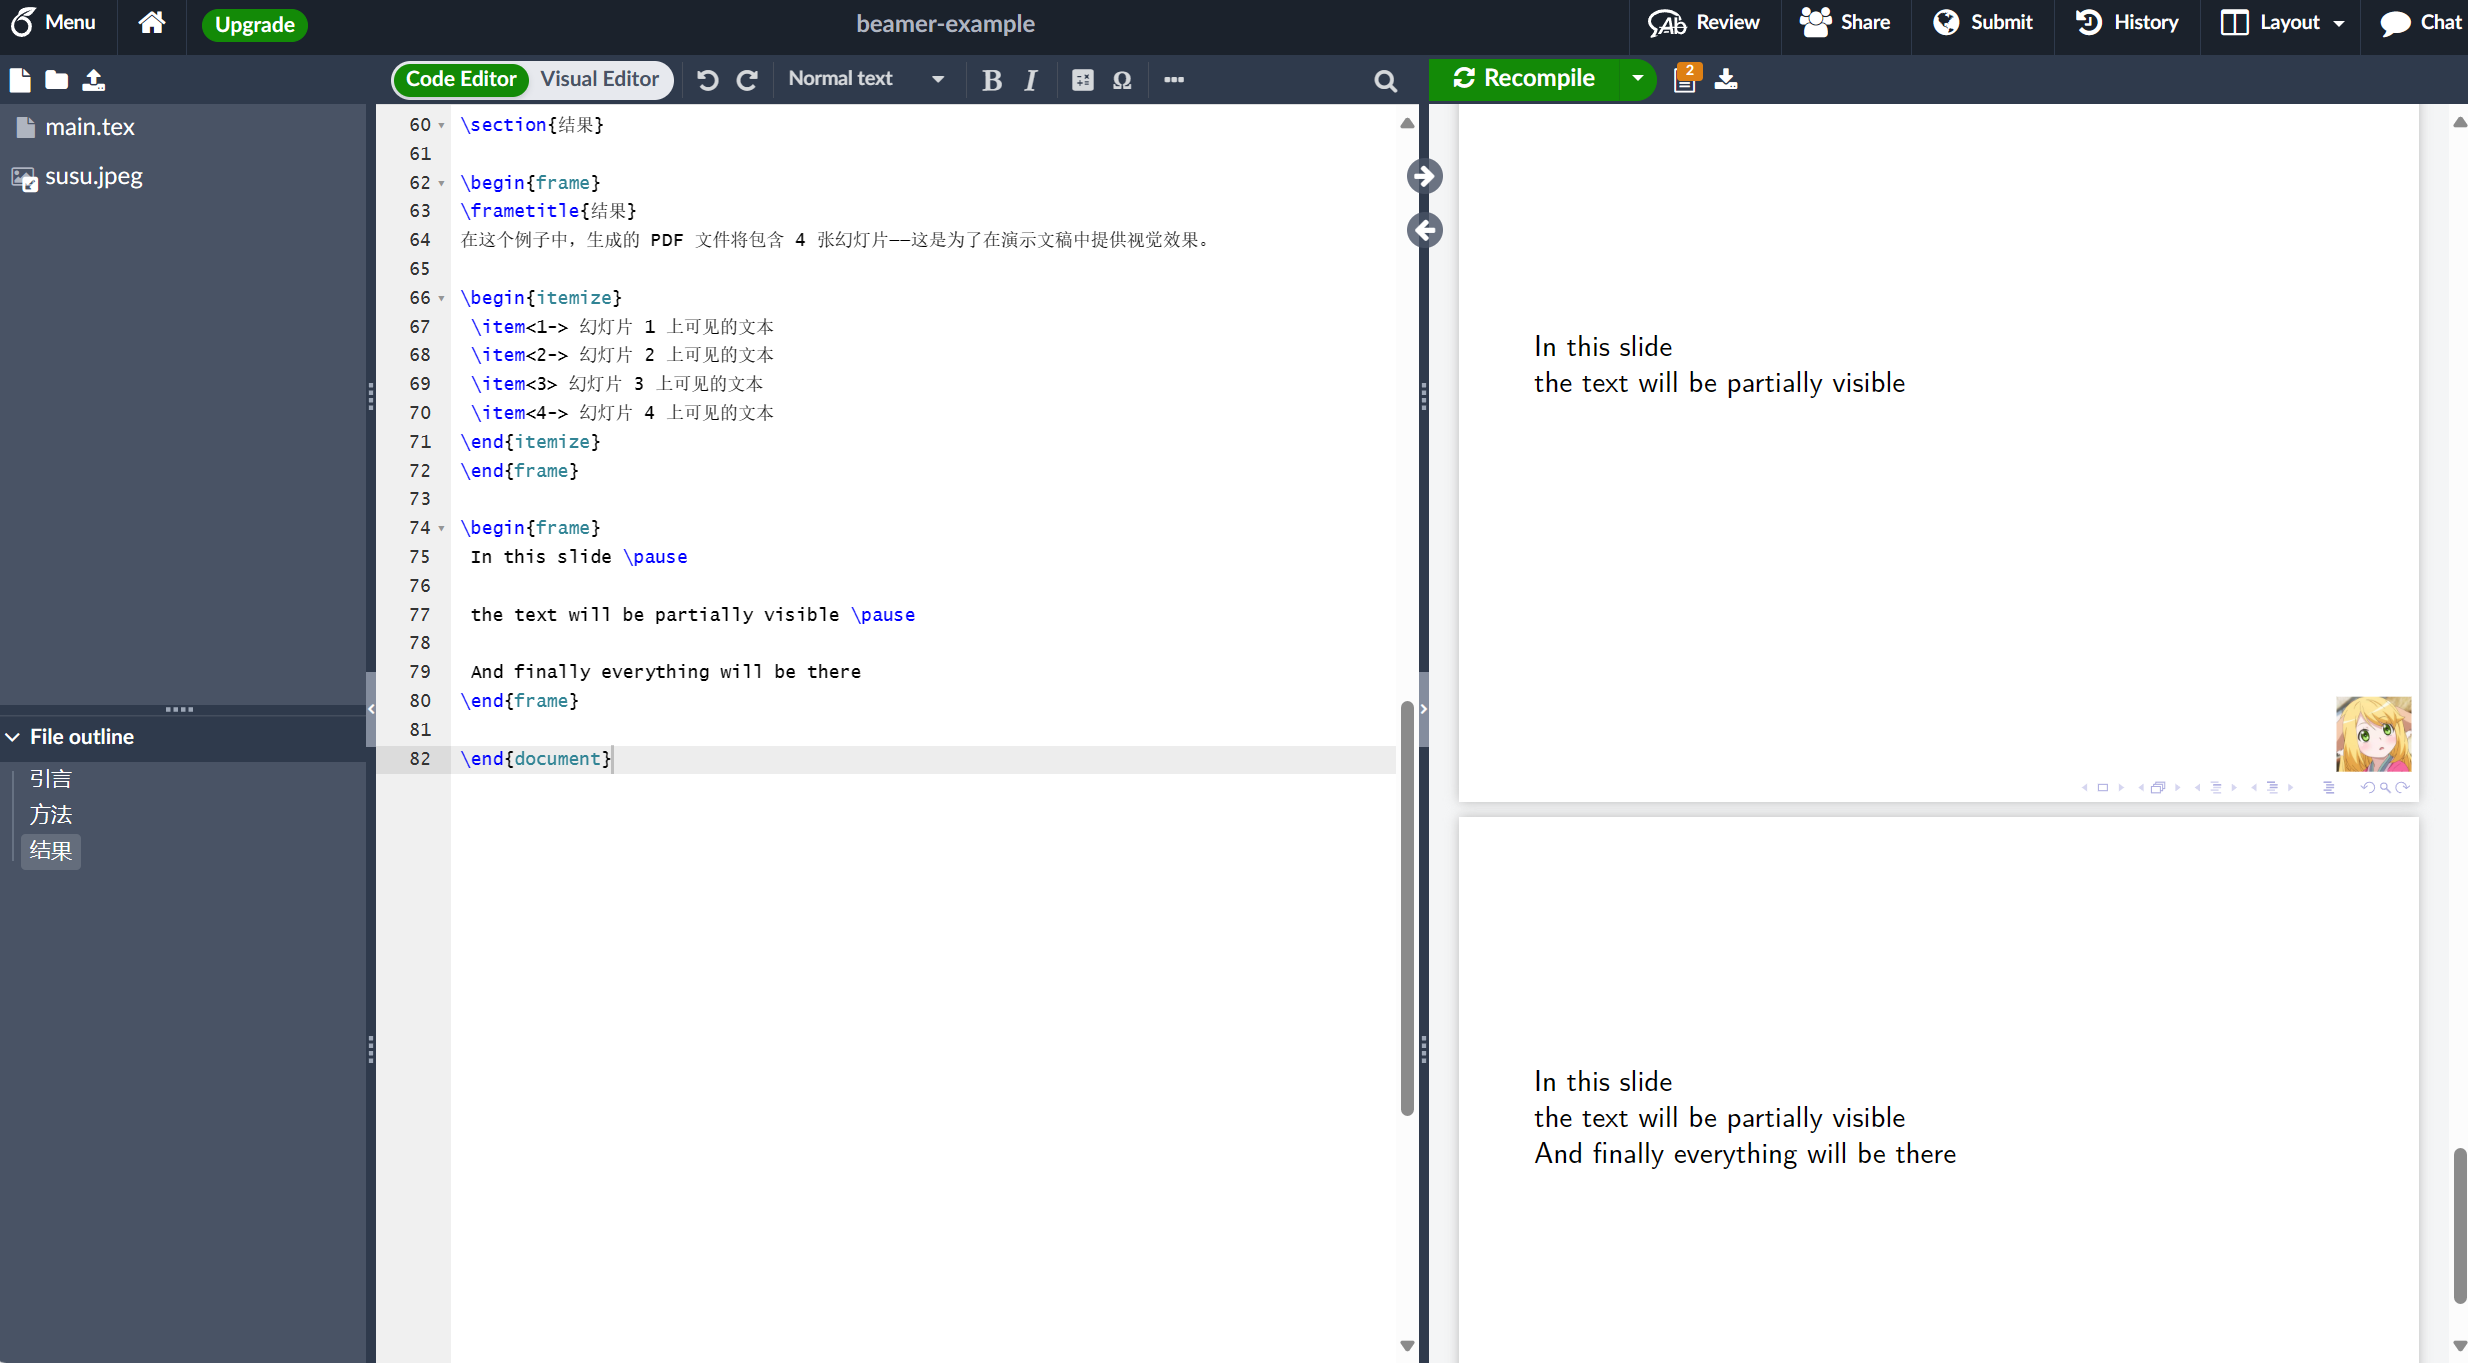
这些效果可以应用于任何类型的文本,而不仅仅是 itemize 环境。还有第二个命令的行为类似,但它更简单,因为您不必指定文本将显示的幻灯片。
1
2
3
4
5
6
7
8
9
10
11
12
13
14
15
16
17
18
19
20
21
22
23
24
25
26
27
28
29
30
31
32
33
34
35
36
37
38
39
40
41
42
43
44
45
46
47
48
49
50
51
52
53
54
55
56
57
58
59
60
61
62
63
64
65
66
67
68
69
70
71
72
73
74
75
76
77
78
79
80
81
82
\documentclass{beamer} \usepackage[UTF8]{ctex} %Information to be included in the title page: \title[关于 Beamer] %optional {关于演示文稿制作中的 Beamer 类} \subtitle{初识 Beamer} \author[LuYF, Doe] % (optional, for multiple authors) {LuYF-Lemon-love\inst{1} \and J.~Doe\inst{2}} \institute[CPU] % (optional) { \inst{1}% 数据科学系\\ 非常著名的大学 \and \inst{2}% 计算机系\\ 非常著名的大学 } \date[VLC 2024] % (optional) {Very Large Conference, May 2024} \logo{\includegraphics[height=1cm]{susu}} \AtBeginSection[] { \begin{frame} \frametitle{目录} \tableofcontents[currentsection] \end{frame} } \begin{document} \frame{\titlepage} % \begin{frame} % \frametitle{目录} % \tableofcontents % \end{frame} \section{引言} \begin{frame} \frametitle{引言} 这是第一帧中的一些文本。这是第一帧中的一些文本。这是第一帧中的一些文本。 \end{frame} \section{方法} \begin{frame} \frametitle{方法} 这是第二帧中的一些文本。这是第二帧中的一些文本。这是第二帧中的一些文本。 \end{frame} \section{结果} \begin{frame} \frametitle{结果} 在这个例子中,生成的 PDF 文件将包含 4 张幻灯片——这是为了在演示文稿中提供视觉效果。 \begin{itemize} \item<1-> 幻灯片 1 上可见的文本 \item<2-> 幻灯片 2 上可见的文本 \item<3> 幻灯片 3 上可见的文本 \item<4-> 幻灯片 4 上可见的文本 \end{itemize} \end{frame} + \begin{frame} + In this slide \pause + + the text will be partially visible \pause + + And finally everything will be there + \end{frame} \end{document}
此示例生成以下输出:
此代码将生成三张幻灯片,为演示文稿添加视觉效果。\pause 将阻止此点下方和下一个 \pause 声明上方的文本出现在当前幻灯片中。
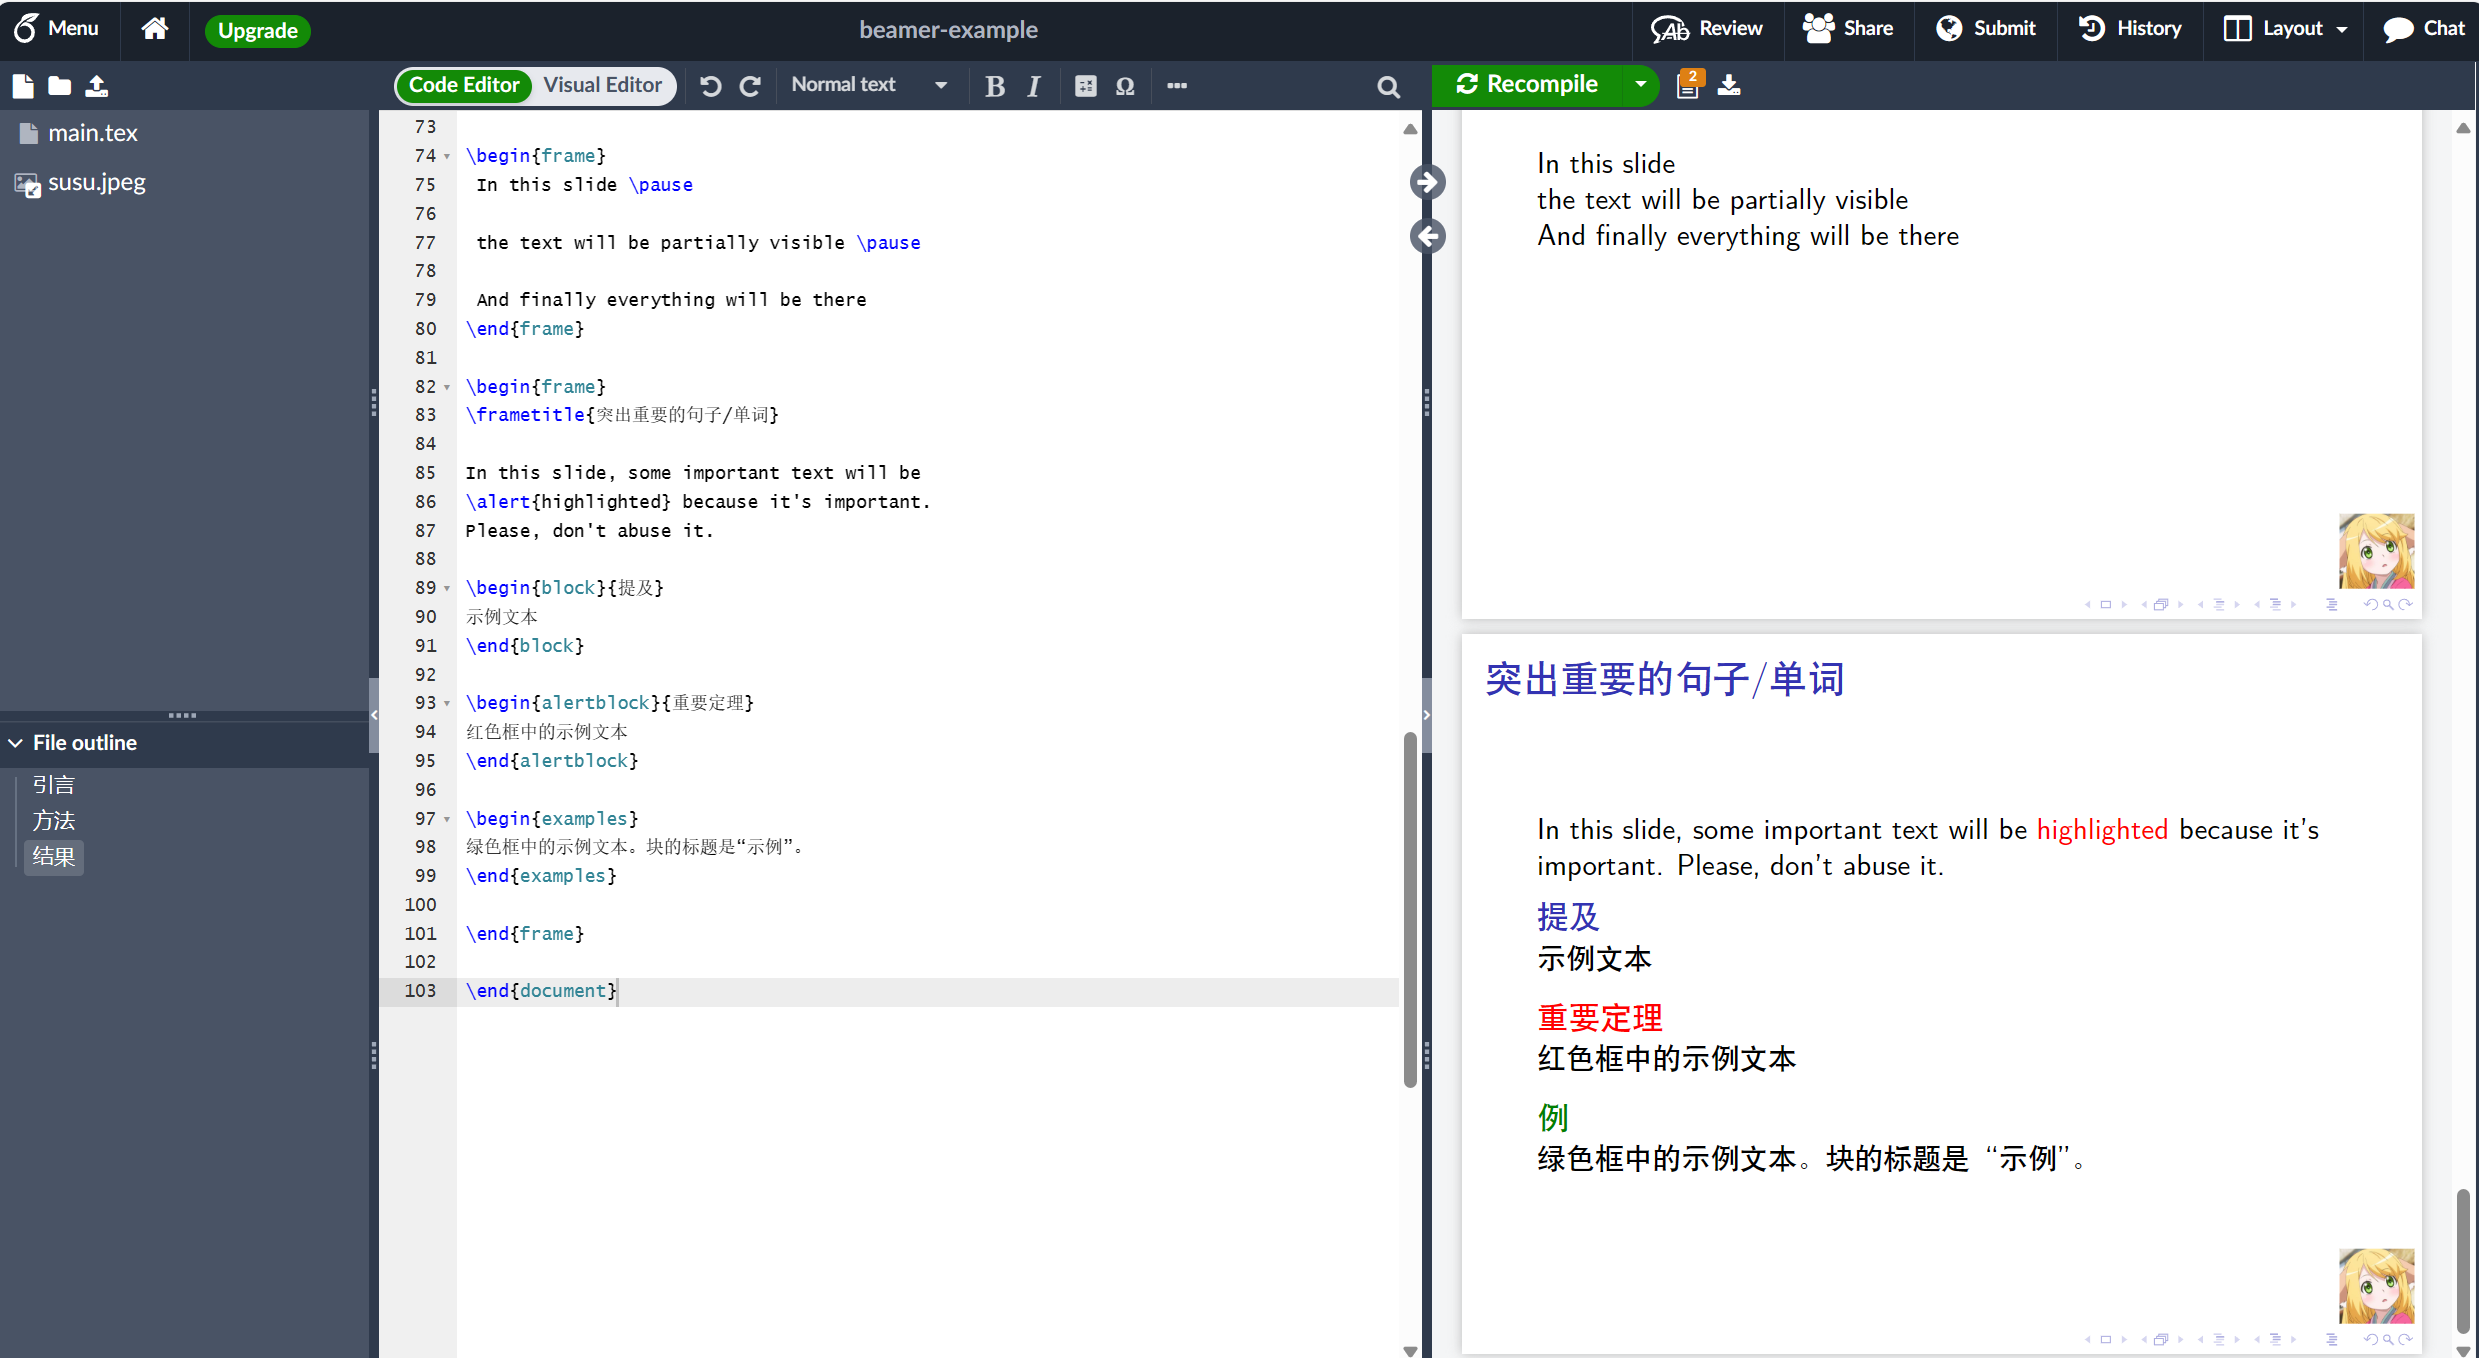
突出重要的句子/单词
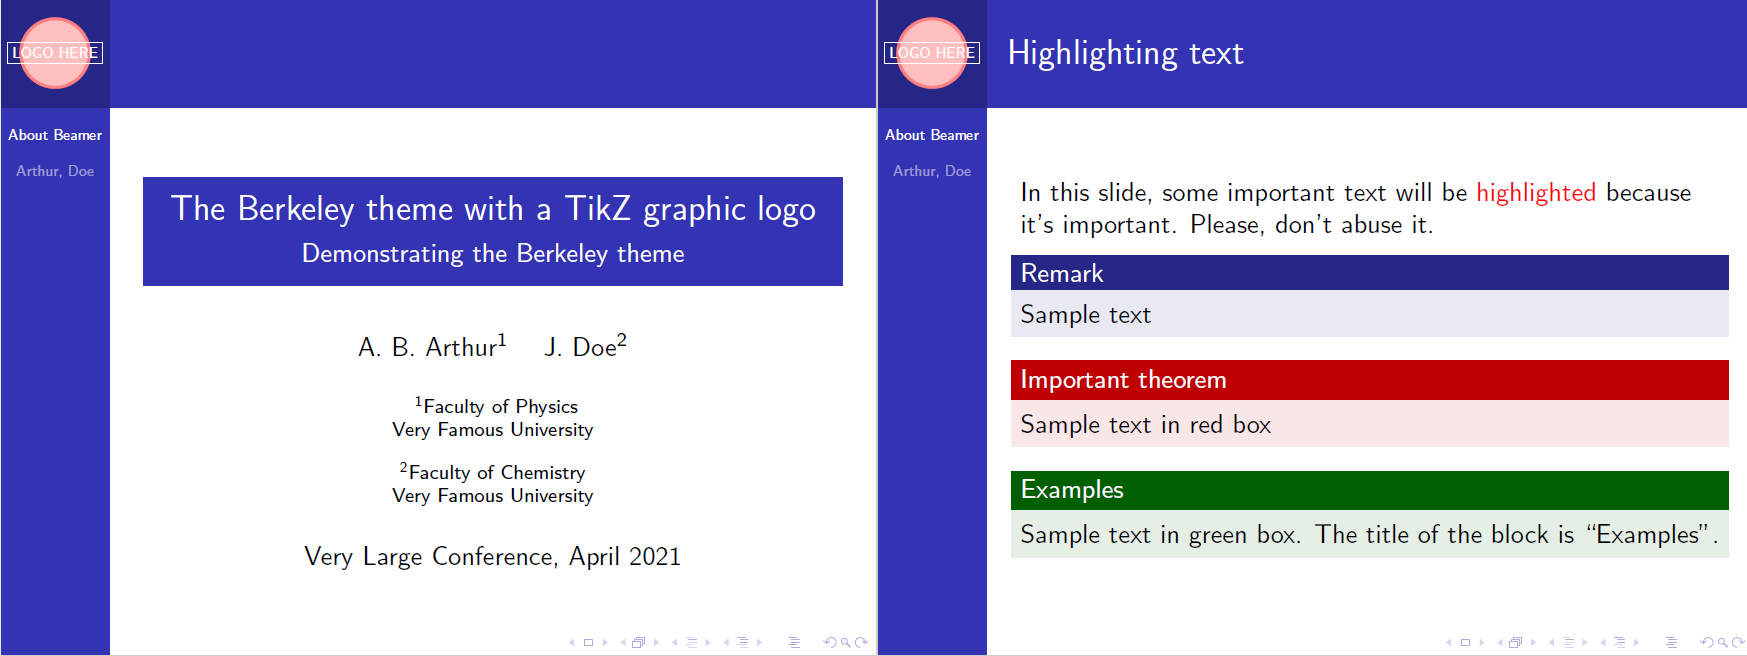
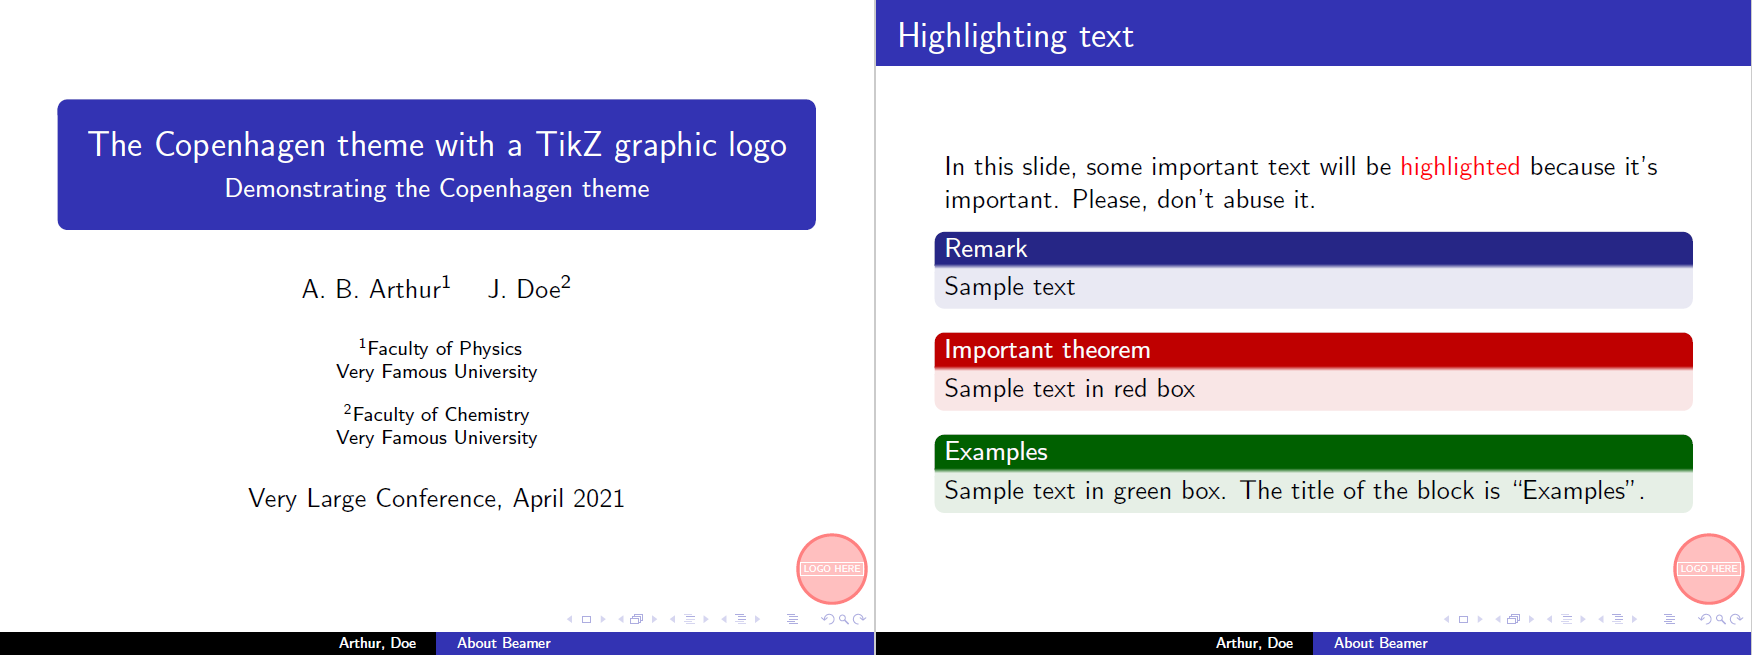
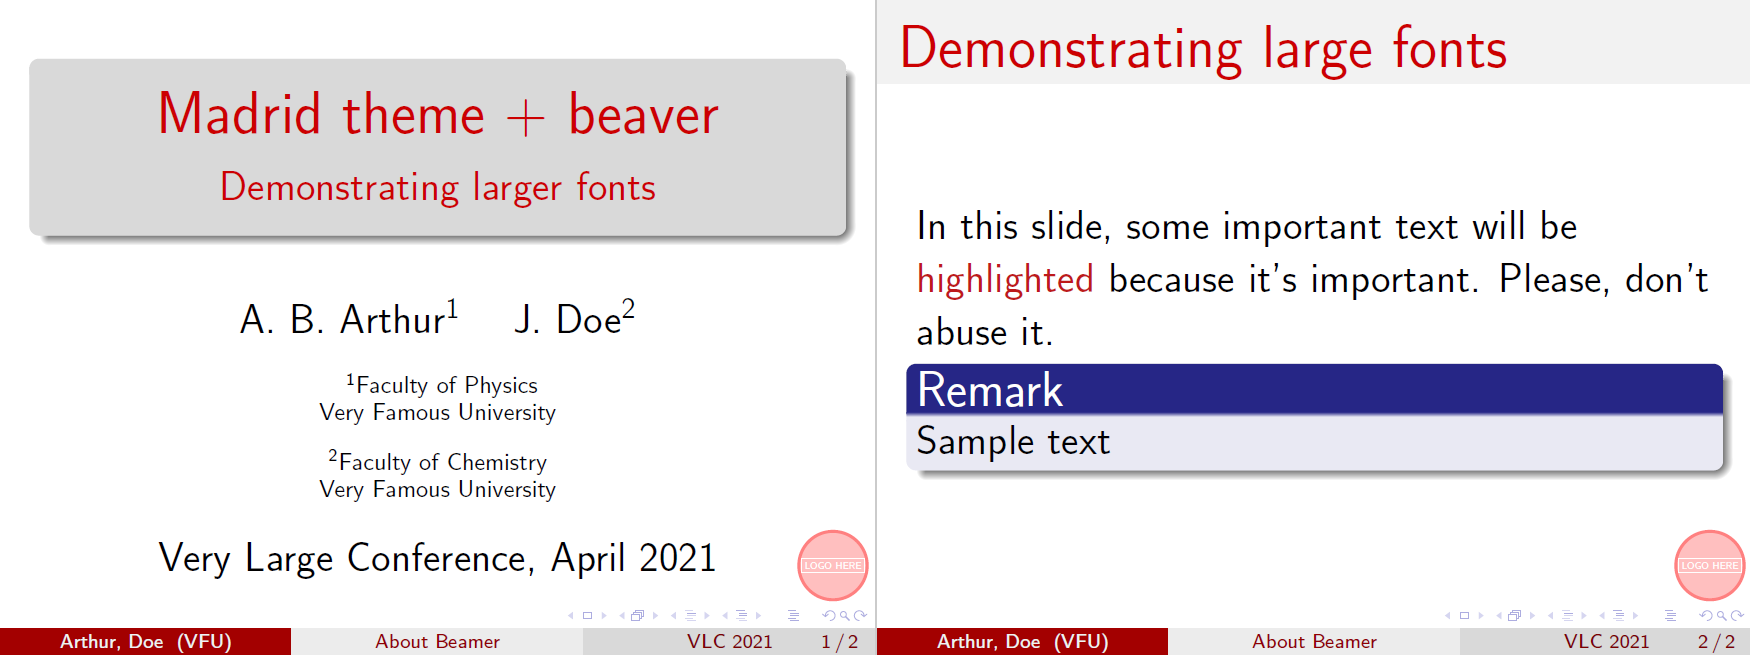
在演示文稿中突出重点是一个很好的做法,这样可以让你的听众更容易识别主要主题。
1
2
3
4
5
6
7
8
9
10
11
12
13
14
15
16
17
18
19
20
21
22
23
24
25
26
27
28
29
30
31
32
33
34
35
36
37
38
39
40
41
42
43
44
45
46
47
48
49
50
51
52
53
54
55
56
57
58
59
60
61
62
63
64
65
66
67
68
69
70
71
72
73
74
75
76
77
78
79
80
81
82
83
84
85
86
87
88
89
90
91
92
93
94
95
96
97
98
99
100
101
102
103
\documentclass{beamer} \usepackage[UTF8]{ctex} %Information to be included in the title page: \title[关于 Beamer] %optional {关于演示文稿制作中的 Beamer 类} \subtitle{初识 Beamer} \author[LuYF, Doe] % (optional, for multiple authors) {LuYF-Lemon-love\inst{1} \and J.~Doe\inst{2}} \institute[CPU] % (optional) { \inst{1}% 数据科学系\\ 非常著名的大学 \and \inst{2}% 计算机系\\ 非常著名的大学 } \date[VLC 2024] % (optional) {Very Large Conference, May 2024} \logo{\includegraphics[height=1cm]{susu}} \AtBeginSection[] { \begin{frame} \frametitle{目录} \tableofcontents[currentsection] \end{frame} } \begin{document} \frame{\titlepage} % \begin{frame} % \frametitle{目录} % \tableofcontents % \end{frame} \section{引言} \begin{frame} \frametitle{引言} 这是第一帧中的一些文本。这是第一帧中的一些文本。这是第一帧中的一些文本。 \end{frame} \section{方法} \begin{frame} \frametitle{方法} 这是第二帧中的一些文本。这是第二帧中的一些文本。这是第二帧中的一些文本。 \end{frame} \section{结果} \begin{frame} \frametitle{结果} 在这个例子中,生成的 PDF 文件将包含 4 张幻灯片——这是为了在演示文稿中提供视觉效果。 \begin{itemize} \item<1-> 幻灯片 1 上可见的文本 \item<2-> 幻灯片 2 上可见的文本 \item<3> 幻灯片 3 上可见的文本 \item<4-> 幻灯片 4 上可见的文本 \end{itemize} \end{frame} \begin{frame} In this slide \pause the text will be partially visible \pause And finally everything will be there \end{frame} + \begin{frame} + \frametitle{突出重要的句子/单词} + + In this slide, some important text will be + \alert{highlighted} because it's important. + Please, don't abuse it. + + \begin{block}{提及} + 示例文本 + \end{block} + + \begin{alertblock}{重要定理} + 红色框中的示例文本 + \end{alertblock} + + \begin{examples} + 绿色框中的示例文本。块的标题是“示例”。 + \end{examples} + + \end{frame} \end{document}
此示例生成以下输出:
如果要突出显示段落中的单词或短语,命令 \alert{} 将更改大括号内单词的样式。随附文本的外观取决于您使用的主题。
要突出包含概念、定义、定理或示例的段落,最好的选择是将其放在盒子里。盒子有三种类型,由您决定哪一种更适合您的演示文稿:
\begin{block}{提及} \end{block}: 块框将文本包装在一个与演示文稿其余部分样式相同的框中。\begin{block} 代码后大括号内的文本是框的标题。\begin{alertblock}{重要定理} \end{alertblock}: 与块相同,但样式与演示文稿使用的样式形成对比。\begin{examples} \end{examples}: 同样,与块非常相似,框具有不同的样式,但对比不如 alertblock。
自定义您的演示文稿
Beamer 演示文稿的某些方面可以轻松自定义。例如,您可以设置不同的主题、颜色并将默认文本布局更改为两列格式。
主题和颜色主题
在幻灯片中使用不同的主题真的很容易。例如,Madrid 主题(本文中的大多数幻灯片都使用这个主题)是通过在序言中添加以下命令来设置的:
此示例生成以下输出:
下面是另外两个例子。
Berkeley 主题
Copenhagen 主题
使用颜色主题
主题可以与颜色主题相结合,以更改用于不同元素的颜色。
1
2
\usetheme {Madrid}\usecolortheme {beaver}
此示例生成以下输出:
必须将 \usecolortheme 语句放在 \usetheme 命令下方。对于各种选项,请查看下面参考指南 中不同主题和颜色主题的屏幕截图表。
字体
您可以更改有关字体的几个参数。在这里,我们将提到如何调整它们的大小并更改使用的字体类型。
字体大小
字体大小,这里是 17pt,可以作为参数传递给文档序言开头的 beamer 类:\documentclass[17pt]{beamer}。下面的示例显示了使用17pt font-size选项的结果:
1
2
3
4
5
6
7
8
9
10
11
12
13
14
15
16
17
18
19
20
21
22
23
24
25
26
27
28
29
30
31
32
33
34
35
36
37
38
39
40
41
42
43
44
45
\documentclass [17pt]{beamer}\usepackage {tikz}\usetheme {Madrid}\usecolortheme {beaver}\title [About Beamer] {Madrid theme + beaver} \subtitle {Demonstrating larger fonts}\author [Arthur, Doe] {A.~B.~Arthur\inst {1} \and J.~Doe\inst {2}} \institute [VFU] { \inst {1} Faculty of Physics\\ Very Famous University \and \inst {2} Faculty of Chemistry\\ Very Famous University } \date [VLC 2021] {Very Large Conference, April 2021} \logo {\begin {tikzpicture}\filldraw [color=red!50, fill=red!25, very thick](0,0) circle (0.5);\node [draw,color=white] at (0,0) {LOGO HERE};\end {tikzpicture}}\begin {document}\frame {\titlepage }\begin {frame}\frametitle {Demonstrating large fonts}In this slide, some important text will be \alert {highlighted} because it's important.Please, don't abuse it. \begin {block}{Remark}Sample text \end {block}\end {frame}\end {document}
此示例生成以下输出:
可用字体大小为 8pt、9pt、10pt、11pt、12pt、14pt、17pt、20pt。默认字体大小为 11pt(在全屏模式下对应于 22pt)。
字体类型
要更改 beamer 演示文稿中的字体类型,有两种方法,要么使用字体主题,要么直接从系统导入字体。让我们从字体主题开始:
1
2
\usefonttheme {structuresmallcapsserif}\usetheme {Madrid}
此示例生成以下输出:
\usefonttheme{} 是自描述的。可用的主题有:structurebold、structurebolditalic、structuresmallcapsserif、structureitalicsserif、serif 和 default。
您还可以导入系统中安装的字体系列。
1
2
\usepackage {bookman}\usetheme {Madrid}
此示例生成以下输出:
命令 \usepackage{bookman} 导入演示文稿中使用的 bookman 系列字体。可用字体取决于您的 LaTeX 安装,最常见的有:mathptmx、helvet、avat、bookman、chancery、charter、culer、mathtime、mathptm、newcent、palatino 和 pifont.
列
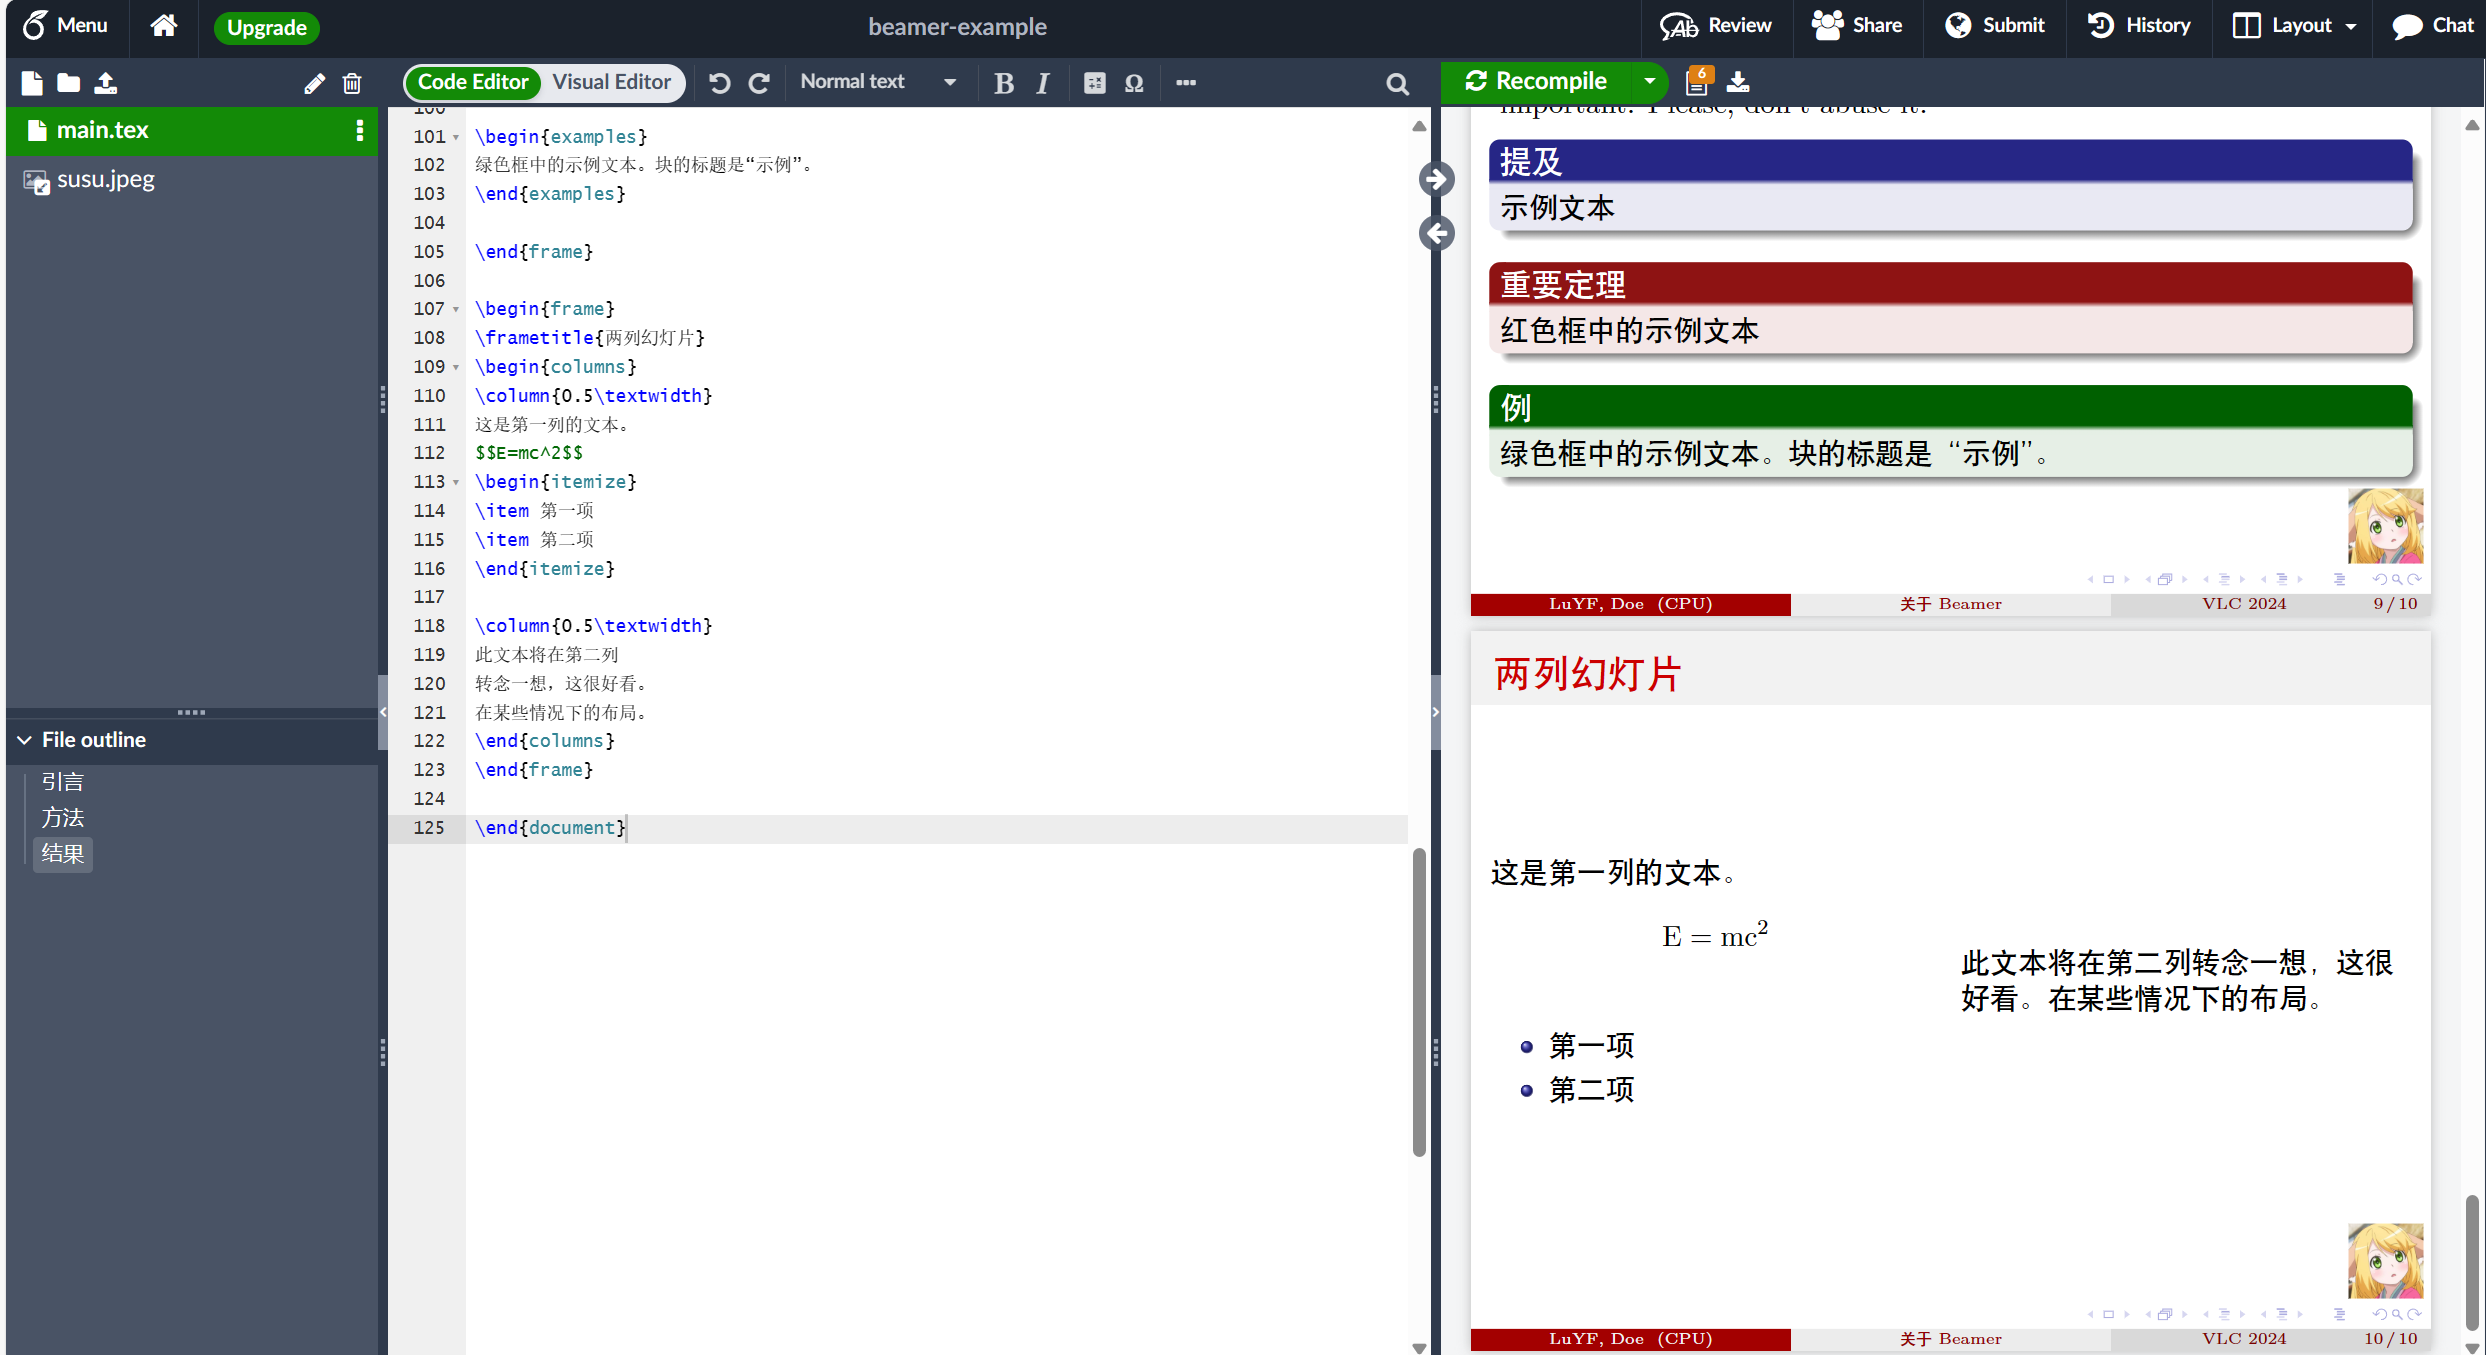
有时,演示文稿中的信息以两列格式看起来更好。在这种情况下,使用列环境:
1
2
3
4
5
6
7
8
9
10
11
12
13
14
15
16
17
18
19
20
21
22
23
24
25
26
27
28
29
30
31
32
33
34
35
36
37
38
39
40
41
42
43
44
45
46
47
48
49
50
51
52
53
54
55
56
57
58
59
60
61
62
63
64
65
66
67
68
69
70
71
72
73
74
75
76
77
78
79
80
81
82
83
84
85
86
87
88
89
90
91
92
93
94
95
96
97
98
99
100
101
102
103
104
105
106
107
108
109
110
111
112
113
114
115
116
117
118
119
120
121
122
123
124
125
\documentclass{beamer} \usepackage[UTF8]{ctex} % \usefonttheme{structuresmallcapsserif} \usepackage{bookman} \usetheme{Madrid} \usecolortheme{beaver} %Information to be included in the title page: \title[关于 Beamer] %optional {关于演示文稿制作中的 Beamer 类} \subtitle{初识 Beamer} \author[LuYF, Doe] % (optional, for multiple authors) {LuYF-Lemon-love\inst{1} \and J.~Doe\inst{2}} \institute[CPU] % (optional) { \inst{1}% 数据科学系\\ 非常著名的大学 \and \inst{2}% 计算机系\\ 非常著名的大学 } \date[VLC 2024] % (optional) {Very Large Conference, May 2024} \logo{\includegraphics[height=1cm]{susu}} \AtBeginSection[] { \begin{frame} \frametitle{目录} \tableofcontents[currentsection] \end{frame} } \begin{document} \frame{\titlepage} % \begin{frame} % \frametitle{目录} % \tableofcontents % \end{frame} \section{引言} \begin{frame} \frametitle{引言} 这是第一帧中的一些文本。这是第一帧中的一些文本。这是第一帧中的一些文本。 \end{frame} \section{方法} \begin{frame} \frametitle{方法} 这是第二帧中的一些文本。这是第二帧中的一些文本。这是第二帧中的一些文本。 \end{frame} \section{结果} \begin{frame} \frametitle{结果} 在这个例子中,生成的 PDF 文件将包含 4 张幻灯片——这是为了在演示文稿中提供视觉效果。 \begin{itemize} \item<1-> 幻灯片 1 上可见的文本 \item<2-> 幻灯片 2 上可见的文本 \item<3> 幻灯片 3 上可见的文本 \item<4-> 幻灯片 4 上可见的文本 \end{itemize} \end{frame} \begin{frame} In this slide \pause the text will be partially visible \pause And finally everything will be there \end{frame} \begin{frame} \frametitle{突出重要的句子/单词} In this slide, some important text will be \alert{highlighted} because it's important. Please, don't abuse it. \begin{block}{提及} 示例文本 \end{block} \begin{alertblock}{重要定理} 红色框中的示例文本 \end{alertblock} \begin{examples} 绿色框中的示例文本。块的标题是“示例”。 \end{examples} \end{frame} + \begin{frame} + \frametitle{两列幻灯片} + \begin{columns} + \column{0.5\textwidth} + 这是第一列的文本。 + $$E=mc^2$$ + \begin{itemize} + \item 第一项 + \item 第二项 + \end{itemize} + + \column{0.5\textwidth} + 此文本将在第二列 + 转念一想,这很好看。 + 在某些情况下的布局。 + \end{columns} + \end{frame} \end{document}
此示例生成以下输出:
在 frame 和 frametitle 声明后,启动了一个由 \begin{columns} \end{columns} 分隔的新列环境。您可以使用 \column{0.5\textwidth} 代码声明每列的宽度,较低的数字将缩小宽度大小。
进一步阅读
有关详细信息,请参阅此处的完整包文档 。以下资源也可能有用:
结语
第一百一十五篇博文写完,开心!!!!
今天,也是充满希望的一天。


 wechat
 alipay