前言
初识 LaTex,主要集中于基础语法知识。
Overleaf: https://www.overleaf.com/
Write like a rocket scientist with Overleaf — the collaborative, online LaTeX editor that anyone can use.
操作系统:Ubuntu 22.04.2 LTS
注册登录 Overleaf
- 打开 Overleaf 官网,注册并登录。

为什么选择 LaTex?
原教程地址: https://www.overleaf.com/about/why-latex
主要是因为能够更好地进行科技写作。
LaTeX 是一个强大的排版系统,可以处理格式,以便您可以专注于您的内容。
LaTeX 是什么?
LaTeX 是一种让任何人都可以创建排版精美的文档的工具。
- 将您的内容与格式分开: 与 Microsoft Word 或 Google Docs 等文档编辑器不同,LaTeX 将编写内容的过程与格式化内容的过程分开。这意味着一旦您编写了内容,就很容易更改其外观。
- 从纯文本到精美的PDF: 您编写一个穿插着 LaTeX 命令的纯文本文件。这些命令告诉一个名为 TeX 引擎的软件如何格式化和排版文档以生成精美的排版 PDF。
- 无需代码即可获得 LaTeX 的好处: 在 Overleaf 中,您可以使用我们的代码编辑器或可视化编辑器。无论您选择哪一种,效果都是一样的——您编写内容,Overleaf 和 LaTeX 负责格式化。
LaTeX 特色
为复杂文档编写更快、更简单的文档。
- 轻松处理数学、表格和技术内容: 由于其一系列软件包,LaTeX 可以排版其他文档编辑器难以处理的极其复杂的数学、图形、表格和技术内容。
- 漂亮的格式和大量的模板: LaTeX 将您的纯文本内容转化为有组织、呈现良好且美观的文档。因为有这样一个专门的用户社区,有成千上万的模板可供您选择。
- 更好的书目、参考文献和引文: LaTeX 使您能够创建有序的、高度可定制的参考书目。它还允许您标记任何您想在以后用于引用或作为参考的信息。
- 高度可定制: 借助 LaTeX 的数千个免费附加包,您可以生成独特的定制文档,而自信的程序员甚至可以创建自己的文档。
Overleaf 和 LaTex
Overleaf 是 LaTeX,简化。您可以协作处理文档,无需下载或安装,您可以选择使用 LaTeX 代码还是 Overleaf 的可视化编辑器。
- 可视化编辑器: 可视化编辑器让您无需编写代码即可使用 LaTeX。只需单击几下按钮即可插入表格和图形。
- 无缝协作: 不再有电子邮件反馈和无穷无尽的文档版本。相反,直接在您的 LaTeX 项目中获取评论、共享、实时跟踪更改和文档历史记录。
- 在任何地方工作: Overleaf 生活在云中,因此无需担心下载或安装。借助对移动和平板设备的支持,您甚至可以随身携带。
从初学者到 TeXpert
学习 LaTeX 一开始会让人望而生畏,但有很多资源可以帮助您入门。
- 模板: 从我们画廊的数千个免费模板中挑选-从研究文章到简历,等等。
- 示例项目: 通过我们的示例项目学习,该项目将引导您了解 LaTeX 基础知识。
- 可视化编辑器: 使用托管用户帐户和单点登录选项,您可以控制项目和用户访问。
- 30 分钟学习 LaTeX: 在我们的分步介绍中了解如何开始您的第一个文档并掌握 LaTeX 基础知识。
- 网络研讨会: 通过注册我们的现场介绍网络研讨会(或按需观看以前的研讨会),直接从我们的 TeXpert 支持团队获得支持。
- 更多资源: 发现数百篇帮助和学习文章、教程等。
30 分钟学习 LaTeX
原教程地址:https://www.overleaf.com/learn/latex/Learn_LaTeX_in_30_minutes
本入门教程不假设您以前有任何 LaTeX 经验,但希望在您完成时,您不仅已经编写了您的第一个 LaTeX 文档,而且还获得了足够的知识和信心来采取下一步的 LaTeX 熟练程度。
什么是 LaTeX ?
LaTeX(发音为“LAY-tek”或“LAH-tek”)是一种用于排版 professional-looking 文档的工具。然而,LaTeX 的操作模式与您可能使用过的许多其他文档制作应用程序(如 Microsoft Word 或 LibreOffice Writer)完全不同:这些“所见即所得”工具为用户提供了一个交互式页面,用户可以在其中键入和编辑文本,并应用各种形式的样式。LaTeX 的工作方式非常不同:相反,您的文档是一个纯文本文件,其中散布着用于表达所需(排版)结果的 LaTeX 命令。要生成可见的排版文档,您的 LaTeX 文件由称为 TeX 引擎的软件处理,该软件使用嵌入在文本文件中的命令来指导和控制排版过程,将 LaTeX 命令和文档文本转换为专业排版的 PDF 文件。这意味着您只需要专注于文档的内容,计算机将通过 LaTeX 命令和 TeX 引擎处理视觉外观(格式化)。
为什么要学习 LaTeX ?
对于学习使用 LaTeX 而不是其他文档创作应用程序,可以提出各种支持或反对意见;但最终,这是基于偏好、亲和力和留档要求的个人选择。
支持 LaTeX 的论点包括:
- 支持为物理科学排版极其复杂的数学、表格和技术内容;
- 脚注、交叉引用和参考书目管理的设施;
- 易于生成复杂或乏味的文档元素,例如索引、词汇表、目录、图形列表;
- 由于其通过数千个免费附加包的内在可编程性和可扩展性,可高度定制定制文档生产。
总的来说,LaTeX 为用户提供了对排版达到极高标准的文档生产的大量控制。当然,有些类型的文档或出版物没有 LaTeX 的光芒,包括杂志类型出版物中常见的许多“自由格式”页面设计。
LaTeX 的一个重要好处是将文档内容与文档样式分开:一旦您编写了文档的内容,就可以轻松更改其外观。 同样,您可以创建一个 LaTeX 文件,该文件定义了特定文档类型的布局/样式,并且该文件可以用作模板来标准化该类型的其他文档的作者身份/制作;例如,这允许科学出版商在 LaTeX 中创建文章模板,作者使用该模板编写论文以提交给期刊。Overleaf 有一个包含数千个模板的画廊,涵盖了大量的文档类型——从科学文章、报告和书籍到简历和演示文稿。因为这些模板定义了文档的布局和风格,作者只需要在 Overleaf 打开它们——创建一个新项目——并开始写作来添加他们的内容。
写你的第一块 LaTeX
第一步是创建一个新的 LaTeX 项目。您可以通过创建一个新的 .tex 文件在自己的计算机上执行此操作;或者,您可以在 Overleaf 中启动一个新项目。
让我们从最简单的工作示例开始,它可以直接在 Overleaf 中打开:
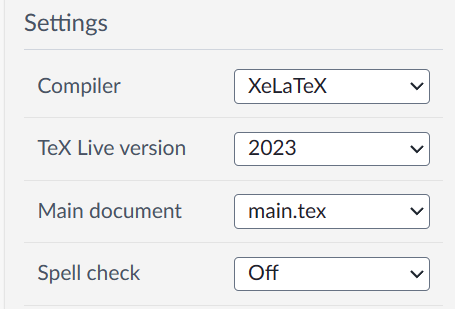
关于如何编译中文 (中文需要引用额外包,编译器选择
XeLaTeX),可以参考下面篇博文:请将拼写检查(Spell check)设置为
off。
\documentclass{article}

% 中文编译需要 ctex 或 xeCJK 包
\usepackage[UTF8]{ctex}
% \usepackage{xeCJK}

\begin{document}
First document. This is a simple example, with no
extra parameters or packages included.

第一个文档。这是一个简单的例子,没有
包括额外的参数或包。
\end{document}
此示例生成以下输出:

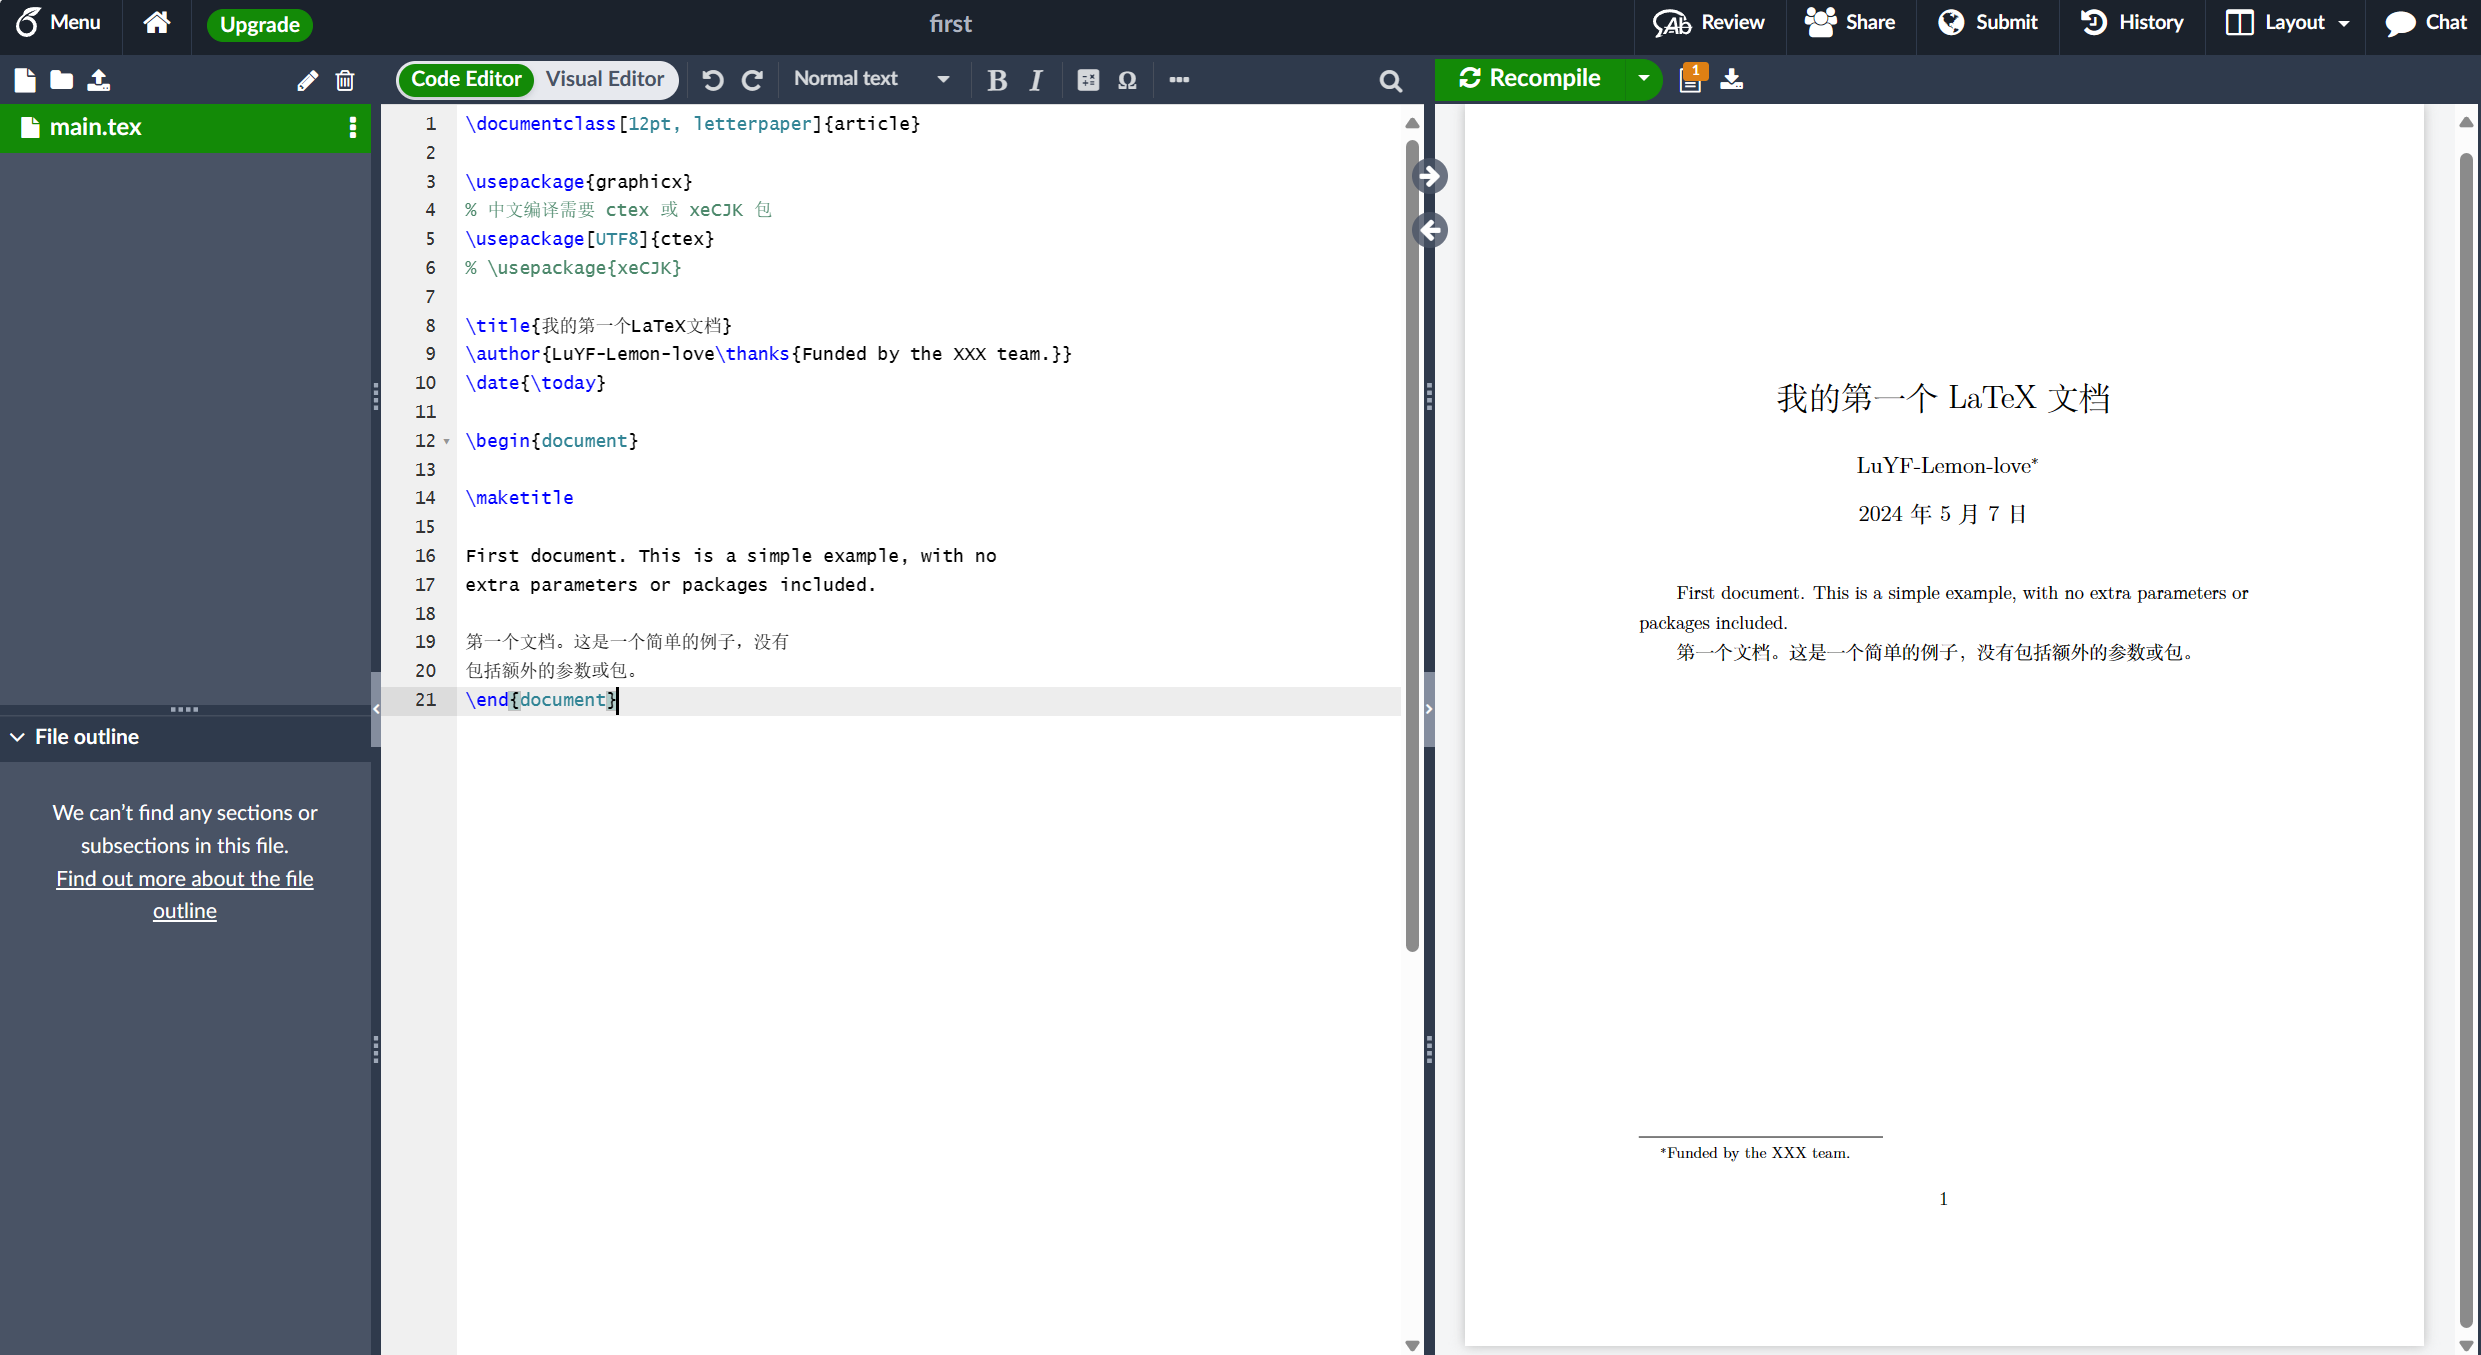
您可以看到 LaTeX 自动缩进了段落的第一行,并为您处理了格式。让我们仔细看看我们代码的每个部分都做了什么。
第一行代码 \documentclass{article} 声明了称为类的文档类型,它控制文档的整体外观。 不同类型的文档需要不同的类;也就是说,CV/resume 需要不同于可能使用标准 LaTeX article 类的科学论文的类。您可能正在处理的其他类型的文档可能需要不同的类,例如 book 或 report。要了解许多可用的LaTeX类类型,请访问CTAN(综合TeX存档网络)上的相关页面。
设置文档类后,我们的内容(称为文档正文)写在 \start{document} 和 \end{document} 标记之间。 打开上面的示例后,您可以对文本进行更改,完成后,通过重新编译文档来查看生成的排版 PDF。要在 Overleaf 中执行此操作,只需点击重新编译。
任何 Overleaf 项目都可以配置为每次编辑时自动重新编译:单击重新编译按钮旁边的小箭头并将自动编译设置为打开。
已经了解了如何向我们的文档添加内容,下一步是给它一个标题。为此,我们必须简要谈谈序言。
文档的序言
上面的屏幕截图显示 Overleaf 将 LaTeX 文档存储为名为 main.tex 的文件:按照惯例,在命名包含文档 LaTeX 代码的文件时使用 .tex 文件扩展名。
前面的示例显示了如何在 \begin{document} 命令之后输入文档内容;但是,在该点之前出现的 .tex 文件中的所有内容都称为序言,它充当文档的“设置”部分。 在序言中,您定义文档类(类型)以及编写文档时使用的语言等细节;加载您想要使用的包(稍后会详细介绍),这是您应用其他类型配置的地方。
最小的文档序言可能如下所示:
+ \documentclass[12pt, letterpaper]{article}
+ \usepackage{graphicx}

% 中文编译需要 ctex 或 xeCJK 包
\usepackage[UTF8]{ctex}
% \usepackage{xeCJK}

\begin{document}
First document. This is a simple example, with no
extra parameters or packages included.

第一个文档。这是一个简单的例子,没有
包括额外的参数或包。
\end{document}
其中 \documentclass[12pt, letterpaper]{article} 定义文档的整体类(类型)。必须用逗号分隔的其他参数包含在方括号([…])中,用于配置文章类的这个实例;即我们希望用于这个特定的基于文章类的文档的设置。
在此示例中,这两个参数执行以下操作:
- 12pt 设置字体大小
- letterpaper 设置纸张尺寸
当然可以使用其他字体大小,9pt、11pt、12pt,但如果没有指定,则默认大小为 10pt。至于纸张尺寸,其他可能的值是 a4paper 和 legalpaper。有关详细信息,请参阅有关页面大小和边距的文章。
序言行 \usepackage{graphicx} 是加载外部包(此处为graphicx)以扩展 LaTeX 功能的示例,使其能够导入外部图形文件。
包括标题、作者和日期信息
在我们的文档中添加标题、作者和日期需要在序言中再添加三行(不是文档的主体)。这些行是:
\title{我的第一个LaTeX文档}: 文档标题\author{LuYF-Lemon-love}: 在这里,您可以在花括号中写入作者的名称和可选的\thanks命令:\thanks{Funded by the XXX team.}: 可以在作者姓名后,在author命令的大括号内添加。它将在大括号内添加一个上标和一个脚注。如果你需要在你的文章中感谢一个机构,这很有用。
\date{May 2024}: 您可以手动输入日期或使用命令\today在每次编译文档时排版当前日期
添加这些行后,您的序言应如下所示:
\documentclass[12pt, letterpaper]{article}

\usepackage{graphicx}
% 中文编译需要 ctex 或 xeCJK 包
\usepackage[UTF8]{ctex}
% \usepackage{xeCJK}

\title{我的第一个LaTeX文档}
\author{LuYF-Lemon-love\thanks{Funded by the XXX team.}}
\date{\today}
要排版标题、作者和日期,请在文档正文中使用 \maketitle 命令,序言和正文现在可以结合起来生成一个完整的文件:
\documentclass[12pt, letterpaper]{article}

\usepackage{graphicx}
% 中文编译需要 ctex 或 xeCJK 包
\usepackage[UTF8]{ctex}
% \usepackage{xeCJK}

\title{我的第一个LaTeX文档}
\author{LuYF-Lemon-love\thanks{Funded by the XXX team.}}
\date{\today}

\begin{document}

\maketitle

First document. This is a simple example, with no
extra parameters or packages included.

第一个文档。这是一个简单的例子,没有
包括额外的参数或包。
\end{document}
此示例生成以下输出:
添加注释
LaTeX是一种“程序代码”形式,但专门用于文档排版;因此,与用任何其他编程语言编写的代码一样,在文档中包含注释非常有用。LaTeX注释是一段不会以任何方式排版或影响文档的文本——通常用于添加“待办事项”注释;包括解释性注释;在调试时提供复杂宏的内联解释或 LaTeX 代码的注释 lines/sections。
要在 LaTeX 中进行注释,只需在行首编写一个 % 符号,如下面使用上面示例的代码所示:
\documentclass[12pt, letterpaper]{article}

\usepackage{graphicx}
% 中文编译需要 ctex 或 xeCJK 包
\usepackage[UTF8]{ctex}
% \usepackage{xeCJK}

\title{我的第一个LaTeX文档}
\author{LuYF-Lemon-love\thanks{Funded by the XXX team.}}
\date{\today}

\begin{document}

\maketitle

First document. This is a simple example, with no
extra parameters or packages included.

第一个文档。这是一个简单的例子,没有
包括额外的参数或包。

+ % 这里的这一行是注释。它不会在文档中排版。

\end{document}
此示例生成的输出与之前不包含注释的 LaTeX 代码相同。
粗体、斜体和下划线
接下来,我们现在来看一些文本格式命令:
- 粗体:LaTeX 中的粗体文本使用
\textbf{...}命令排版。 - 斜体:使用
\textit{...}命令生成斜体文本。 - 下划线:使用
\underline{…}命令为文本下划线。
下一个示例演示了这些命令:
\documentclass[12pt, letterpaper]{article}

\usepackage{graphicx}
% 中文编译需要 ctex 或 xeCJK 包
\usepackage[UTF8]{ctex}
% \usepackage{xeCJK}

\title{我的第一个LaTeX文档}
\author{LuYF-Lemon-love\thanks{Funded by the XXX team.}}
\date{\today}

\begin{document}

\maketitle

First document. This is a simple example, with no
extra parameters or packages included.

第一个文档。这是一个简单的例子,没有
包括额外的参数或包。

% 这里的这一行是注释。它不会在文档中排版。

+ Some of the \textbf{greatest}
+ discoveries in \underline{science}
+ were made by \textbf{\textit{accident}}.

\end{document}
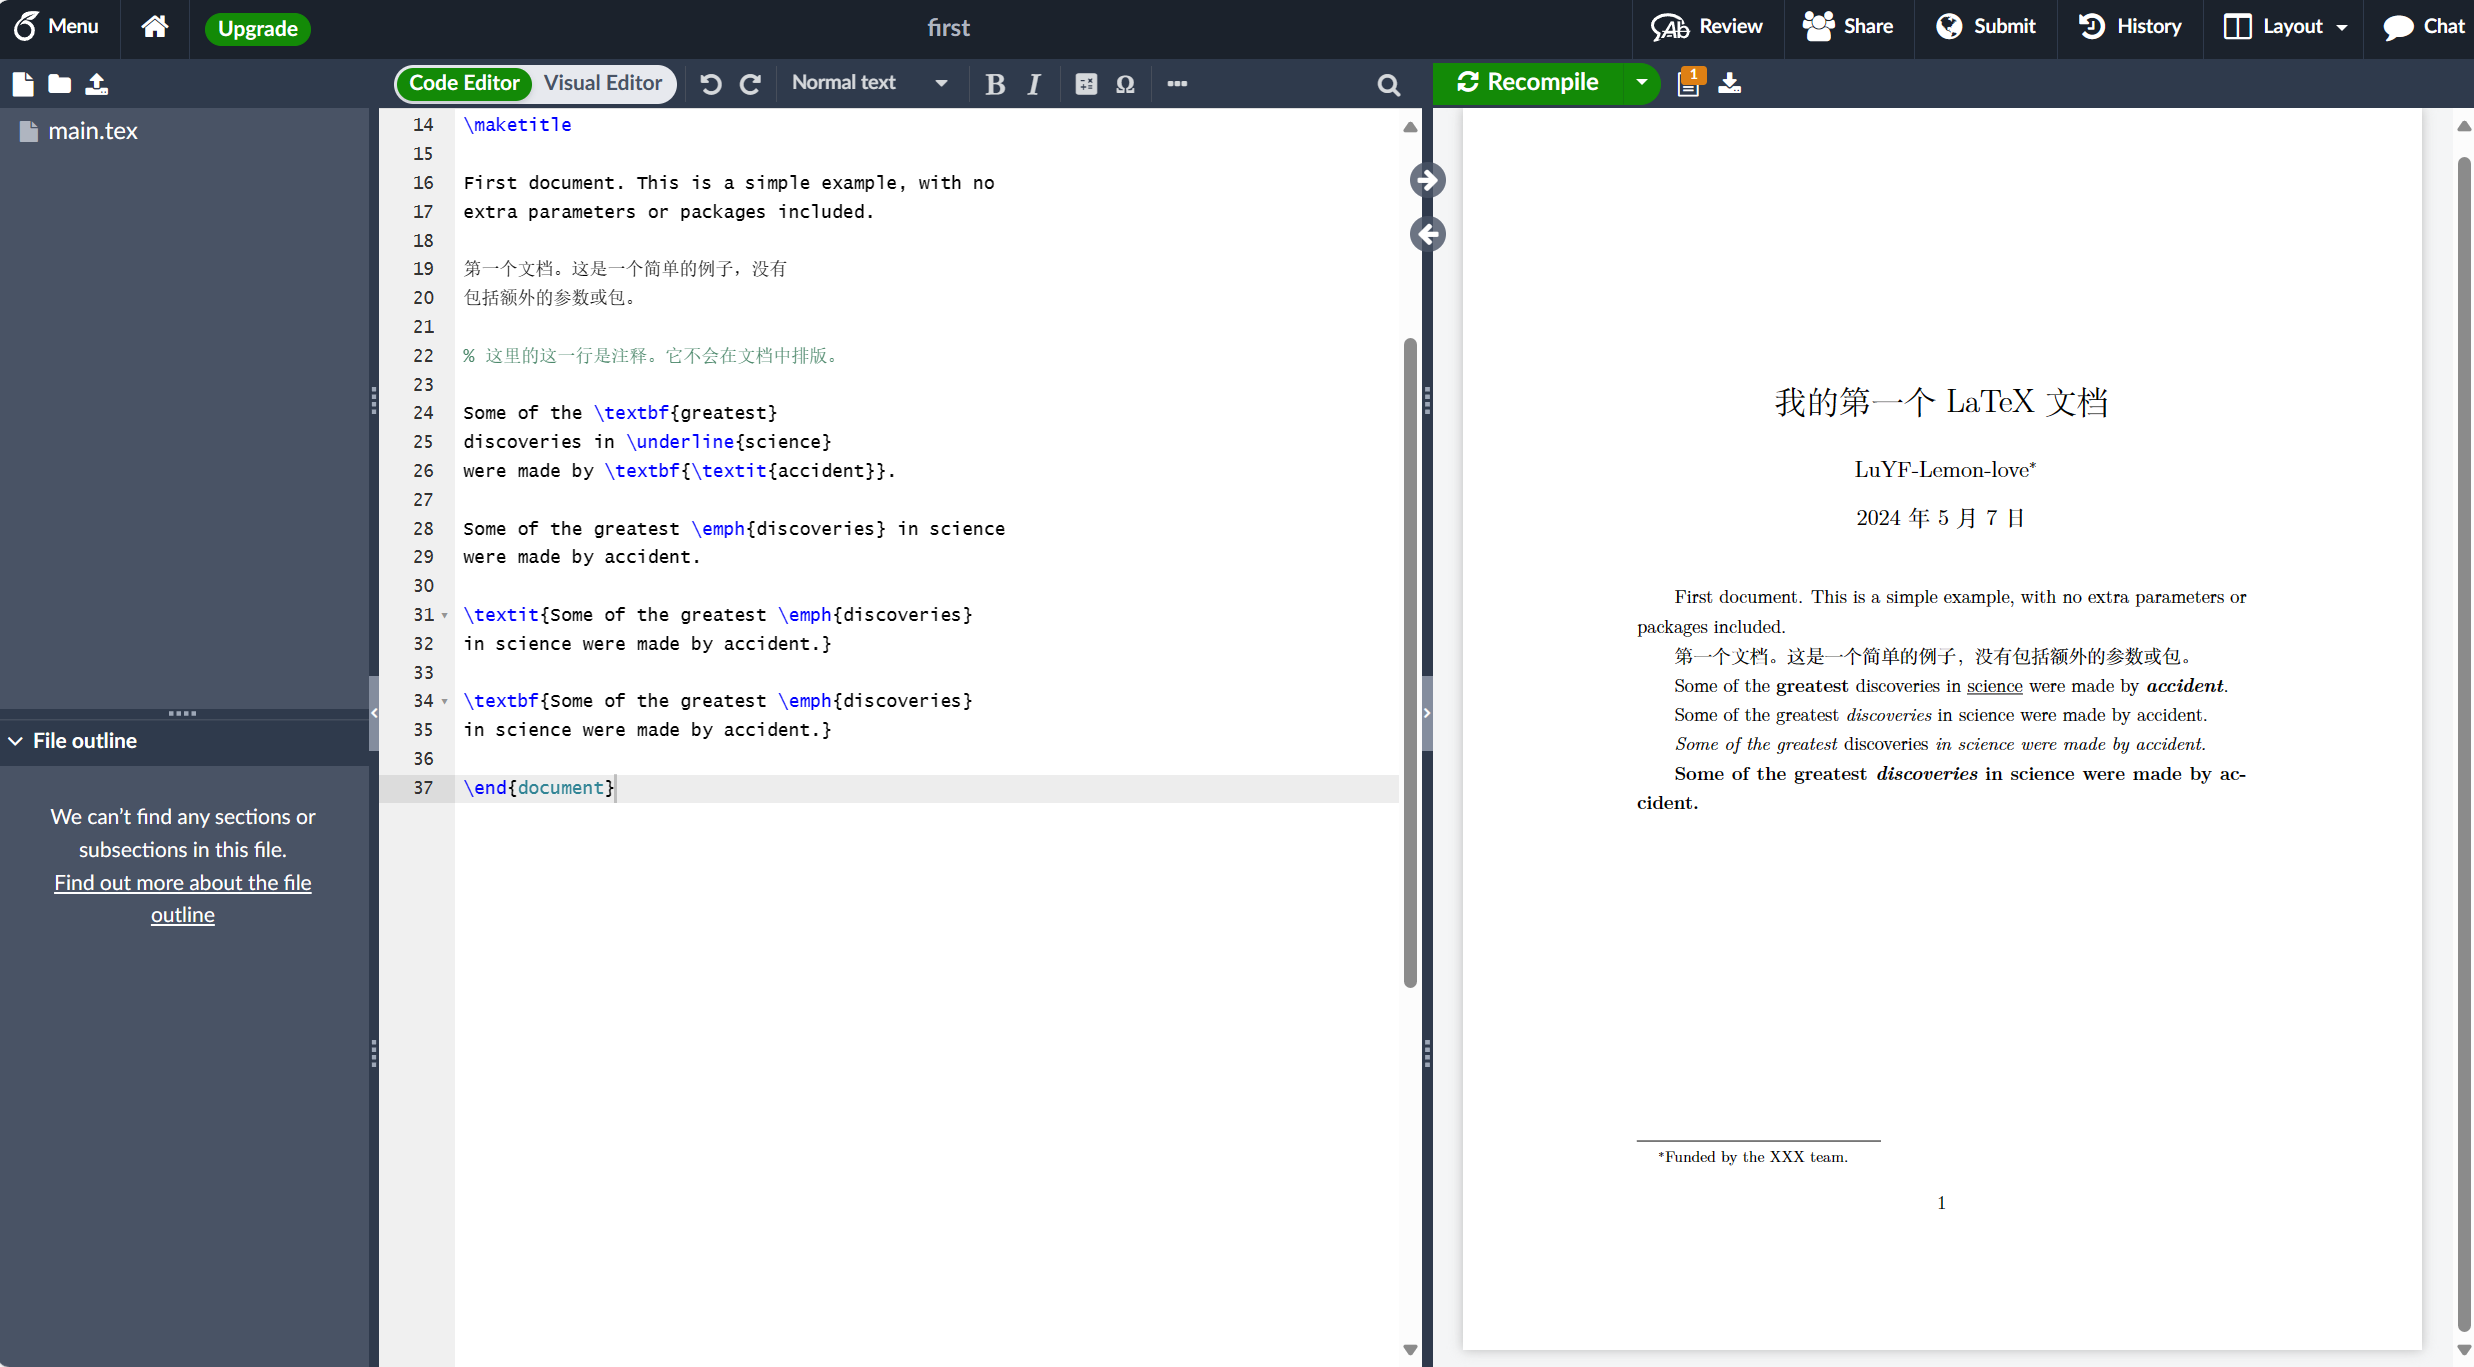
另一个非常有用的命令是 \emph{argument},它对其参数的影响取决于上下文。在普通文本中,强调的文本是斜体的,但如果在斜体文本中使用,这种行为会相反-请参阅下一个示例:
\documentclass[12pt, letterpaper]{article}

\usepackage{graphicx}
% 中文编译需要 ctex 或 xeCJK 包
\usepackage[UTF8]{ctex}
% \usepackage{xeCJK}

\title{我的第一个LaTeX文档}
\author{LuYF-Lemon-love\thanks{Funded by the XXX team.}}
\date{\today}

\begin{document}

\maketitle

First document. This is a simple example, with no
extra parameters or packages included.

第一个文档。这是一个简单的例子,没有
包括额外的参数或包。

% 这里的这一行是注释。它不会在文档中排版。

Some of the \textbf{greatest}
discoveries in \underline{science}
were made by \textbf{\textit{accident}}.

+ Some of the greatest \emph{discoveries} in science
+ were made by accident.

+ \textit{Some of the greatest \emph{discoveries}
+ in science were made by accident.}

+ \textbf{Some of the greatest \emph{discoveries}
+ in science were made by accident.}

\end{document}
此示例生成以下输出:
注意:某些包(例如 Beamer)会更改
\emph命令的行为。
添加图像
在本节中,我们将了解如何将图像添加到 LaTeX 文档中。Overleaf 支持三种插入图像的方法:
- 使用位于编辑器工具栏上的插入图形按钮,将图像插入到可视化编辑器或代码编辑器中。
- 将图像复制并粘贴到可视化编辑器或代码编辑器中。
- 使用代码编辑器编写插入图形的 LaTeX 代码。
选项 1 和 2 自动生成插入图像所需的 LaTeX 代码,但这里我们引入选项 3-请注意,您需要将这些图像上传到您的 Overleaf 项目中。以下示例演示如何包含图片:
\documentclass[12pt, letterpaper]{article}

+ \usepackage{graphicx} %LaTeX package to import graphics
+ \graphicspath{{images/}} %configuring the graphicx package

% 中文编译需要 ctex 或 xeCJK 包
\usepackage[UTF8]{ctex}
% \usepackage{xeCJK}

\title{我的第一个LaTeX文档}
\author{LuYF-Lemon-love\thanks{Funded by the XXX team.}}
\date{\today}

\begin{document}

\maketitle

First document. This is a simple example, with no
extra parameters or packages included.

第一个文档。这是一个简单的例子,没有
包括额外的参数或包。

% 这里的这一行是注释。它不会在文档中排版。

Some of the \textbf{greatest}
discoveries in \underline{science}
were made by \textbf{\textit{accident}}.

Some of the greatest \emph{discoveries} in science
were made by accident.

\textit{Some of the greatest \emph{discoveries}
in science were made by accident.}

\textbf{Some of the greatest \emph{discoveries}
in science were made by accident.}

+ 苏苏真可爱!

+ % The \includegraphcs command is
+ % provided (implemented) by the
+ % graphicx package
+ \includegraphics{susu}

\end{document}
此示例生成以下输出:
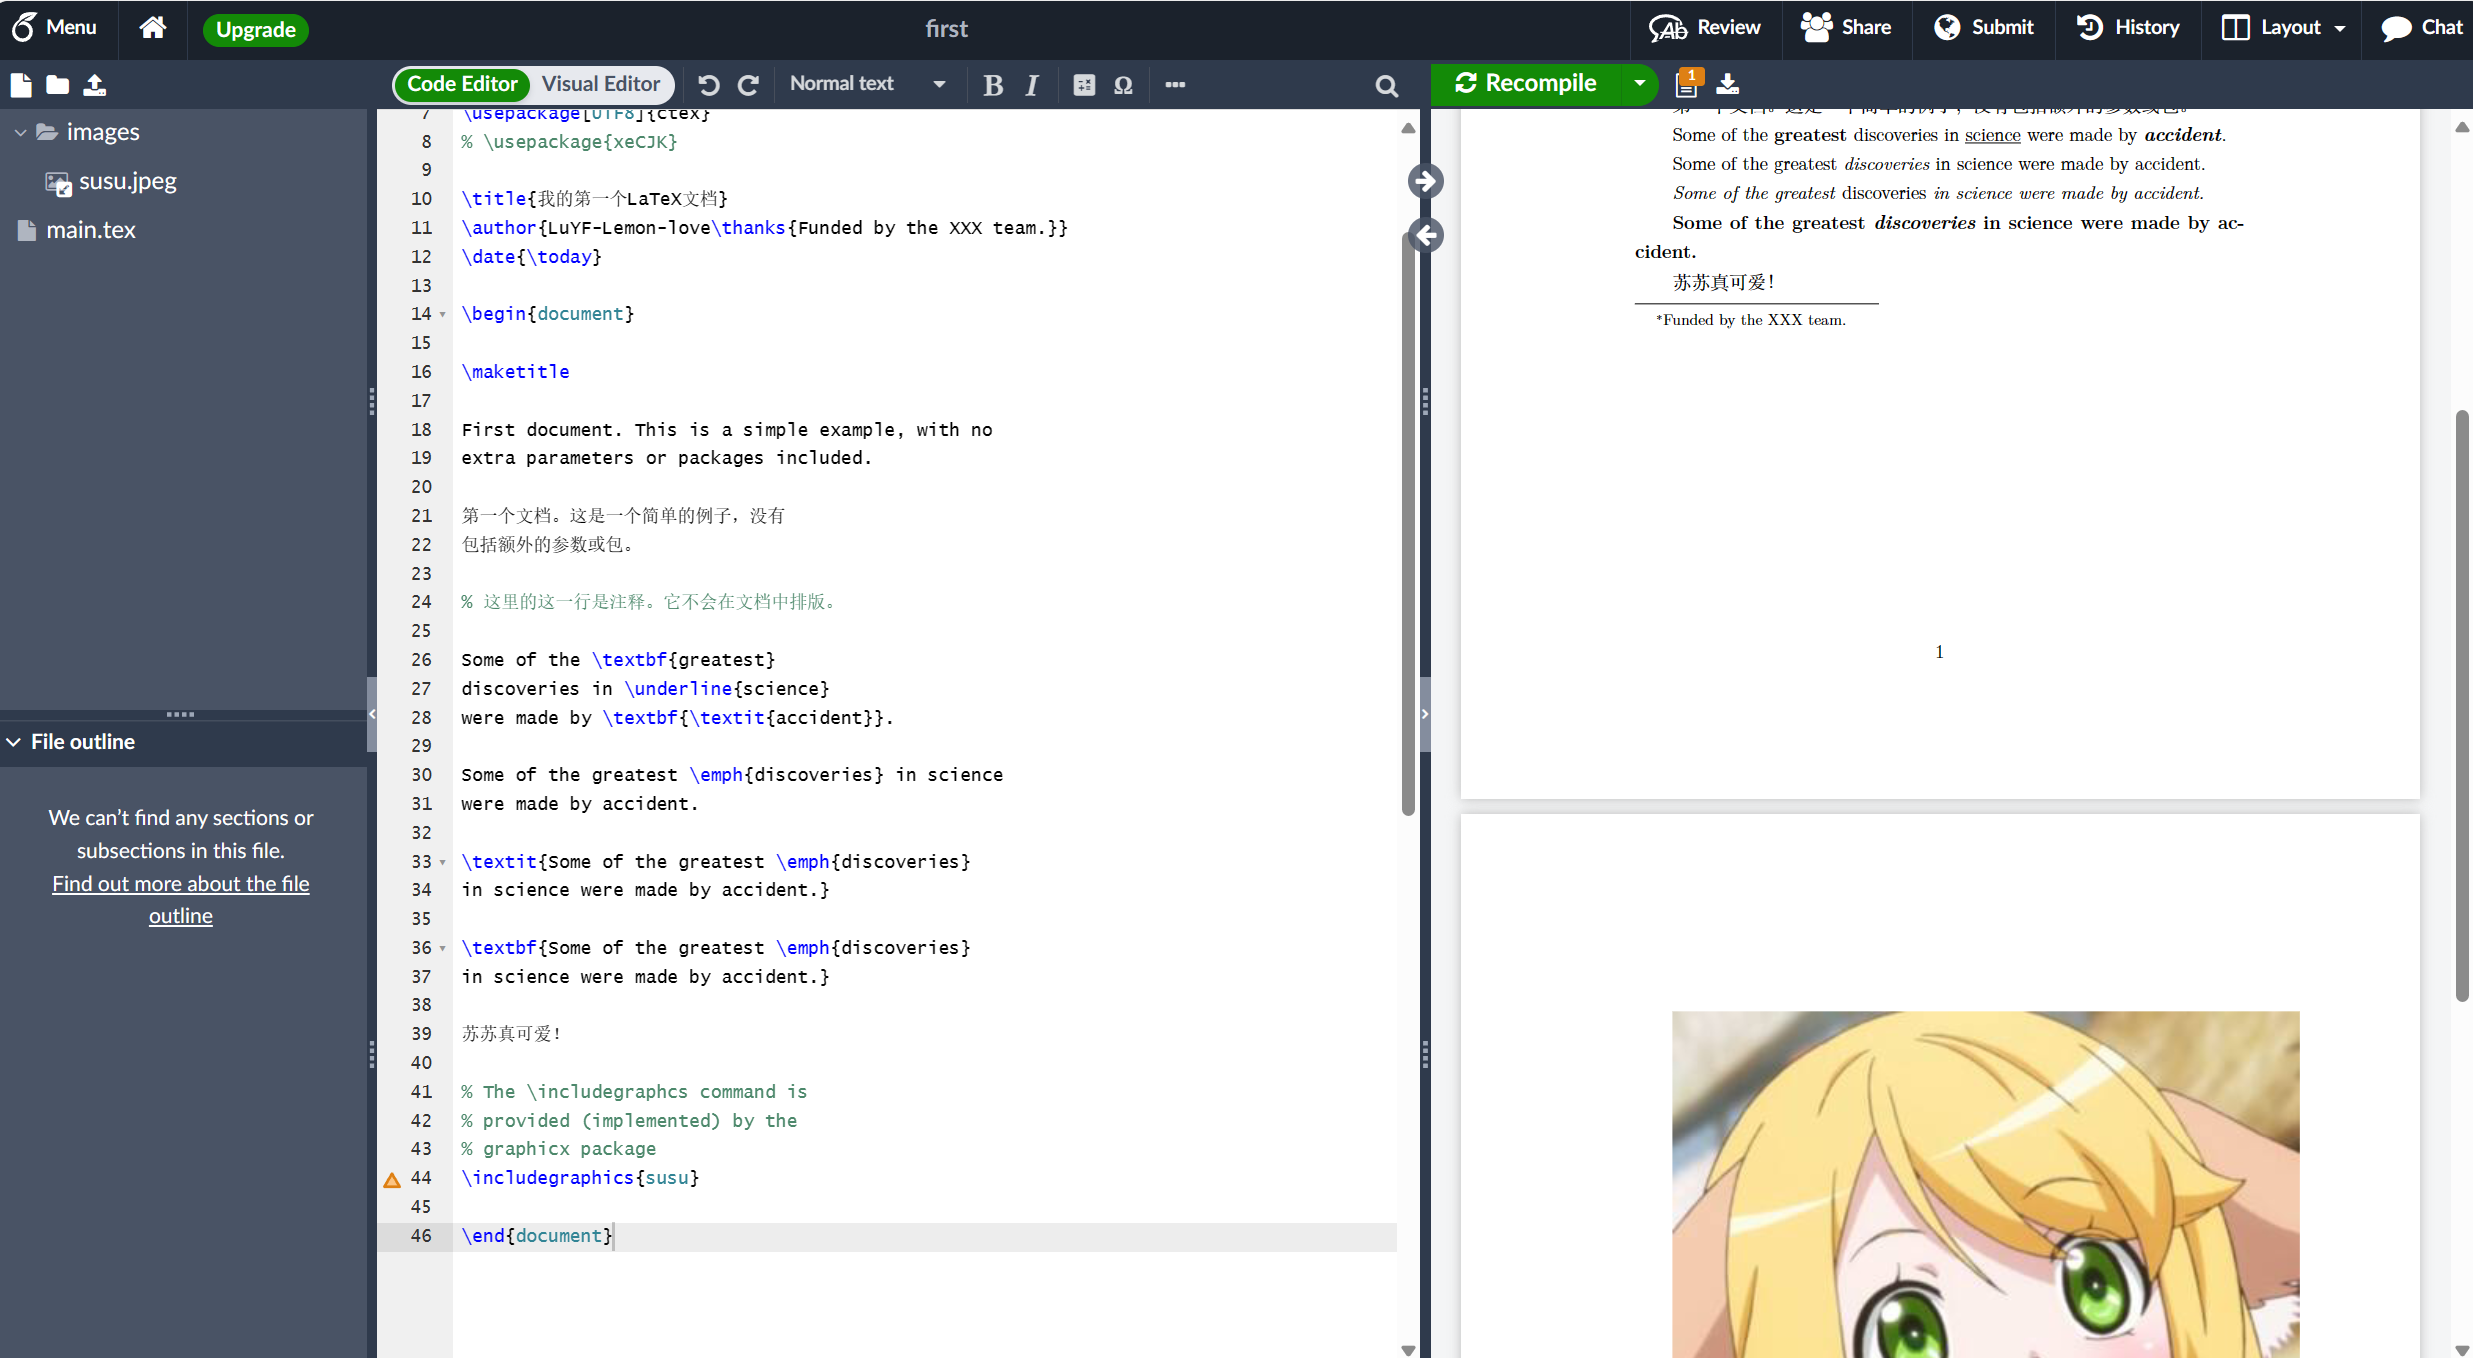
将图形导入 LaTeX 文档需要一个附加包,该包提供包含外部图形文件所需的命令和功能。上面的示例加载了 graphicx 包,除了许多其他命令之外,它还提供 \includegraphics{...} 来导入图形,并使用 \graphicspath{...} 告知 LaTeX 图形的位置。
要使用 graphicx 包,请在 Overleaf 文档序言中包含以下行:
\usepackage{graphicx}在我们的示例中,命令 \graphicspath{{images/}} 通知 LaTeX 图像保存在名为 images 的文件夹中,该文件夹包含在当前目录中。
\includegraphics{susu} 命令执行在文档中插入图像的实际工作。在这里,susu 是图像文件的名称,但没有扩展名。
- 尽管
\includegraphics命令中允许使用完整的文件名(包括其扩展名),但省略文件扩展名被认为是最佳做法,因为它会提示 LaTeX 搜索所有支持的格式。 - 一般来说,图形的文件名不应包含空白符或多个点;在将图像文件上传到 Overleaf 时,还建议使用小写字母作为文件扩展名。
标题、标签和参考文献
图像可以通过 figure 环境进行标题、标记和引用,如下所示:
\documentclass[12pt, letterpaper]{article}

\usepackage{graphicx} %LaTeX package to import graphics
\graphicspath{{images/}} %configuring the graphicx package

% 中文编译需要 ctex 或 xeCJK 包
\usepackage[UTF8]{ctex}
% \usepackage{xeCJK}

\title{我的第一个LaTeX文档}
\author{LuYF-Lemon-love\thanks{Funded by the XXX team.}}
\date{\today}

\begin{document}

\maketitle

First document. This is a simple example, with no
extra parameters or packages included.

第一个文档。这是一个简单的例子,没有
包括额外的参数或包。

% 这里的这一行是注释。它不会在文档中排版。

Some of the \textbf{greatest}
discoveries in \underline{science}
were made by \textbf{\textit{accident}}.

Some of the greatest \emph{discoveries} in science
were made by accident.

\textit{Some of the greatest \emph{discoveries}
in science were made by accident.}

\textbf{Some of the greatest \emph{discoveries}
in science were made by accident.}

苏苏真可爱!

% The \includegraphcs command is
% provided (implemented) by the
% graphicx package
\includegraphics{susu}

+ \begin{figure}[h]
+     \centering
+     \includegraphics[width=0.75\textwidth]{girl}
+     \caption{白衣少女.}
+     \label{fig:mesh1}
+ \end{figure}

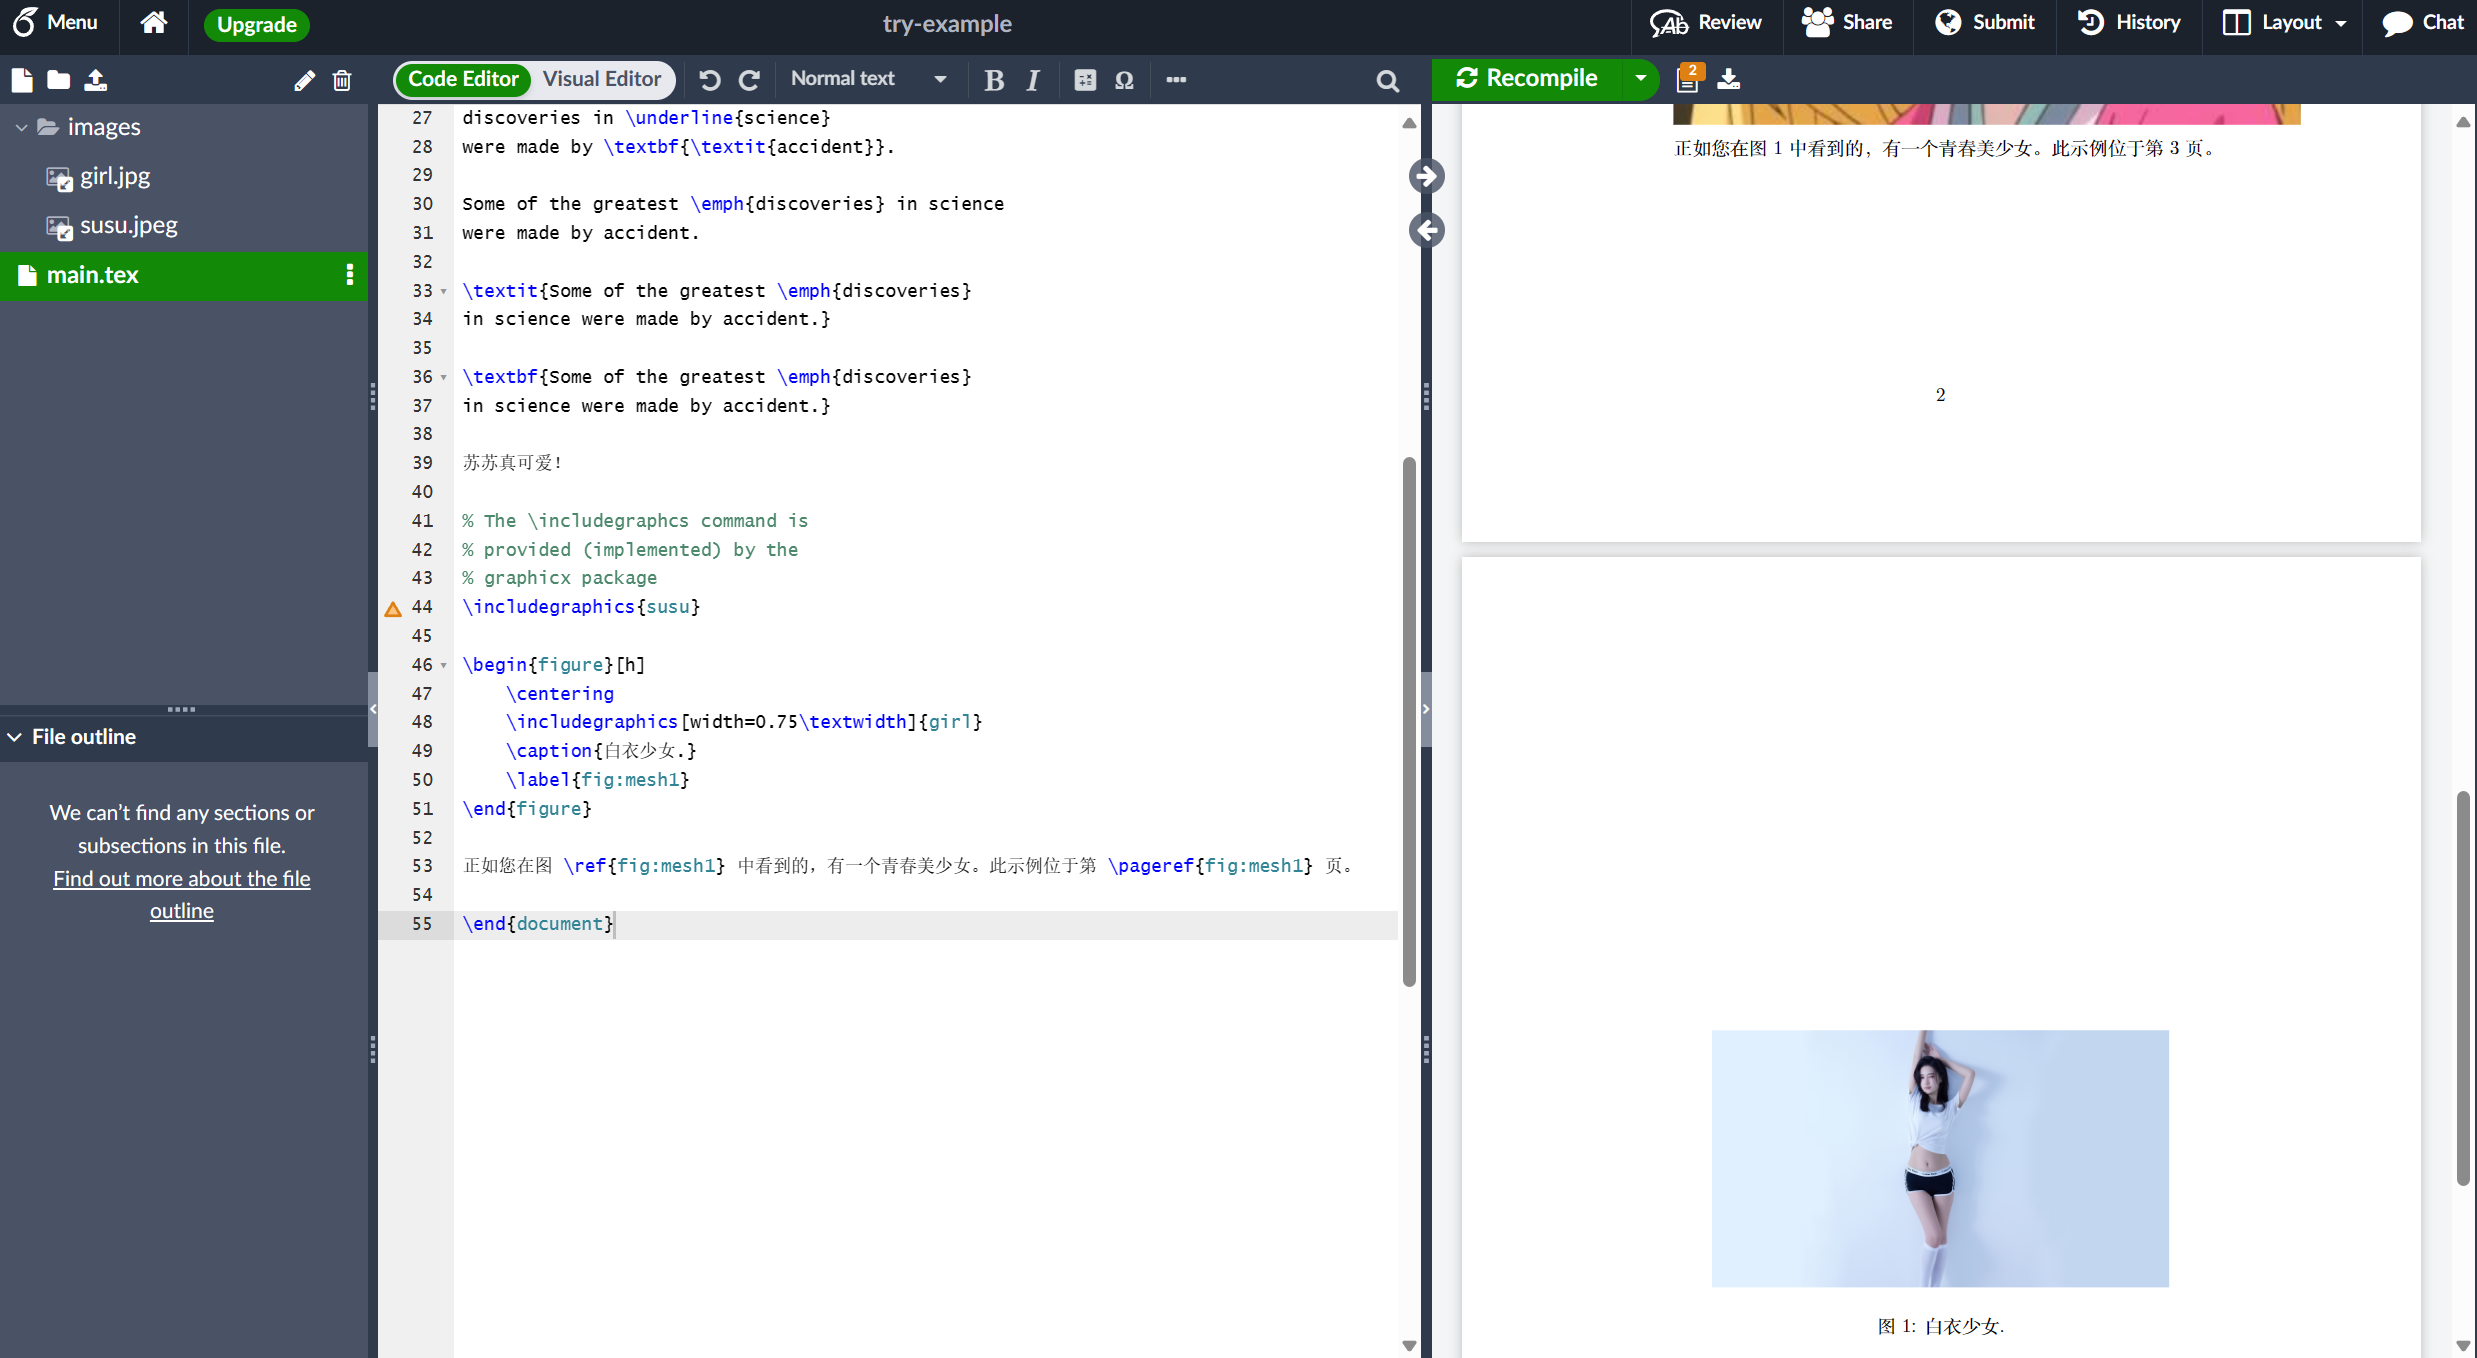
+ 正如您在图 \ref{fig:mesh1} 中看到的,有一个青春美少女。此示例位于第 \pageref{fig:mesh1} 页。

\end{document}
此示例生成以下输出:
示例中有几个值得注意的命令:
\includegraphics[width=0.75\textwidth]{mesh}:这种形式的\includegraphics指示 LaTeX 将图形的宽度设置为文本宽度的 75% -其值存储在\textwidth命令中。\caption{白衣少女.}: 顾名思义,此命令设置可以放置在图形上方或下方的图形标题。如果您创建一个图形列表,则此标题将在该列表中使用。\label{fig:mesh1}: 要在文档中引用此图像,请使用\label命令给它一个标签。该标签用于为图像生成一个数字,并与下一个命令结合使用,将允许您引用它。\ref{fig:mesh1}:此代码将被引用图形对应的数字替换。
LaTeX 文档中包含的图像应放置在 figure 环境或类似环境中,以便 LaTeX 可以自动将图像定位在文档中的合适位置。
进一步的指导包含在以下 Overleaf 帮助文章中:
在 LaTeX 中创建列表
您可以使用环境创建不同类型的列表,这些环境用于封装实现特定排版功能所需的 LaTeX 代码。环境以 \begin{environment-name} 开始,以 \end{environment-name} 结束,environment-name 可能是 figure、tabular 或列表类型之一:itemize 无序列表或 enumerate 有序列表。
- 无序列表
无序列表由 itemize 环境生成。每个列表条目前面必须有 \item 命令,如下所示:
\documentclass[12pt, letterpaper]{article}

\usepackage{graphicx} %LaTeX package to import graphics
\graphicspath{{images/}} %configuring the graphicx package

% 中文编译需要 ctex 或 xeCJK 包
\usepackage[UTF8]{ctex}
% \usepackage{xeCJK}

\title{我的第一个LaTeX文档}
\author{LuYF-Lemon-love\thanks{Funded by the XXX team.}}
\date{\today}

\begin{document}

\maketitle

First document. This is a simple example, with no
extra parameters or packages included.

第一个文档。这是一个简单的例子,没有
包括额外的参数或包。

% 这里的这一行是注释。它不会在文档中排版。

Some of the \textbf{greatest}
discoveries in \underline{science}
were made by \textbf{\textit{accident}}.

Some of the greatest \emph{discoveries} in science
were made by accident.

\textit{Some of the greatest \emph{discoveries}
in science were made by accident.}

\textbf{Some of the greatest \emph{discoveries}
in science were made by accident.}

苏苏真可爱!

% The \includegraphcs command is
% provided (implemented) by the
% graphicx package
\includegraphics{susu}

\begin{figure}[h]
    \centering
    \includegraphics[width=0.75\textwidth]{girl}
    \caption{白衣少女.}
    \label{fig:mesh1}
\end{figure}

正如您在图 \ref{fig:mesh1} 中看到的,有一个青春美少女。此示例位于第 \pageref{fig:mesh1} 页。

+ \begin{itemize}
+   \item The individual entries are indicated with a black dot, a so-called bullet.
+   \item The text in the entries may be of any length.
+ \end{itemize}

\end{document}您还可以打开这个更大的 Overleaf 项目,其中演示了各种类型的 LaTeX 列表。
- 有序列表
有序列表使用与无序列表相同的语法,但使用 enumerate 环境创建:
\documentclass[12pt, letterpaper]{article}

\usepackage{graphicx} %LaTeX package to import graphics
\graphicspath{{images/}} %configuring the graphicx package

% 中文编译需要 ctex 或 xeCJK 包
\usepackage[UTF8]{ctex}
% \usepackage{xeCJK}

\title{我的第一个LaTeX文档}
\author{LuYF-Lemon-love\thanks{Funded by the XXX team.}}
\date{\today}

\begin{document}

\maketitle

First document. This is a simple example, with no
extra parameters or packages included.

第一个文档。这是一个简单的例子,没有
包括额外的参数或包。

% 这里的这一行是注释。它不会在文档中排版。

Some of the \textbf{greatest}
discoveries in \underline{science}
were made by \textbf{\textit{accident}}.

Some of the greatest \emph{discoveries} in science
were made by accident.

\textit{Some of the greatest \emph{discoveries}
in science were made by accident.}

\textbf{Some of the greatest \emph{discoveries}
in science were made by accident.}

苏苏真可爱!

% The \includegraphcs command is
% provided (implemented) by the
% graphicx package
\includegraphics{susu}

\begin{figure}[h]
    \centering
    \includegraphics[width=0.75\textwidth]{girl}
    \caption{白衣少女.}
    \label{fig:mesh1}
\end{figure}

正如您在图 \ref{fig:mesh1} 中看到的,有一个青春美少女。此示例位于第 \pageref{fig:mesh1} 页。

\begin{itemize}
  \item The individual entries are indicated with a black dot, a so-called bullet.
  \item The text in the entries may be of any length.
\end{itemize}

+ \begin{enumerate}
+   \item This is the first entry in our list.
+   \item The list numbers increase with each entry we add.
+ \end{enumerate}

\end{document}
此示例生成以下输出:
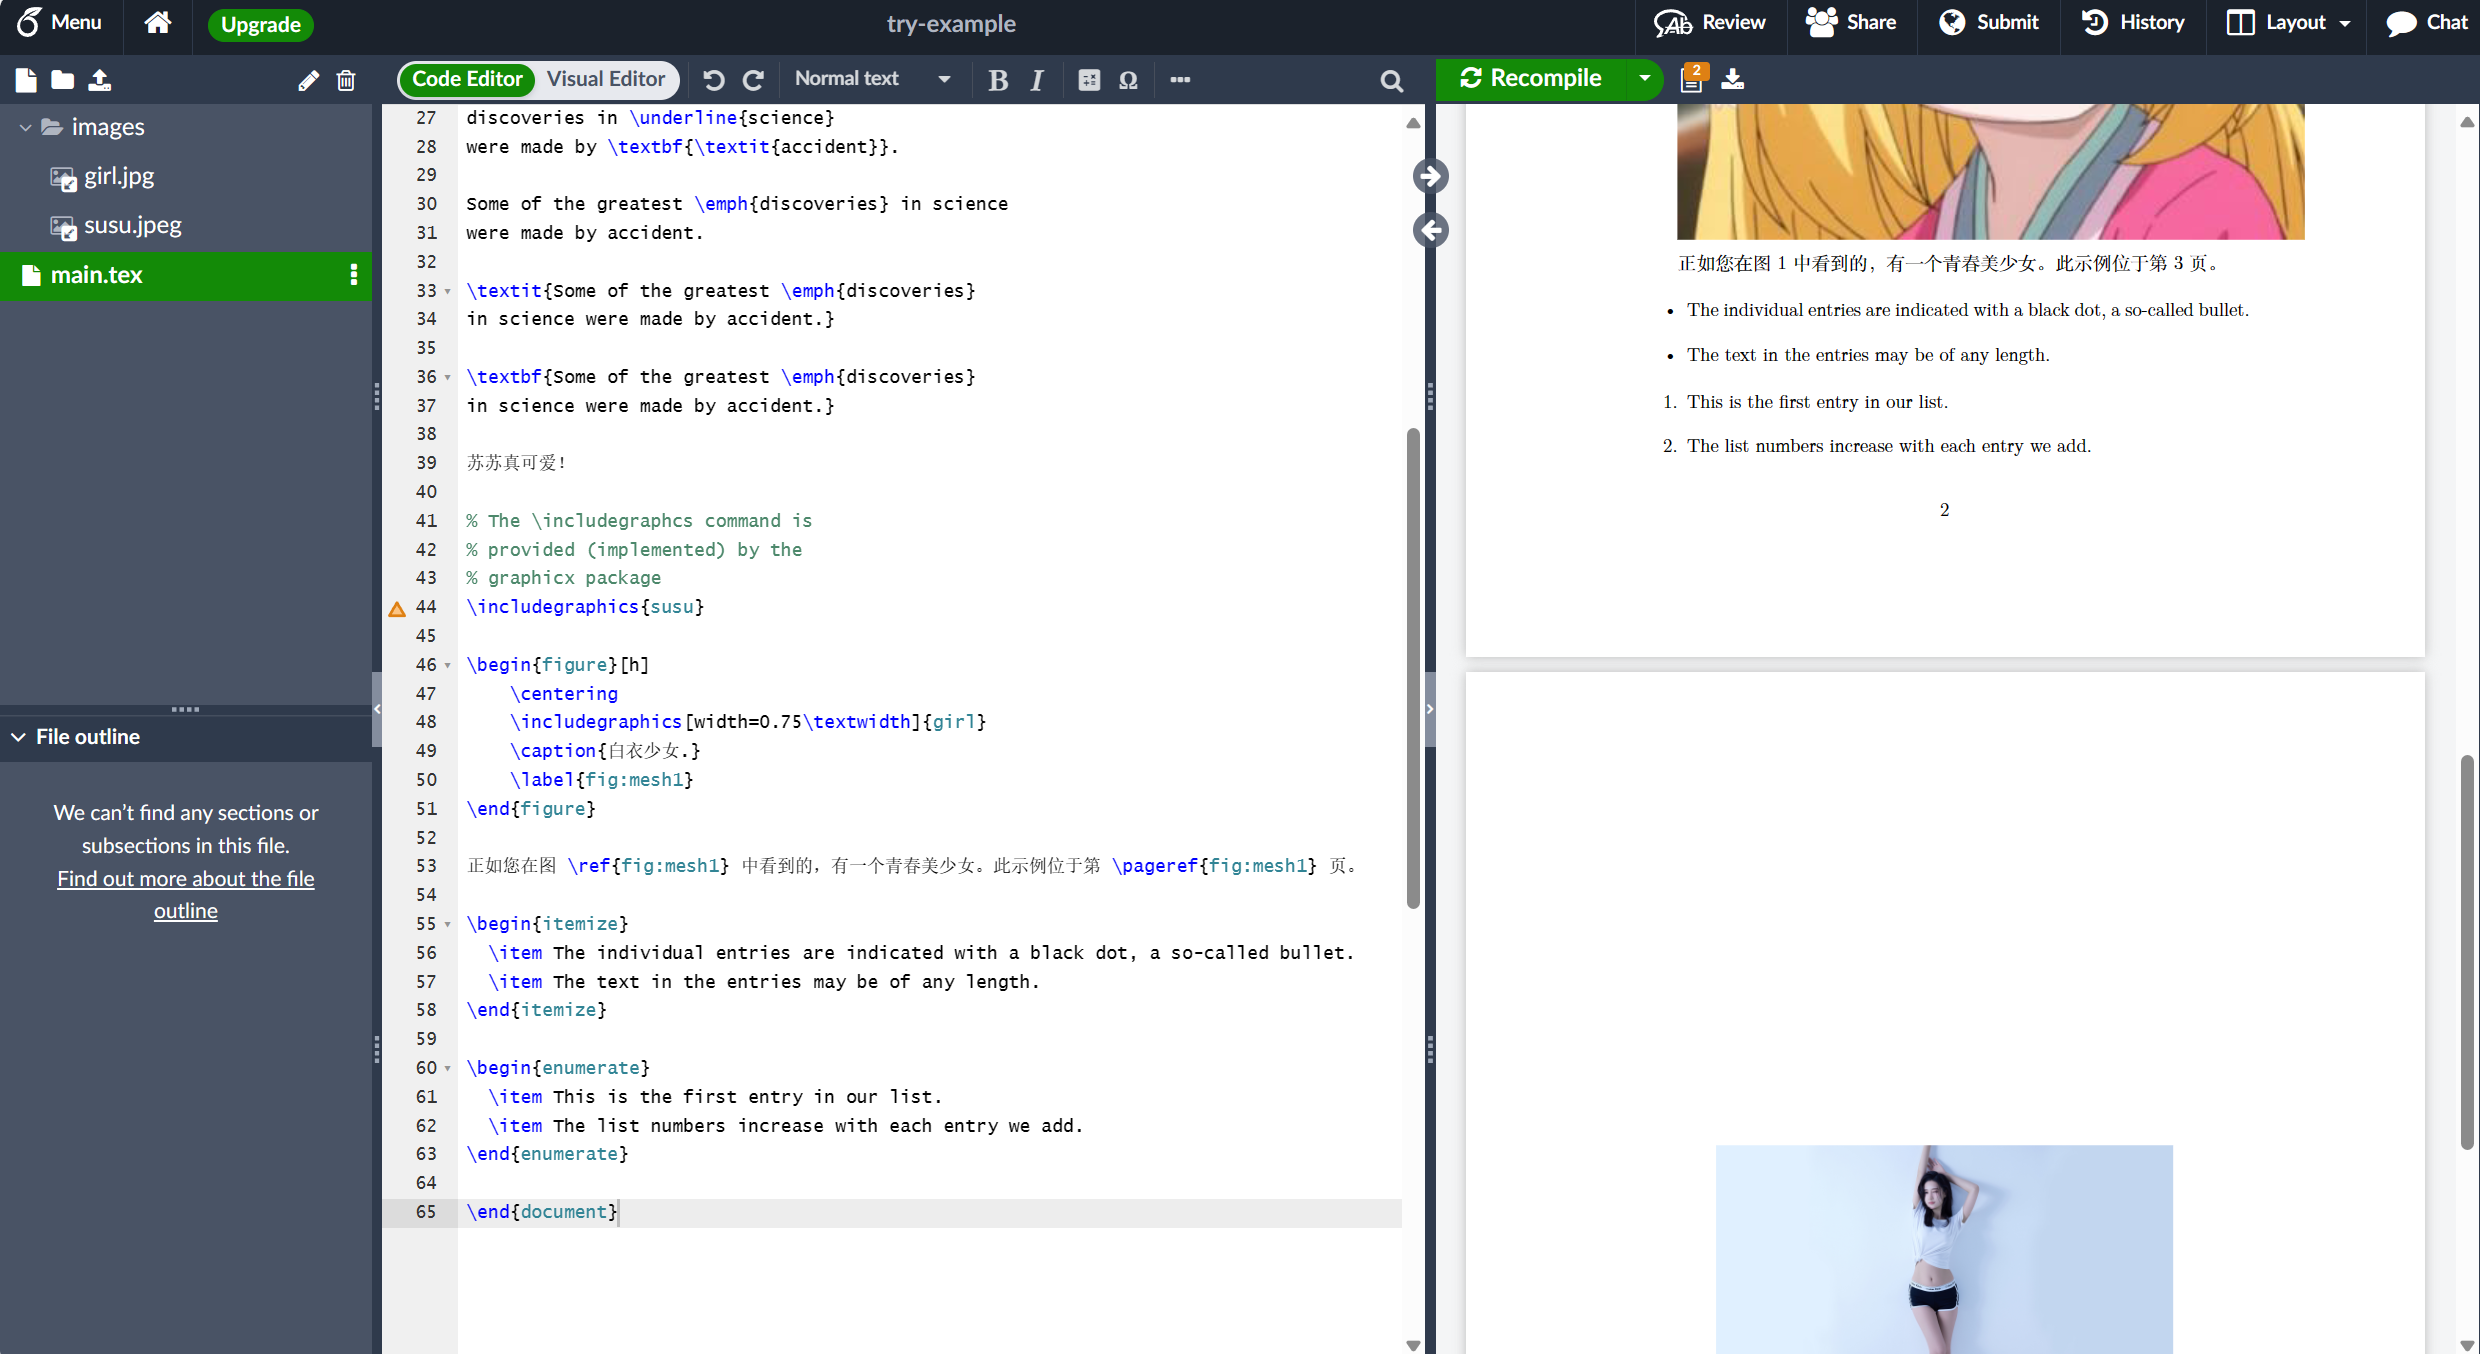
与无序列表一样,每个条目都必须前面有 \item 命令,在这里,它会自动生成数字有序列表标签值,从 1 开始。
有关更多信息,您可以打开这个更大的 Overleaf 项目,该项目演示了各种类型的 LaTeX 列表,或者访问关于 LaTeX 列表的专门帮助文章,该文章提供了更多示例并展示了如何创建自定义列表。
将数学添加到 LaTeX
LaTeX 的主要优点之一是易于编写数学表达式。LaTeX 为排版数学提供了两种书写模式:
- 用于编写作为段落一部分的公式的内联数学模式
- 显示数学模式,用于编写不属于文本或段落的表达式,并在单独的行上排版
- 内联数学模式
让我们看一个内联数学模式的示例:
\documentclass[12pt, letterpaper]{article}

\usepackage{graphicx} %LaTeX package to import graphics
\graphicspath{{images/}} %configuring the graphicx package

% 中文编译需要 ctex 或 xeCJK 包
\usepackage[UTF8]{ctex}
% \usepackage{xeCJK}

\title{我的第一个LaTeX文档}
\author{LuYF-Lemon-love\thanks{Funded by the XXX team.}}
\date{\today}

\begin{document}

\maketitle

First document. This is a simple example, with no
extra parameters or packages included.

第一个文档。这是一个简单的例子,没有
包括额外的参数或包。

% 这里的这一行是注释。它不会在文档中排版。

Some of the \textbf{greatest}
discoveries in \underline{science}
were made by \textbf{\textit{accident}}.

Some of the greatest \emph{discoveries} in science
were made by accident.

\textit{Some of the greatest \emph{discoveries}
in science were made by accident.}

\textbf{Some of the greatest \emph{discoveries}
in science were made by accident.}

苏苏真可爱!

% The \includegraphcs command is
% provided (implemented) by the
% graphicx package
\includegraphics{susu}

\begin{figure}[h]
    \centering
    \includegraphics[width=0.75\textwidth]{girl}
    \caption{白衣少女.}
    \label{fig:mesh1}
\end{figure}

正如您在图 \ref{fig:mesh1} 中看到的,有一个青春美少女。此示例位于第 \pageref{fig:mesh1} 页。

\begin{itemize}
  \item The individual entries are indicated with a black dot, a so-called bullet.
  \item The text in the entries may be of any length.
\end{itemize}

\begin{enumerate}
  \item This is the first entry in our list.
  \item The list numbers increase with each entry we add.
\end{enumerate}

+ In physics, the mass-energy equivalence is stated
+ by the equation $E=mc^2$, discovered in 1905 by Albert Einstein.

\end{document}要排版内联模式数学,您可以使用以下分隔符对之一:\( ... \)、$ ... $ 或 \begin{math} ... \end{math},如下例所示:
\documentclass[12pt, letterpaper]{article}

\usepackage{graphicx} %LaTeX package to import graphics
\graphicspath{{images/}} %configuring the graphicx package

% 中文编译需要 ctex 或 xeCJK 包
\usepackage[UTF8]{ctex}
% \usepackage{xeCJK}

\title{我的第一个LaTeX文档}
\author{LuYF-Lemon-love\thanks{Funded by the XXX team.}}
\date{\today}

\begin{document}

\maketitle

First document. This is a simple example, with no
extra parameters or packages included.

第一个文档。这是一个简单的例子,没有
包括额外的参数或包。

% 这里的这一行是注释。它不会在文档中排版。

Some of the \textbf{greatest}
discoveries in \underline{science}
were made by \textbf{\textit{accident}}.

Some of the greatest \emph{discoveries} in science
were made by accident.

\textit{Some of the greatest \emph{discoveries}
in science were made by accident.}

\textbf{Some of the greatest \emph{discoveries}
in science were made by accident.}

苏苏真可爱!

% The \includegraphcs command is
% provided (implemented) by the
% graphicx package
\includegraphics{susu}

\begin{figure}[h]
    \centering
    \includegraphics[width=0.75\textwidth]{girl}
    \caption{白衣少女.}
    \label{fig:mesh1}
\end{figure}

正如您在图 \ref{fig:mesh1} 中看到的,有一个青春美少女。此示例位于第 \pageref{fig:mesh1} 页。

\begin{itemize}
  \item The individual entries are indicated with a black dot, a so-called bullet.
  \item The text in the entries may be of any length.
\end{itemize}

\begin{enumerate}
  \item This is the first entry in our list.
  \item The list numbers increase with each entry we add.
\end{enumerate}

In physics, the mass-energy equivalence is stated
by the equation $E=mc^2$, discovered in 1905 by Albert Einstein.

+ \begin{math}
+ E=mc^2
+ \end{math} is typeset in a paragraph using inline math mode---as is $E=mc^2$, and so too is \(E=mc^2\).

\end{document}- 显示数学模式
显示模式下排版的方程可以编号或未编号,如下例所示:
\documentclass[12pt, letterpaper]{article}

\usepackage{graphicx} %LaTeX package to import graphics
\graphicspath{{images/}} %configuring the graphicx package

% 中文编译需要 ctex 或 xeCJK 包
\usepackage[UTF8]{ctex}
% \usepackage{xeCJK}

\title{我的第一个LaTeX文档}
\author{LuYF-Lemon-love\thanks{Funded by the XXX team.}}
\date{\today}

\begin{document}

\maketitle

First document. This is a simple example, with no
extra parameters or packages included.

第一个文档。这是一个简单的例子,没有
包括额外的参数或包。

% 这里的这一行是注释。它不会在文档中排版。

Some of the \textbf{greatest}
discoveries in \underline{science}
were made by \textbf{\textit{accident}}.

Some of the greatest \emph{discoveries} in science
were made by accident.

\textit{Some of the greatest \emph{discoveries}
in science were made by accident.}

\textbf{Some of the greatest \emph{discoveries}
in science were made by accident.}

苏苏真可爱!

% The \includegraphcs command is
% provided (implemented) by the
% graphicx package
\includegraphics{susu}

\begin{figure}[h]
    \centering
    \includegraphics[width=0.75\textwidth]{girl}
    \caption{白衣少女.}
    \label{fig:mesh1}
\end{figure}

正如您在图 \ref{fig:mesh1} 中看到的,有一个青春美少女。此示例位于第 \pageref{fig:mesh1} 页。

\begin{itemize}
  \item The individual entries are indicated with a black dot, a so-called bullet.
  \item The text in the entries may be of any length.
\end{itemize}

\begin{enumerate}
  \item This is the first entry in our list.
  \item The list numbers increase with each entry we add.
\end{enumerate}

In physics, the mass-energy equivalence is stated
by the equation $E=mc^2$, discovered in 1905 by Albert Einstein.

\begin{math}
E=mc^2
\end{math} is typeset in a paragraph using inline math mode---as is $E=mc^2$, and so too is \(E=mc^2\).

+ The mass-energy equivalence is described by the famous equation
+ \[ E=mc^2 \] discovered in 1905 by Albert Einstein.

+ In natural units ($c = 1$), the formula expresses the identity
+ \begin{equation}
+ E=m
+ \end{equation}

\end{document}
此示例生成以下输出:
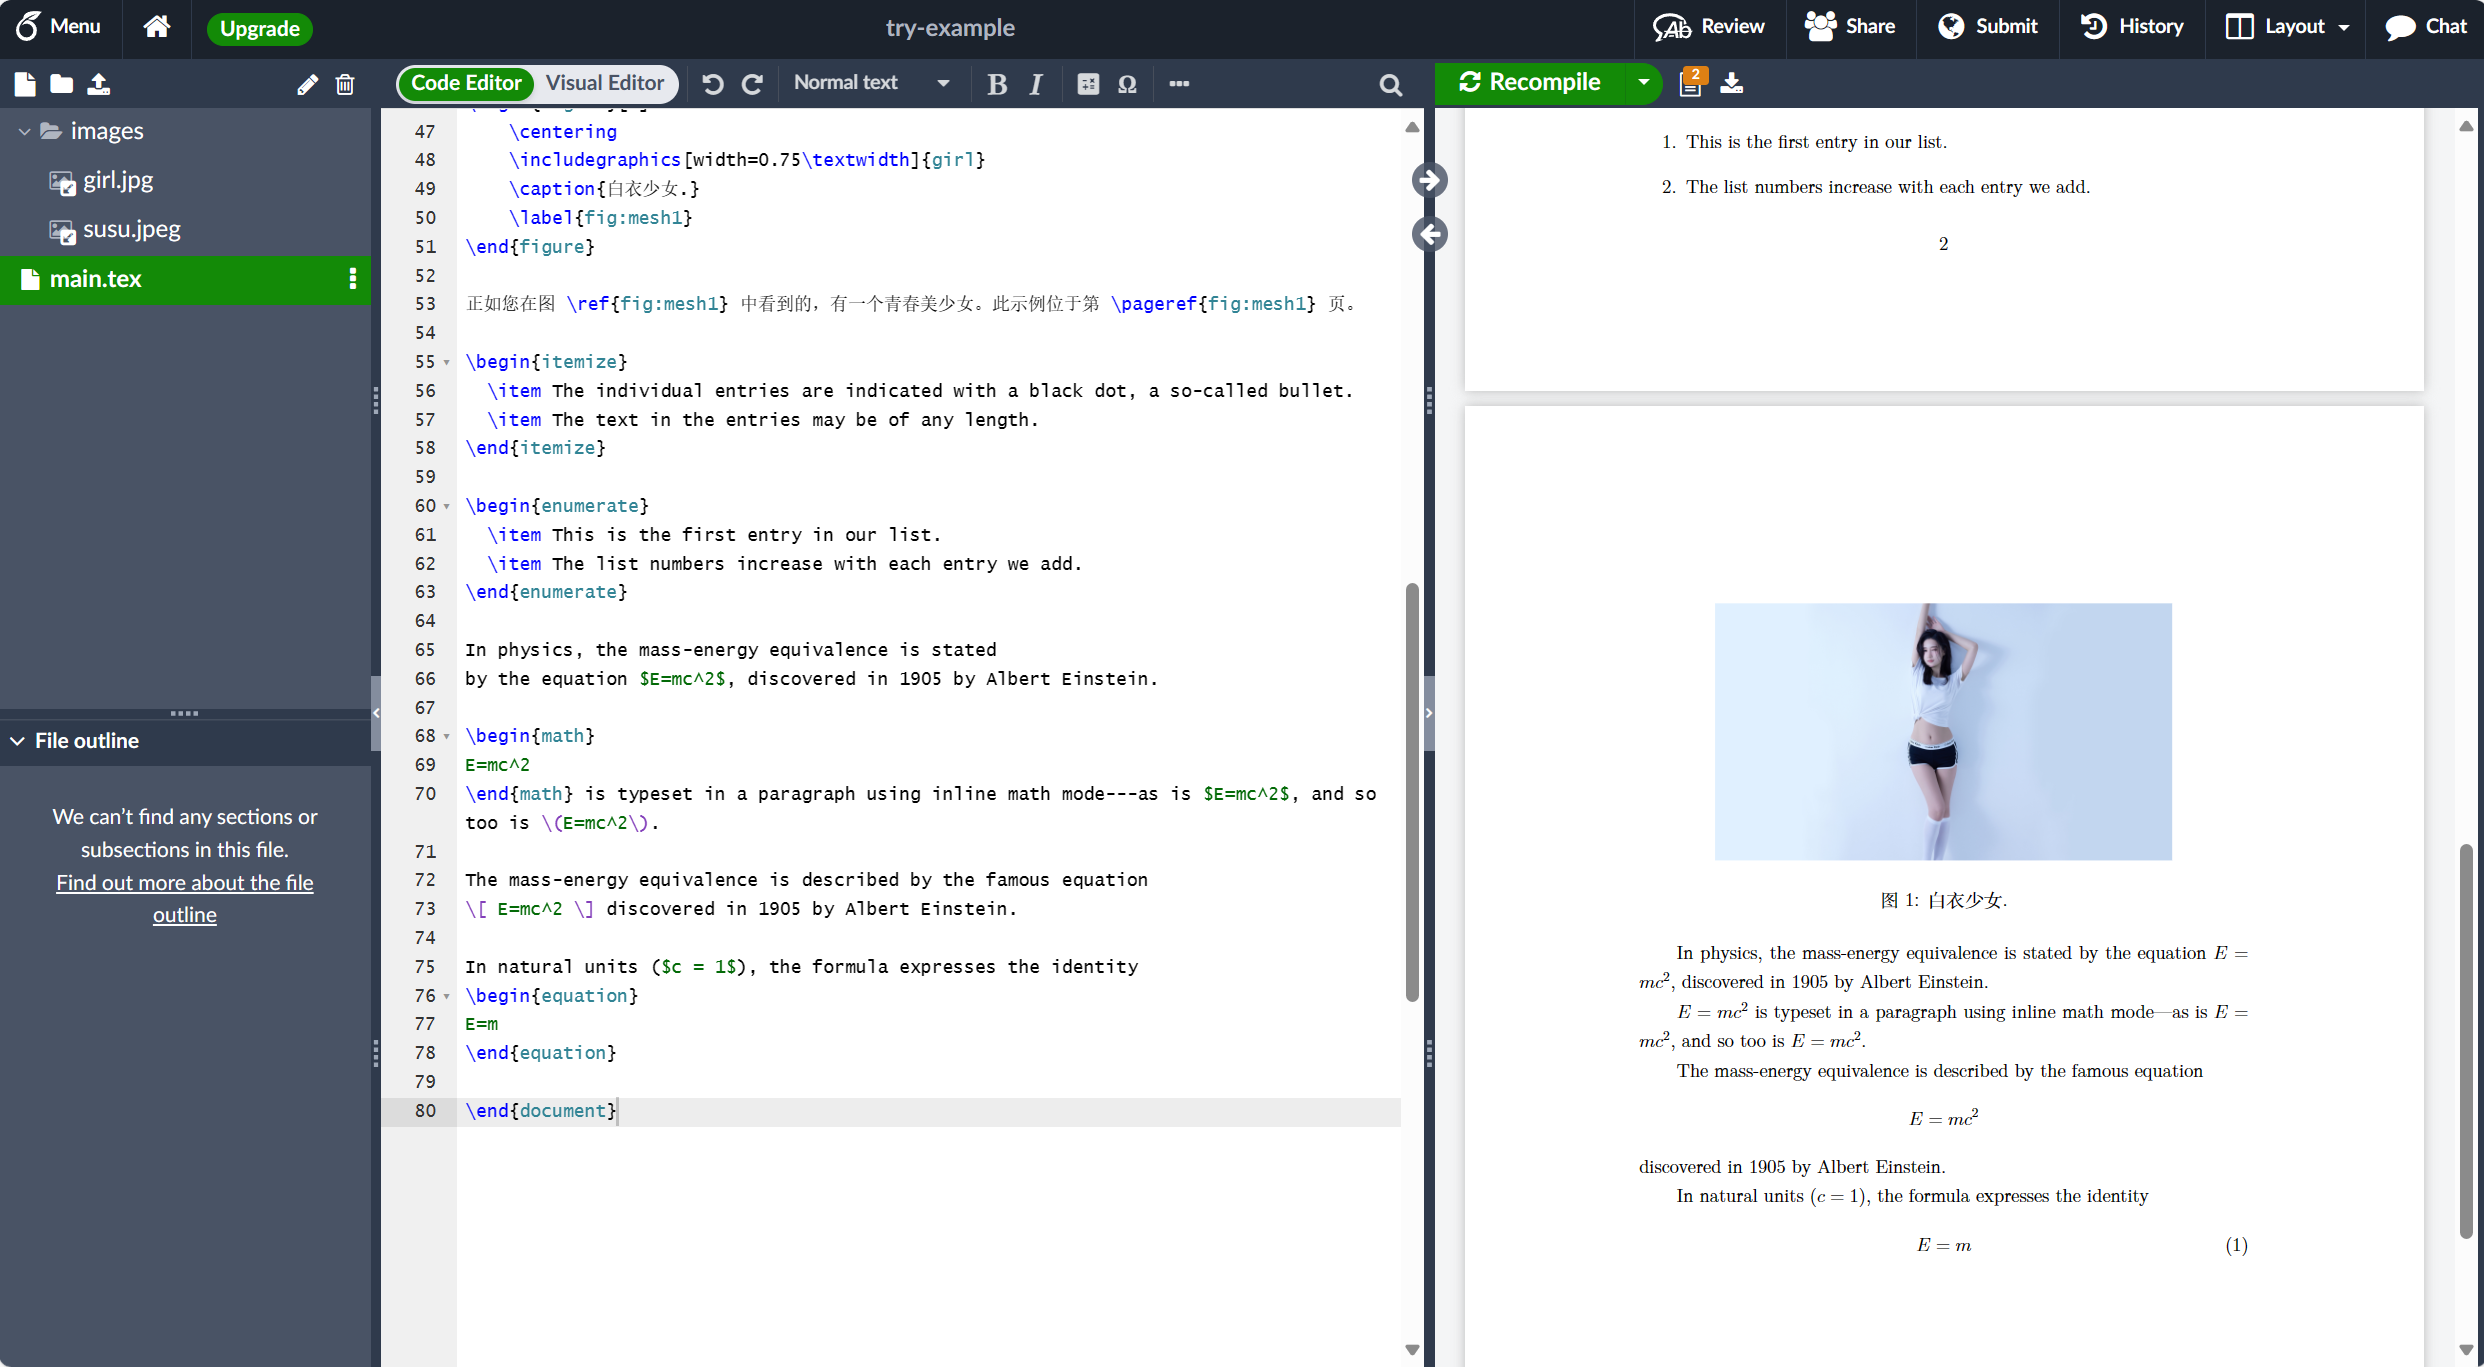
要排版显示模式数学,您可以使用以下分隔符对之一:\[ ... \]、\begin{displaymath} ... \end{displaymath} 或 \begin{equation} ... \end{equation}。从历史上看,排版显示模式数学需要使用 $$ 字符分隔符,如 $$ ... display math here ...$$,但不再建议使用此方法:改用 LaTeX 的分隔符 \[ ... \]。
- 更完整的示例
以下示例演示了使用 LaTeX 的一系列数学内容排版。
\documentclass[12pt, letterpaper]{article}

\usepackage{graphicx} %LaTeX package to import graphics
\graphicspath{{images/}} %configuring the graphicx package

% 中文编译需要 ctex 或 xeCJK 包
\usepackage[UTF8]{ctex}
% \usepackage{xeCJK}

\title{我的第一个LaTeX文档}
\author{LuYF-Lemon-love\thanks{Funded by the XXX team.}}
\date{\today}

\begin{document}

\maketitle

First document. This is a simple example, with no
extra parameters or packages included.

第一个文档。这是一个简单的例子,没有
包括额外的参数或包。

% 这里的这一行是注释。它不会在文档中排版。

Some of the \textbf{greatest}
discoveries in \underline{science}
were made by \textbf{\textit{accident}}.

Some of the greatest \emph{discoveries} in science
were made by accident.

\textit{Some of the greatest \emph{discoveries}
in science were made by accident.}

\textbf{Some of the greatest \emph{discoveries}
in science were made by accident.}

苏苏真可爱!

% The \includegraphcs command is
% provided (implemented) by the
% graphicx package
\includegraphics{susu}

\begin{figure}[h]
    \centering
    \includegraphics[width=0.75\textwidth]{girl}
    \caption{白衣少女.}
    \label{fig:mesh1}
\end{figure}

正如您在图 \ref{fig:mesh1} 中看到的,有一个青春美少女。此示例位于第 \pageref{fig:mesh1} 页。

\begin{itemize}
  \item The individual entries are indicated with a black dot, a so-called bullet.
  \item The text in the entries may be of any length.
\end{itemize}

\begin{enumerate}
  \item This is the first entry in our list.
  \item The list numbers increase with each entry we add.
\end{enumerate}

In physics, the mass-energy equivalence is stated
by the equation $E=mc^2$, discovered in 1905 by Albert Einstein.

\begin{math}
E=mc^2
\end{math} is typeset in a paragraph using inline math mode---as is $E=mc^2$, and so too is \(E=mc^2\).

The mass-energy equivalence is described by the famous equation
\[ E=mc^2 \] discovered in 1905 by Albert Einstein.

In natural units ($c = 1$), the formula expresses the identity
\begin{equation}
E=m
\end{equation}

+ Subscripts in math mode are written as $a_b$ and superscripts are written as $a^b$. These can be combined and nested to write expressions such as

+ \[ T^{i_1 i_2 \dots i_p}_{j_1 j_2 \dots j_q} = T(x^{i_1},\dots,x^{i_p},e_{j_1},\dots,e_{j_q}) \]

+ We write integrals using $\int$ and fractions using $\frac{a}{b}$. Limits are placed on integrals using superscripts and subscripts:

+ \[ \int_0^1 \frac{dx}{e^x} =  \frac{e-1}{e} \]

+ Lower case Greek letters are written as $\omega$ $\delta$ etc. while upper case Greek letters are written as $\Omega$ $\Delta$.

+ Mathematical operators are prefixed with a backslash as $\sin(\beta)$, $\cos(\alpha)$, $\log(x)$ etc.

\end{document}
此示例生成以下输出:
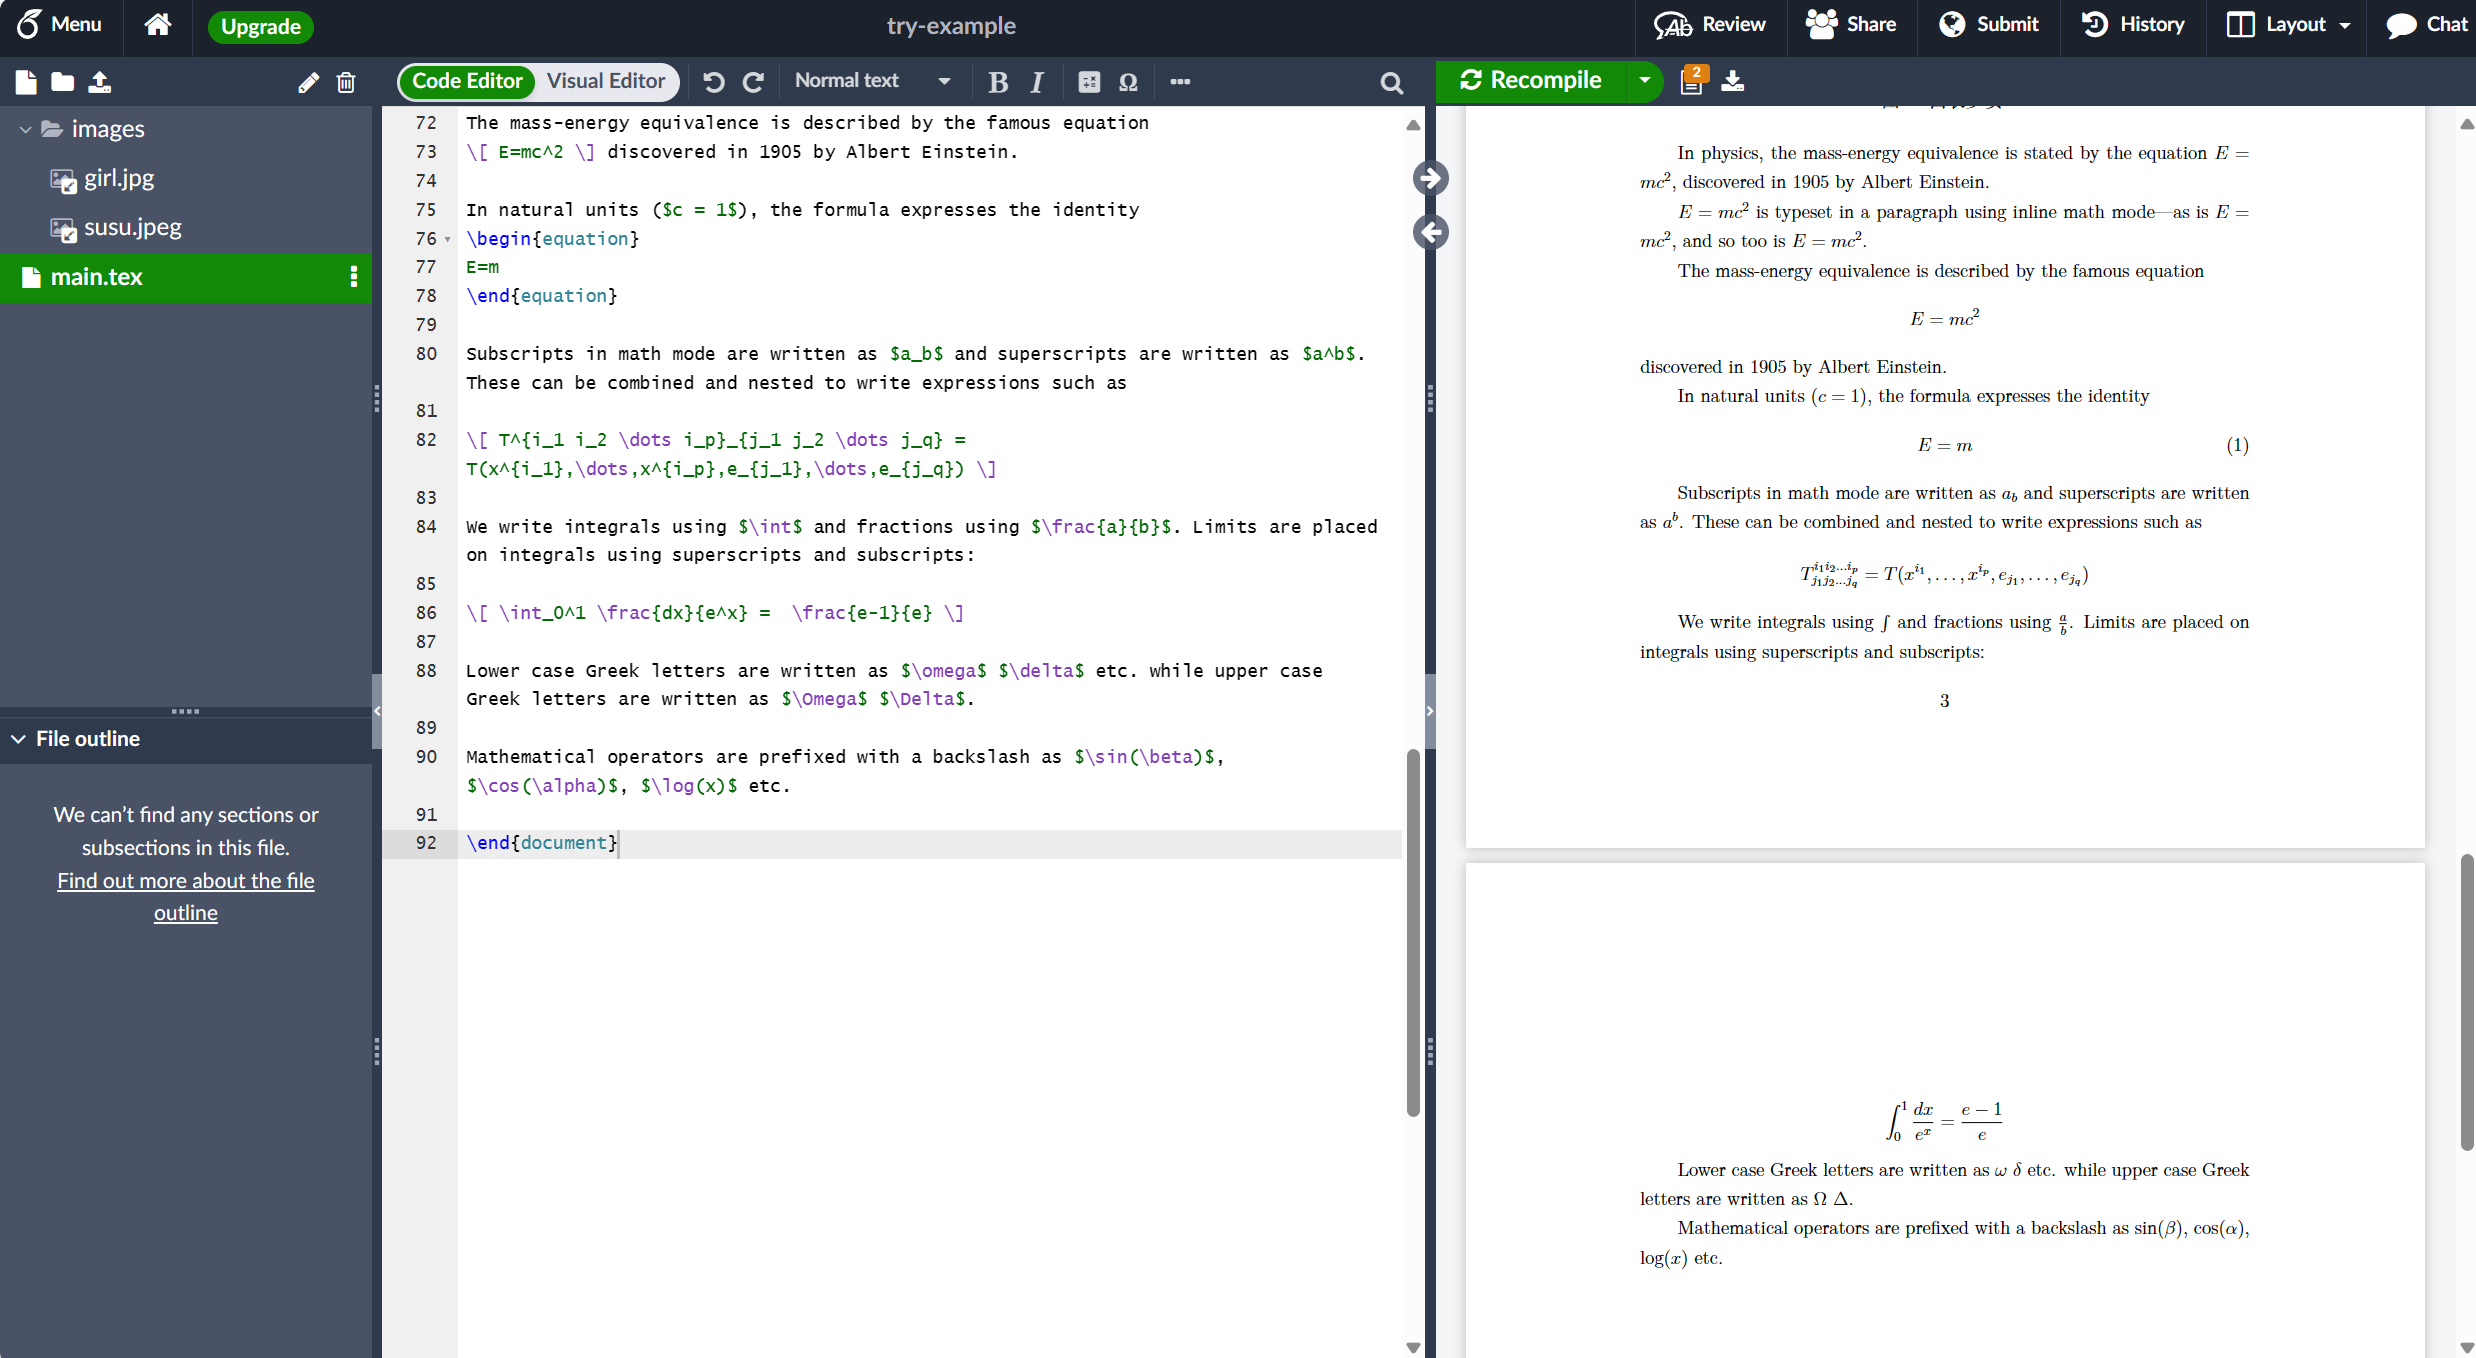
下一个示例使用 amsmath 包提供的 equation* 环境,因此我们需要在文档序言中添加以下行:
\usepackage{amsmath}% For the equation* environment有关使用 amsmath 的更多信息,请参阅 Overleaf 的帮助文章。
\documentclass[12pt, letterpaper]{article}

\usepackage{graphicx} %LaTeX package to import graphics
\graphicspath{{images/}} %configuring the graphicx package

+ \usepackage{amsmath}% For the equation* environment

% 中文编译需要 ctex 或 xeCJK 包
\usepackage[UTF8]{ctex}
% \usepackage{xeCJK}

\title{我的第一个LaTeX文档}
\author{LuYF-Lemon-love\thanks{Funded by the XXX team.}}
\date{\today}

\begin{document}

\maketitle

First document. This is a simple example, with no
extra parameters or packages included.

第一个文档。这是一个简单的例子,没有
包括额外的参数或包。

% 这里的这一行是注释。它不会在文档中排版。

Some of the \textbf{greatest}
discoveries in \underline{science}
were made by \textbf{\textit{accident}}.

Some of the greatest \emph{discoveries} in science
were made by accident.

\textit{Some of the greatest \emph{discoveries}
in science were made by accident.}

\textbf{Some of the greatest \emph{discoveries}
in science were made by accident.}

苏苏真可爱!

% The \includegraphcs command is
% provided (implemented) by the
% graphicx package
\includegraphics{susu}

\begin{figure}[h]
    \centering
    \includegraphics[width=0.75\textwidth]{girl}
    \caption{白衣少女.}
    \label{fig:mesh1}
\end{figure}

正如您在图 \ref{fig:mesh1} 中看到的,有一个青春美少女。此示例位于第 \pageref{fig:mesh1} 页。

\begin{itemize}
  \item The individual entries are indicated with a black dot, a so-called bullet.
  \item The text in the entries may be of any length.
\end{itemize}

\begin{enumerate}
  \item This is the first entry in our list.
  \item The list numbers increase with each entry we add.
\end{enumerate}

In physics, the mass-energy equivalence is stated
by the equation $E=mc^2$, discovered in 1905 by Albert Einstein.

\begin{math}
E=mc^2
\end{math} is typeset in a paragraph using inline math mode---as is $E=mc^2$, and so too is \(E=mc^2\).

The mass-energy equivalence is described by the famous equation
\[ E=mc^2 \] discovered in 1905 by Albert Einstein.

In natural units ($c = 1$), the formula expresses the identity
\begin{equation}
E=m
\end{equation}

Subscripts in math mode are written as $a_b$ and superscripts are written as $a^b$. These can be combined and nested to write expressions such as

\[ T^{i_1 i_2 \dots i_p}_{j_1 j_2 \dots j_q} = T(x^{i_1},\dots,x^{i_p},e_{j_1},\dots,e_{j_q}) \]

We write integrals using $\int$ and fractions using $\frac{a}{b}$. Limits are placed on integrals using superscripts and subscripts:

\[ \int_0^1 \frac{dx}{e^x} =  \frac{e-1}{e} \]

Lower case Greek letters are written as $\omega$ $\delta$ etc. while upper case Greek letters are written as $\Omega$ $\Delta$.

Mathematical operators are prefixed with a backslash as $\sin(\beta)$, $\cos(\alpha)$, $\log(x)$ etc.

+ \section{First example}

+ The well-known Pythagorean theorem \(x^2 + y^2 = z^2\) was proved to be invalid for other exponents, meaning the next equation has no integer solutions for \(n>2\):

+ \[ x^n + y^n = z^n \]

+ \section{Second example}

+ This is a simple math expression \(\sqrt{x^2+1}\) inside text.
+ And this is also the same:
+ \begin{math}
+ \sqrt{x^2+1}
+ \end{math}
+ but by using another command.

+ This is a simple math expression without numbering
+ \[\sqrt{x^2+1}\]
+ separated from text.

+ This is also the same:
+ \begin{displaymath}
+ \sqrt{x^2+1}
+ \end{displaymath}

+ \ldots and this:
+ \begin{equation*}
+ \sqrt{x^2+1}
+ \end{equation*}

\end{document}
此示例生成以下输出:
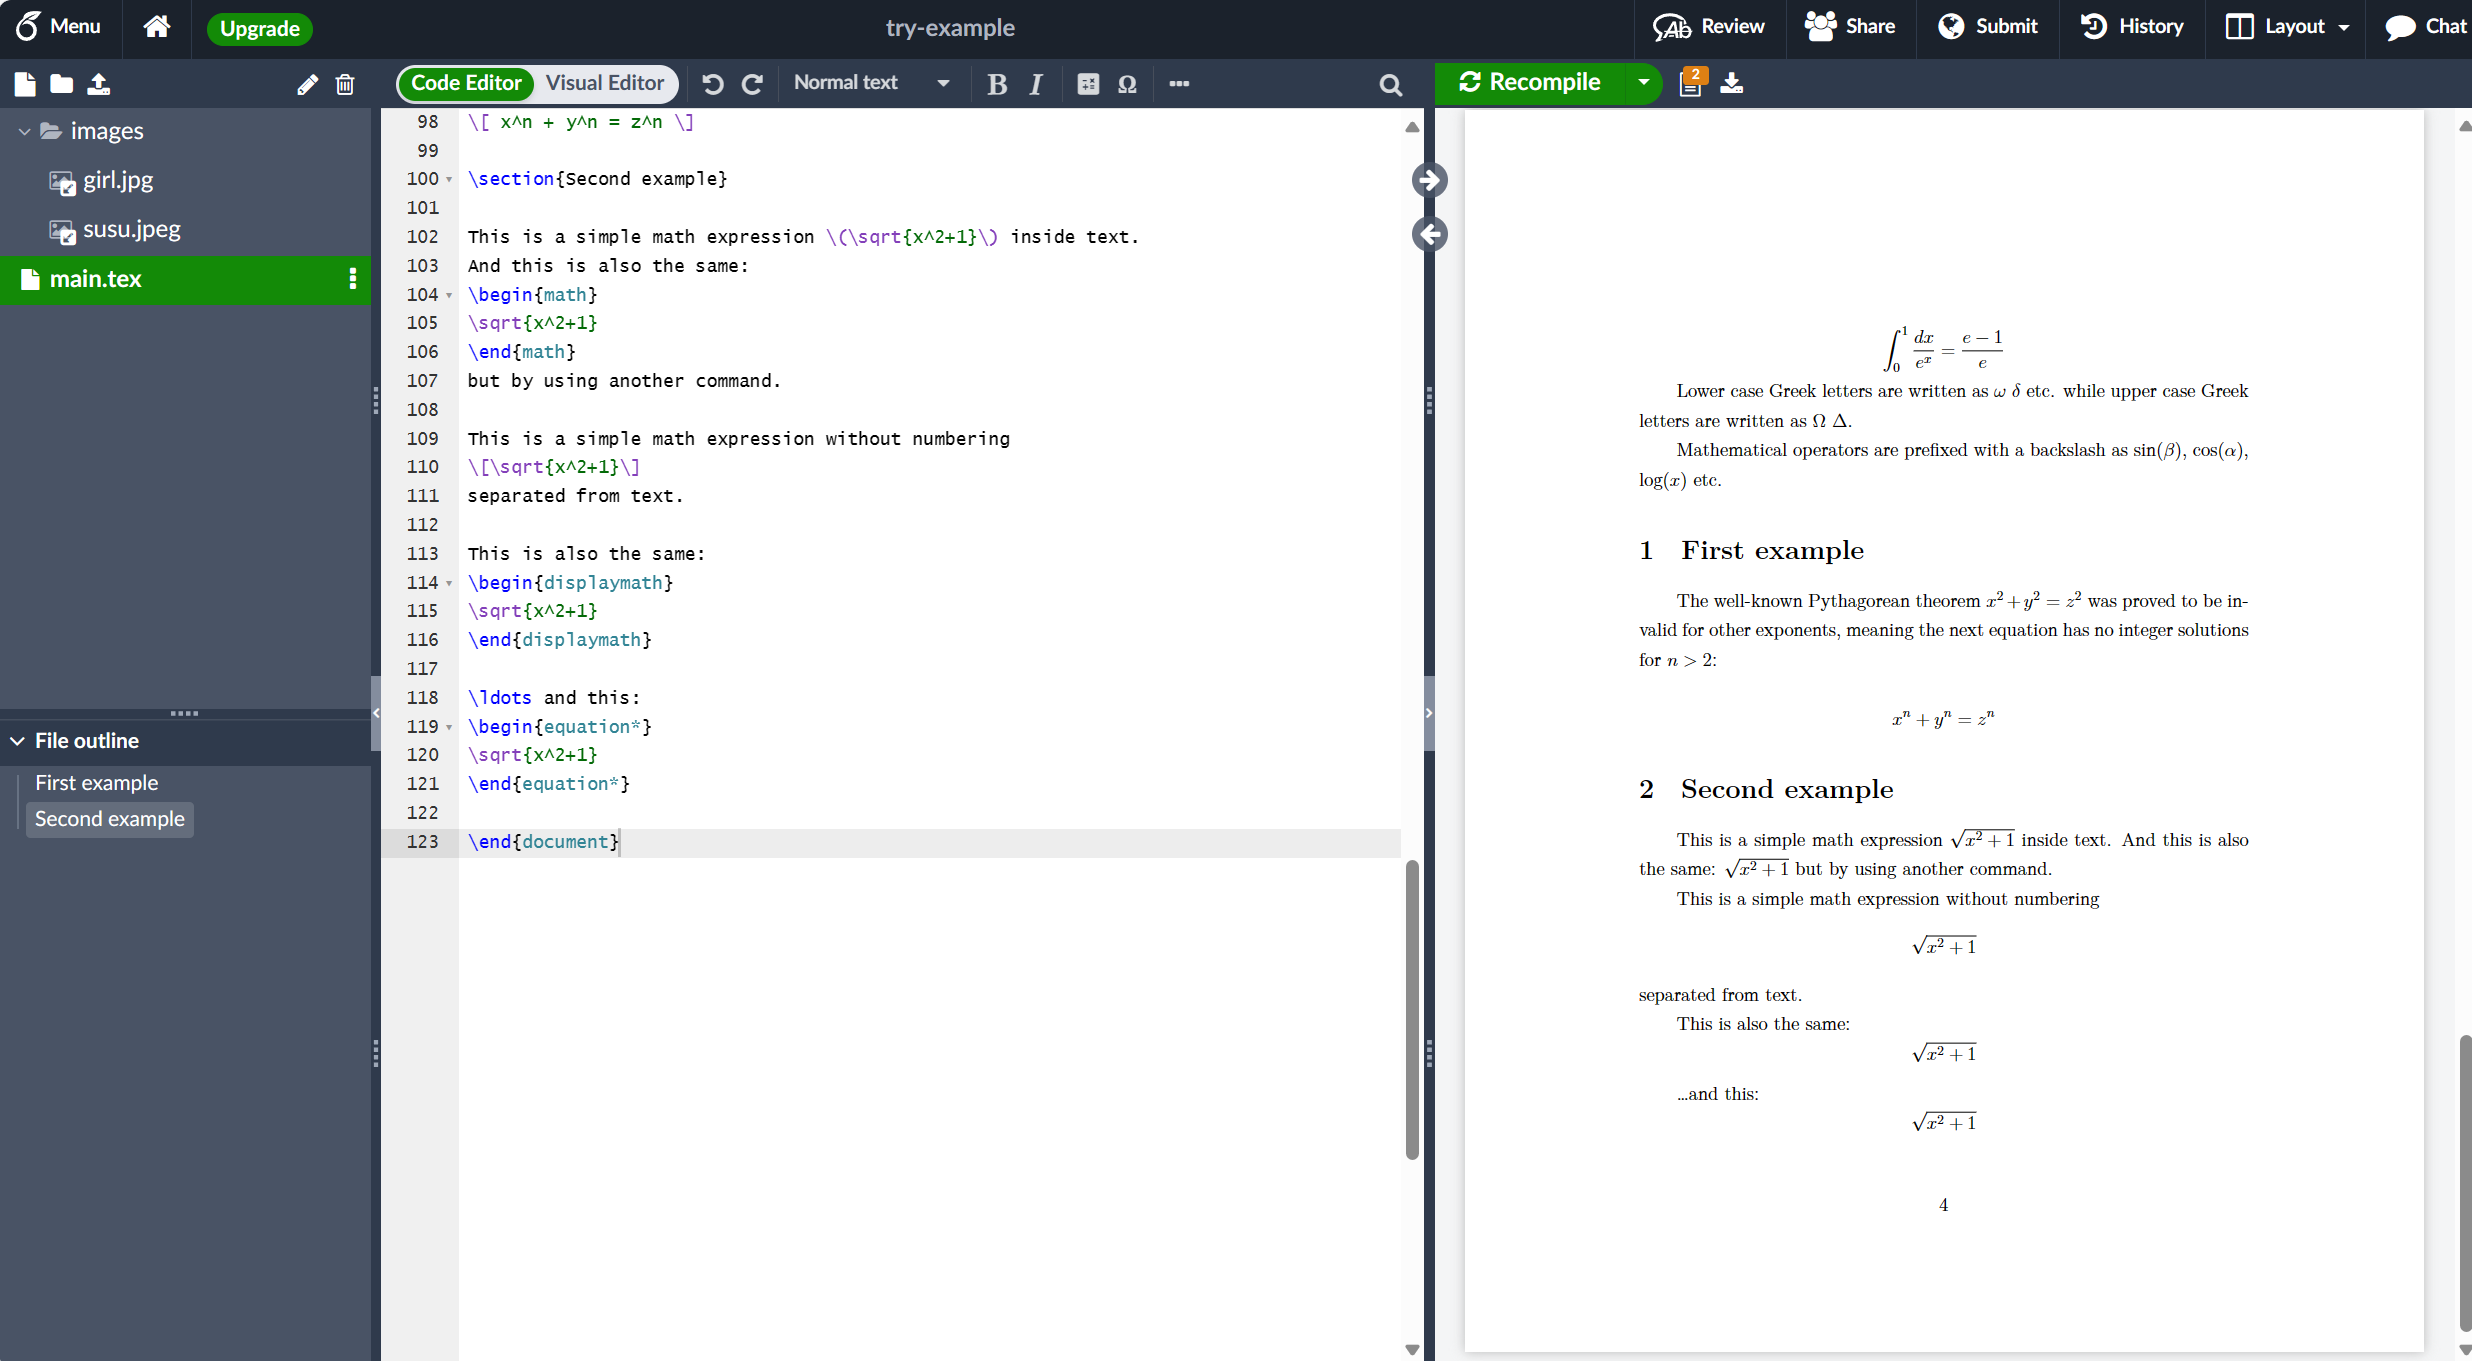
LaTeX 中数学的可能性是无穷无尽的,因此请务必访问 Overleaf 的帮助页面以获取有关特定主题的建议和示例:
基本文档结构
接下来,我们将探讨摘要以及如何将 LaTeX 文档划分为不同的章节、部分和段落。
- 摘要
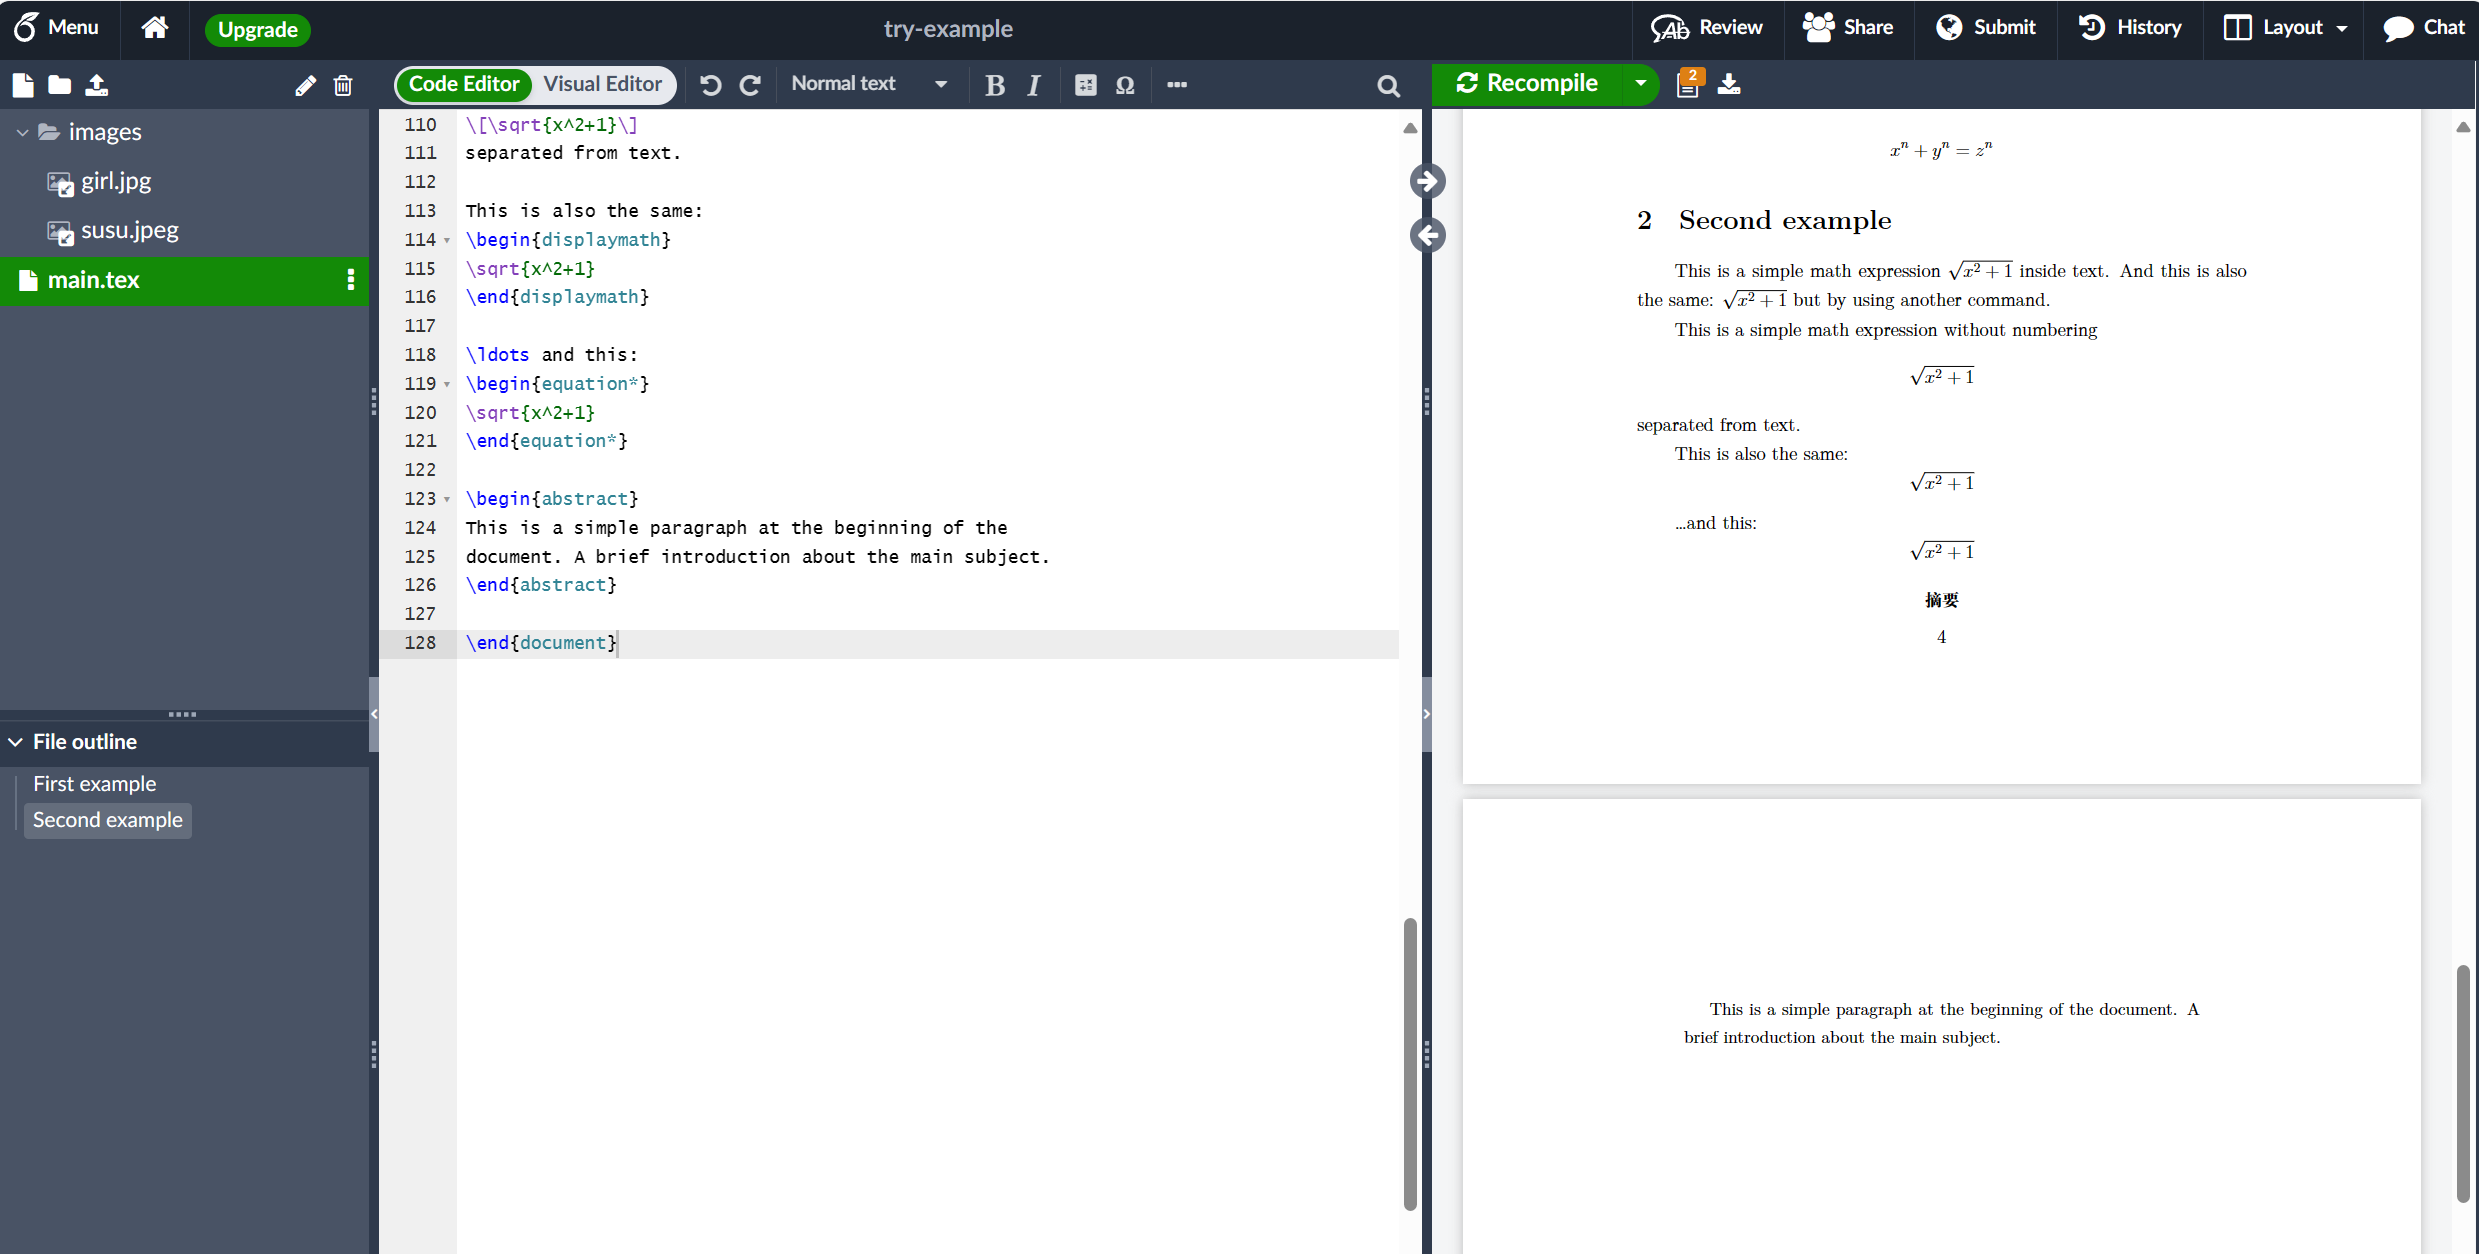
科学文章通常提供摘要,简要概述/总结其核心主题或论点。下一个示例演示使用 LaTeX 的 abstract 环境排版摘要:
\documentclass[12pt, letterpaper]{article}

\usepackage{graphicx} %LaTeX package to import graphics
\graphicspath{{images/}} %configuring the graphicx package

\usepackage{amsmath}% For the equation* environment

% 中文编译需要 ctex 或 xeCJK 包
\usepackage[UTF8]{ctex}
% \usepackage{xeCJK}

\title{我的第一个LaTeX文档}
\author{LuYF-Lemon-love\thanks{Funded by the XXX team.}}
\date{\today}

\begin{document}

\maketitle

First document. This is a simple example, with no
extra parameters or packages included.

第一个文档。这是一个简单的例子,没有
包括额外的参数或包。

% 这里的这一行是注释。它不会在文档中排版。

Some of the \textbf{greatest}
discoveries in \underline{science}
were made by \textbf{\textit{accident}}.

Some of the greatest \emph{discoveries} in science
were made by accident.

\textit{Some of the greatest \emph{discoveries}
in science were made by accident.}

\textbf{Some of the greatest \emph{discoveries}
in science were made by accident.}

苏苏真可爱!

% The \includegraphcs command is
% provided (implemented) by the
% graphicx package
\includegraphics{susu}

\begin{figure}[h]
    \centering
    \includegraphics[width=0.75\textwidth]{girl}
    \caption{白衣少女.}
    \label{fig:mesh1}
\end{figure}

正如您在图 \ref{fig:mesh1} 中看到的,有一个青春美少女。此示例位于第 \pageref{fig:mesh1} 页。

\begin{itemize}
  \item The individual entries are indicated with a black dot, a so-called bullet.
  \item The text in the entries may be of any length.
\end{itemize}

\begin{enumerate}
  \item This is the first entry in our list.
  \item The list numbers increase with each entry we add.
\end{enumerate}

In physics, the mass-energy equivalence is stated
by the equation $E=mc^2$, discovered in 1905 by Albert Einstein.

\begin{math}
E=mc^2
\end{math} is typeset in a paragraph using inline math mode---as is $E=mc^2$, and so too is \(E=mc^2\).

The mass-energy equivalence is described by the famous equation
\[ E=mc^2 \] discovered in 1905 by Albert Einstein.

In natural units ($c = 1$), the formula expresses the identity
\begin{equation}
E=m
\end{equation}

Subscripts in math mode are written as $a_b$ and superscripts are written as $a^b$. These can be combined and nested to write expressions such as

\[ T^{i_1 i_2 \dots i_p}_{j_1 j_2 \dots j_q} = T(x^{i_1},\dots,x^{i_p},e_{j_1},\dots,e_{j_q}) \]

We write integrals using $\int$ and fractions using $\frac{a}{b}$. Limits are placed on integrals using superscripts and subscripts:

\[ \int_0^1 \frac{dx}{e^x} =  \frac{e-1}{e} \]

Lower case Greek letters are written as $\omega$ $\delta$ etc. while upper case Greek letters are written as $\Omega$ $\Delta$.

Mathematical operators are prefixed with a backslash as $\sin(\beta)$, $\cos(\alpha)$, $\log(x)$ etc.

\section{First example}

The well-known Pythagorean theorem \(x^2 + y^2 = z^2\) was proved to be invalid for other exponents, meaning the next equation has no integer solutions for \(n>2\):

\[ x^n + y^n = z^n \]

\section{Second example}

This is a simple math expression \(\sqrt{x^2+1}\) inside text.
And this is also the same:
\begin{math}
\sqrt{x^2+1}
\end{math}
but by using another command.

This is a simple math expression without numbering
\[\sqrt{x^2+1}\]
separated from text.

This is also the same:
\begin{displaymath}
\sqrt{x^2+1}
\end{displaymath}

\ldots and this:
\begin{equation*}
\sqrt{x^2+1}
\end{equation*}

+ \begin{abstract}
+ This is a simple paragraph at the beginning of the
+ document. A brief introduction about the main subject.
+ \end{abstract}

\end{document}
此示例生成以下输出:
- 段落和新行
有了摘要,我们就可以开始写第一段了。下一个例子演示:
- 如何通过按两次“回车键”、结束当前行并插入后续空行来创建新段落;
- 如何通过使用
\\命令(双反斜杠)插入手动换行符来开始新行而不开始新段落;或者,使用\newline命令。
此示例中的第三段演示了命令 \\ 和 \newline 的使用:
\documentclass[12pt, letterpaper]{article}

\usepackage{graphicx} %LaTeX package to import graphics
\graphicspath{{images/}} %configuring the graphicx package

\usepackage{amsmath}% For the equation* environment

% 中文编译需要 ctex 或 xeCJK 包
\usepackage[UTF8]{ctex}
% \usepackage{xeCJK}

\title{我的第一个LaTeX文档}
\author{LuYF-Lemon-love\thanks{Funded by the XXX team.}}
\date{\today}

\begin{document}

\maketitle

First document. This is a simple example, with no
extra parameters or packages included.

第一个文档。这是一个简单的例子,没有
包括额外的参数或包。

% 这里的这一行是注释。它不会在文档中排版。

Some of the \textbf{greatest}
discoveries in \underline{science}
were made by \textbf{\textit{accident}}.

Some of the greatest \emph{discoveries} in science
were made by accident.

\textit{Some of the greatest \emph{discoveries}
in science were made by accident.}

\textbf{Some of the greatest \emph{discoveries}
in science were made by accident.}

苏苏真可爱!

% The \includegraphcs command is
% provided (implemented) by the
% graphicx package
\includegraphics{susu}

\begin{figure}[h]
    \centering
    \includegraphics[width=0.75\textwidth]{girl}
    \caption{白衣少女.}
    \label{fig:mesh1}
\end{figure}

正如您在图 \ref{fig:mesh1} 中看到的,有一个青春美少女。此示例位于第 \pageref{fig:mesh1} 页。

\begin{itemize}
  \item The individual entries are indicated with a black dot, a so-called bullet.
  \item The text in the entries may be of any length.
\end{itemize}

\begin{enumerate}
  \item This is the first entry in our list.
  \item The list numbers increase with each entry we add.
\end{enumerate}

In physics, the mass-energy equivalence is stated
by the equation $E=mc^2$, discovered in 1905 by Albert Einstein.

\begin{math}
E=mc^2
\end{math} is typeset in a paragraph using inline math mode---as is $E=mc^2$, and so too is \(E=mc^2\).

The mass-energy equivalence is described by the famous equation
\[ E=mc^2 \] discovered in 1905 by Albert Einstein.

In natural units ($c = 1$), the formula expresses the identity
\begin{equation}
E=m
\end{equation}

Subscripts in math mode are written as $a_b$ and superscripts are written as $a^b$. These can be combined and nested to write expressions such as

\[ T^{i_1 i_2 \dots i_p}_{j_1 j_2 \dots j_q} = T(x^{i_1},\dots,x^{i_p},e_{j_1},\dots,e_{j_q}) \]

We write integrals using $\int$ and fractions using $\frac{a}{b}$. Limits are placed on integrals using superscripts and subscripts:

\[ \int_0^1 \frac{dx}{e^x} =  \frac{e-1}{e} \]

Lower case Greek letters are written as $\omega$ $\delta$ etc. while upper case Greek letters are written as $\Omega$ $\Delta$.

Mathematical operators are prefixed with a backslash as $\sin(\beta)$, $\cos(\alpha)$, $\log(x)$ etc.

\section{First example}

The well-known Pythagorean theorem \(x^2 + y^2 = z^2\) was proved to be invalid for other exponents, meaning the next equation has no integer solutions for \(n>2\):

\[ x^n + y^n = z^n \]

\section{Second example}

This is a simple math expression \(\sqrt{x^2+1}\) inside text.
And this is also the same:
\begin{math}
\sqrt{x^2+1}
\end{math}
but by using another command.

This is a simple math expression without numbering
\[\sqrt{x^2+1}\]
separated from text.

This is also the same:
\begin{displaymath}
\sqrt{x^2+1}
\end{displaymath}

\ldots and this:
\begin{equation*}
\sqrt{x^2+1}
\end{equation*}

\begin{abstract}
This is a simple paragraph at the beginning of the
document. A brief introduction about the main subject.
\end{abstract}

+ After our abstract we can begin the first paragraph, then press ``enter'' twice to start the second one.

+ This line will start a second paragraph.

+ I will start the third paragraph and then add \\ a manual line break which causes this text to start on a new line but remains part of the same paragraph. Alternatively, I can use the \verb|\newline|\newline command to start a new line, which is also part of the same paragraph.

\end{document}
此示例生成以下输出:
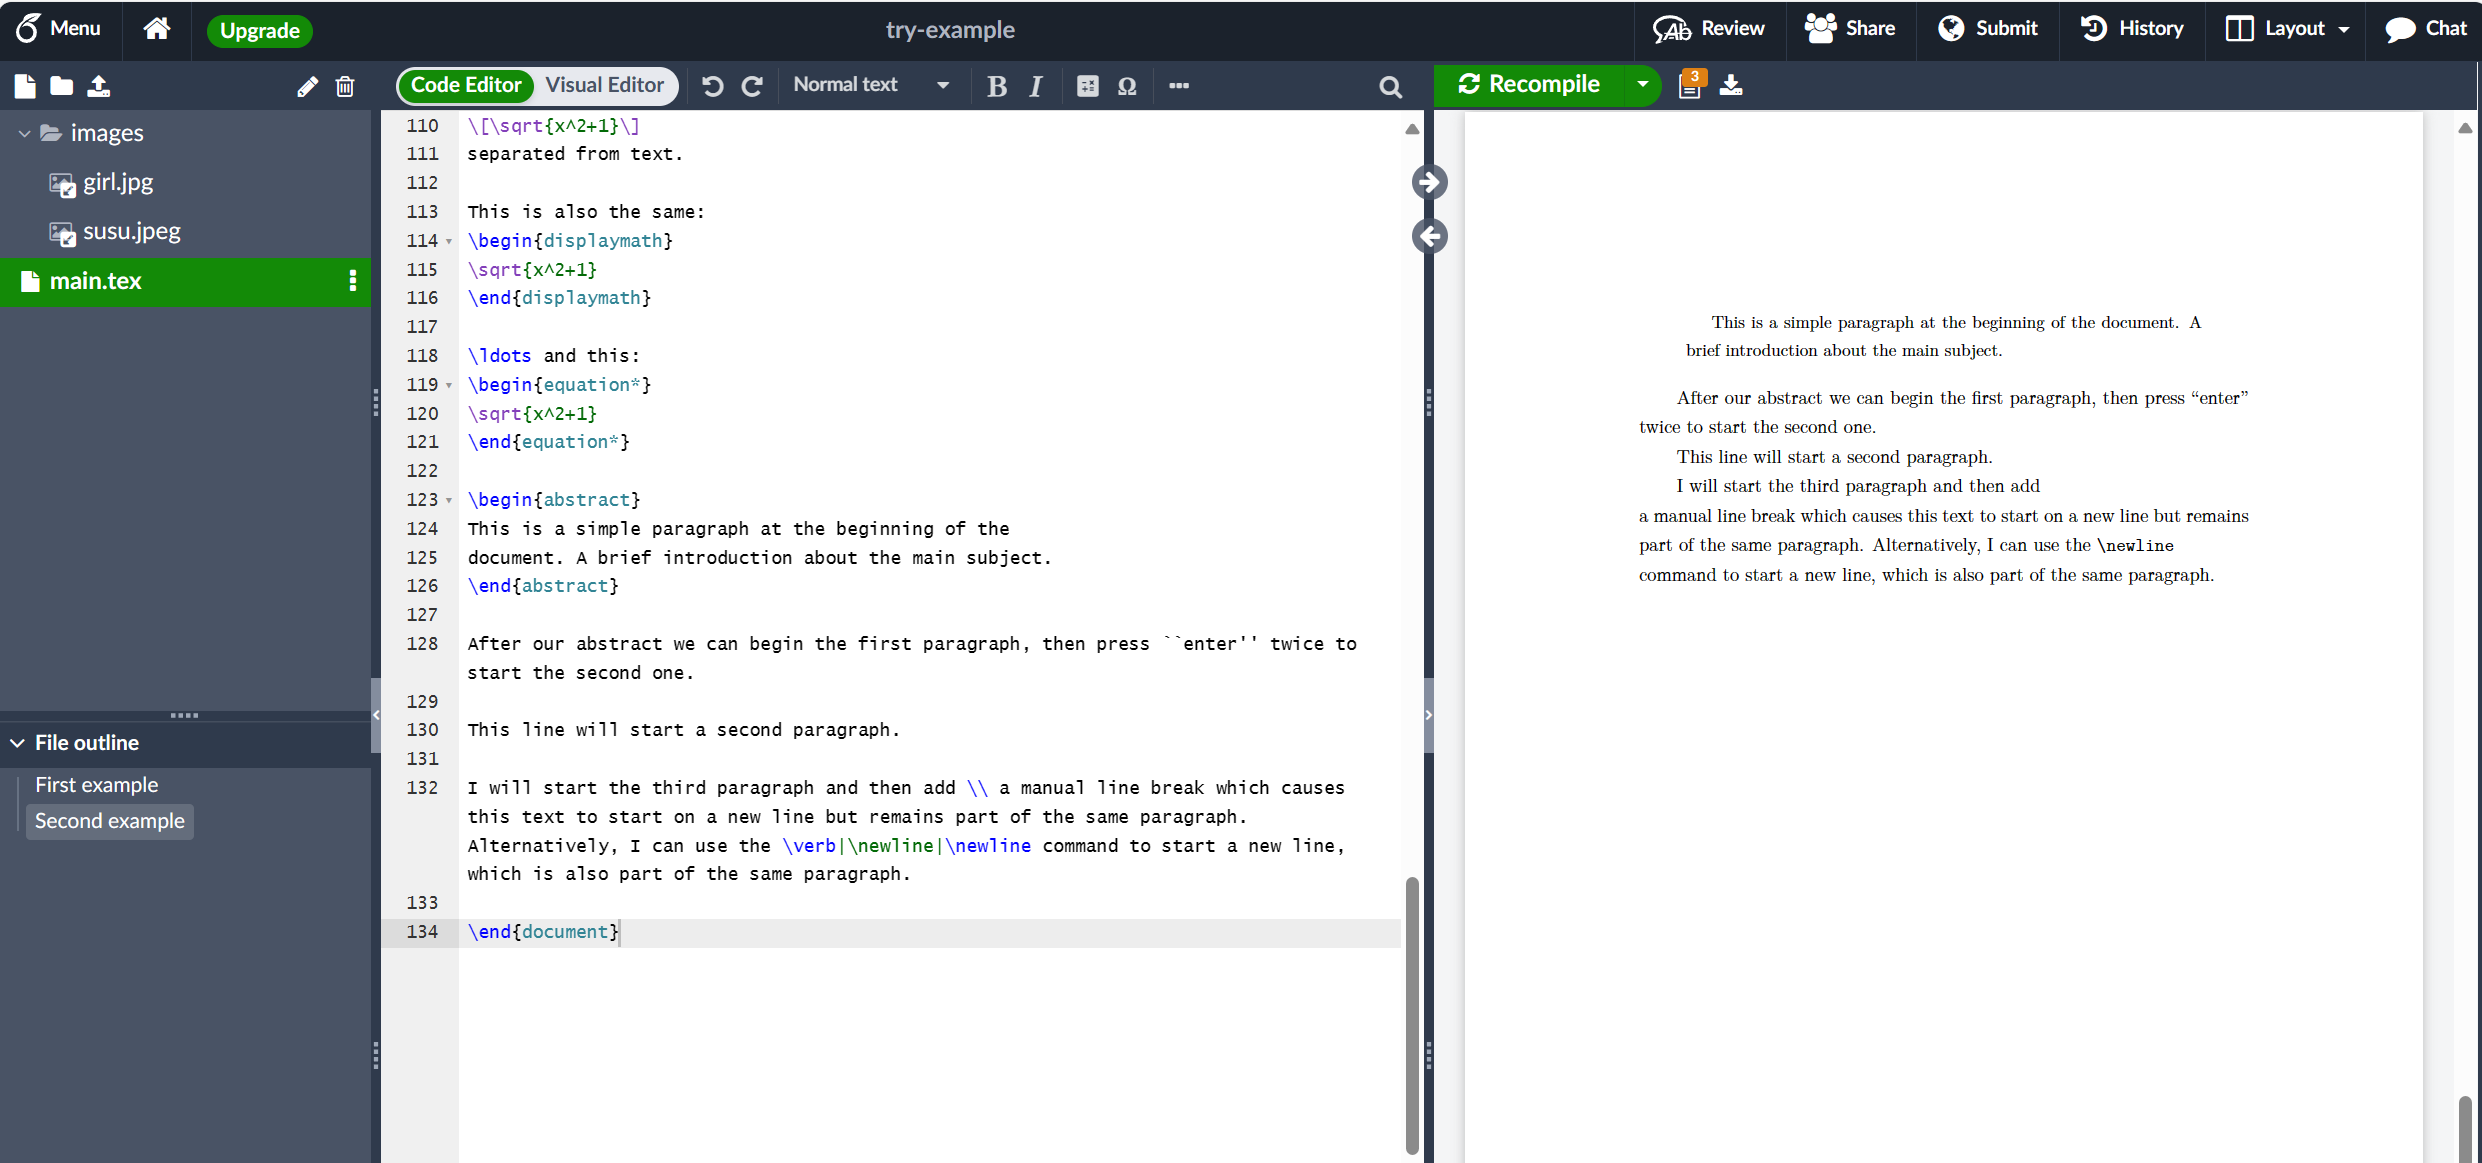
请注意 LaTeX 如何自动缩进段落-除了紧跟在文档标题(如部分和小节)之后-正如我们将看到的那样。
建议新用户不要使用多个 \\ 或 \newlines 来“模拟”行间距较大的段落,因为这会干扰 LaTeX 的排版算法。推荐的方法是继续使用空行来创建新段落,没有任何 \\,并通过在序言中添加 \usepackage{parskip} 来加载 parskip 包。
关于段落的更多信息可在以下文章中找到:
- 段落和新行
- 如何在LaTeX中更改段落行间距
- LaTeX错误:这里没有结束的行: 提供了关于使用
\\的额外建议和指导。
- 章节和部分
较长的文档,与创作软件无关,通常分为 parts、chapters、sections、subsections 等。LaTeX 还提供 document-structuring 命令,但可用命令及其实现(它们的作用)可能取决于正在使用的文档类。 例如,使用 book 类创建的文档可以拆分为 parts、chapters、sections、subsections 等,但 letter 类不提供(支持)任何命令来执行此操作。
下一个示例演示了用于根据 book 类构建文档的命令:
\documentclass{book}
\begin{document}

\chapter{First Chapter}

\section{Introduction}

This is the first section.

Lorem  ipsum  dolor  sit  amet,  consectetuer  adipiscing
elit. Etiam  lobortisfacilisis sem.  Nullam nec mi et
neque pharetra sollicitudin.  Praesent imperdietmi nec ante.
Donec ullamcorper, felis non sodales...

\section{Second Section}

Lorem ipsum dolor sit amet, consectetuer adipiscing elit.
Etiam lobortis facilisissem.  Nullam nec mi et neque pharetra
sollicitudin.  Praesent imperdiet mi necante...

\subsection{First Subsection}
Praesent imperdietmi nec ante. Donec ullamcorper, felis non sodales...

\section*{Unnumbered Section}
Lorem ipsum dolor sit amet, consectetuer adipiscing elit.
Etiam lobortis facilisissem...
\end{document}
此示例生成以下输出:
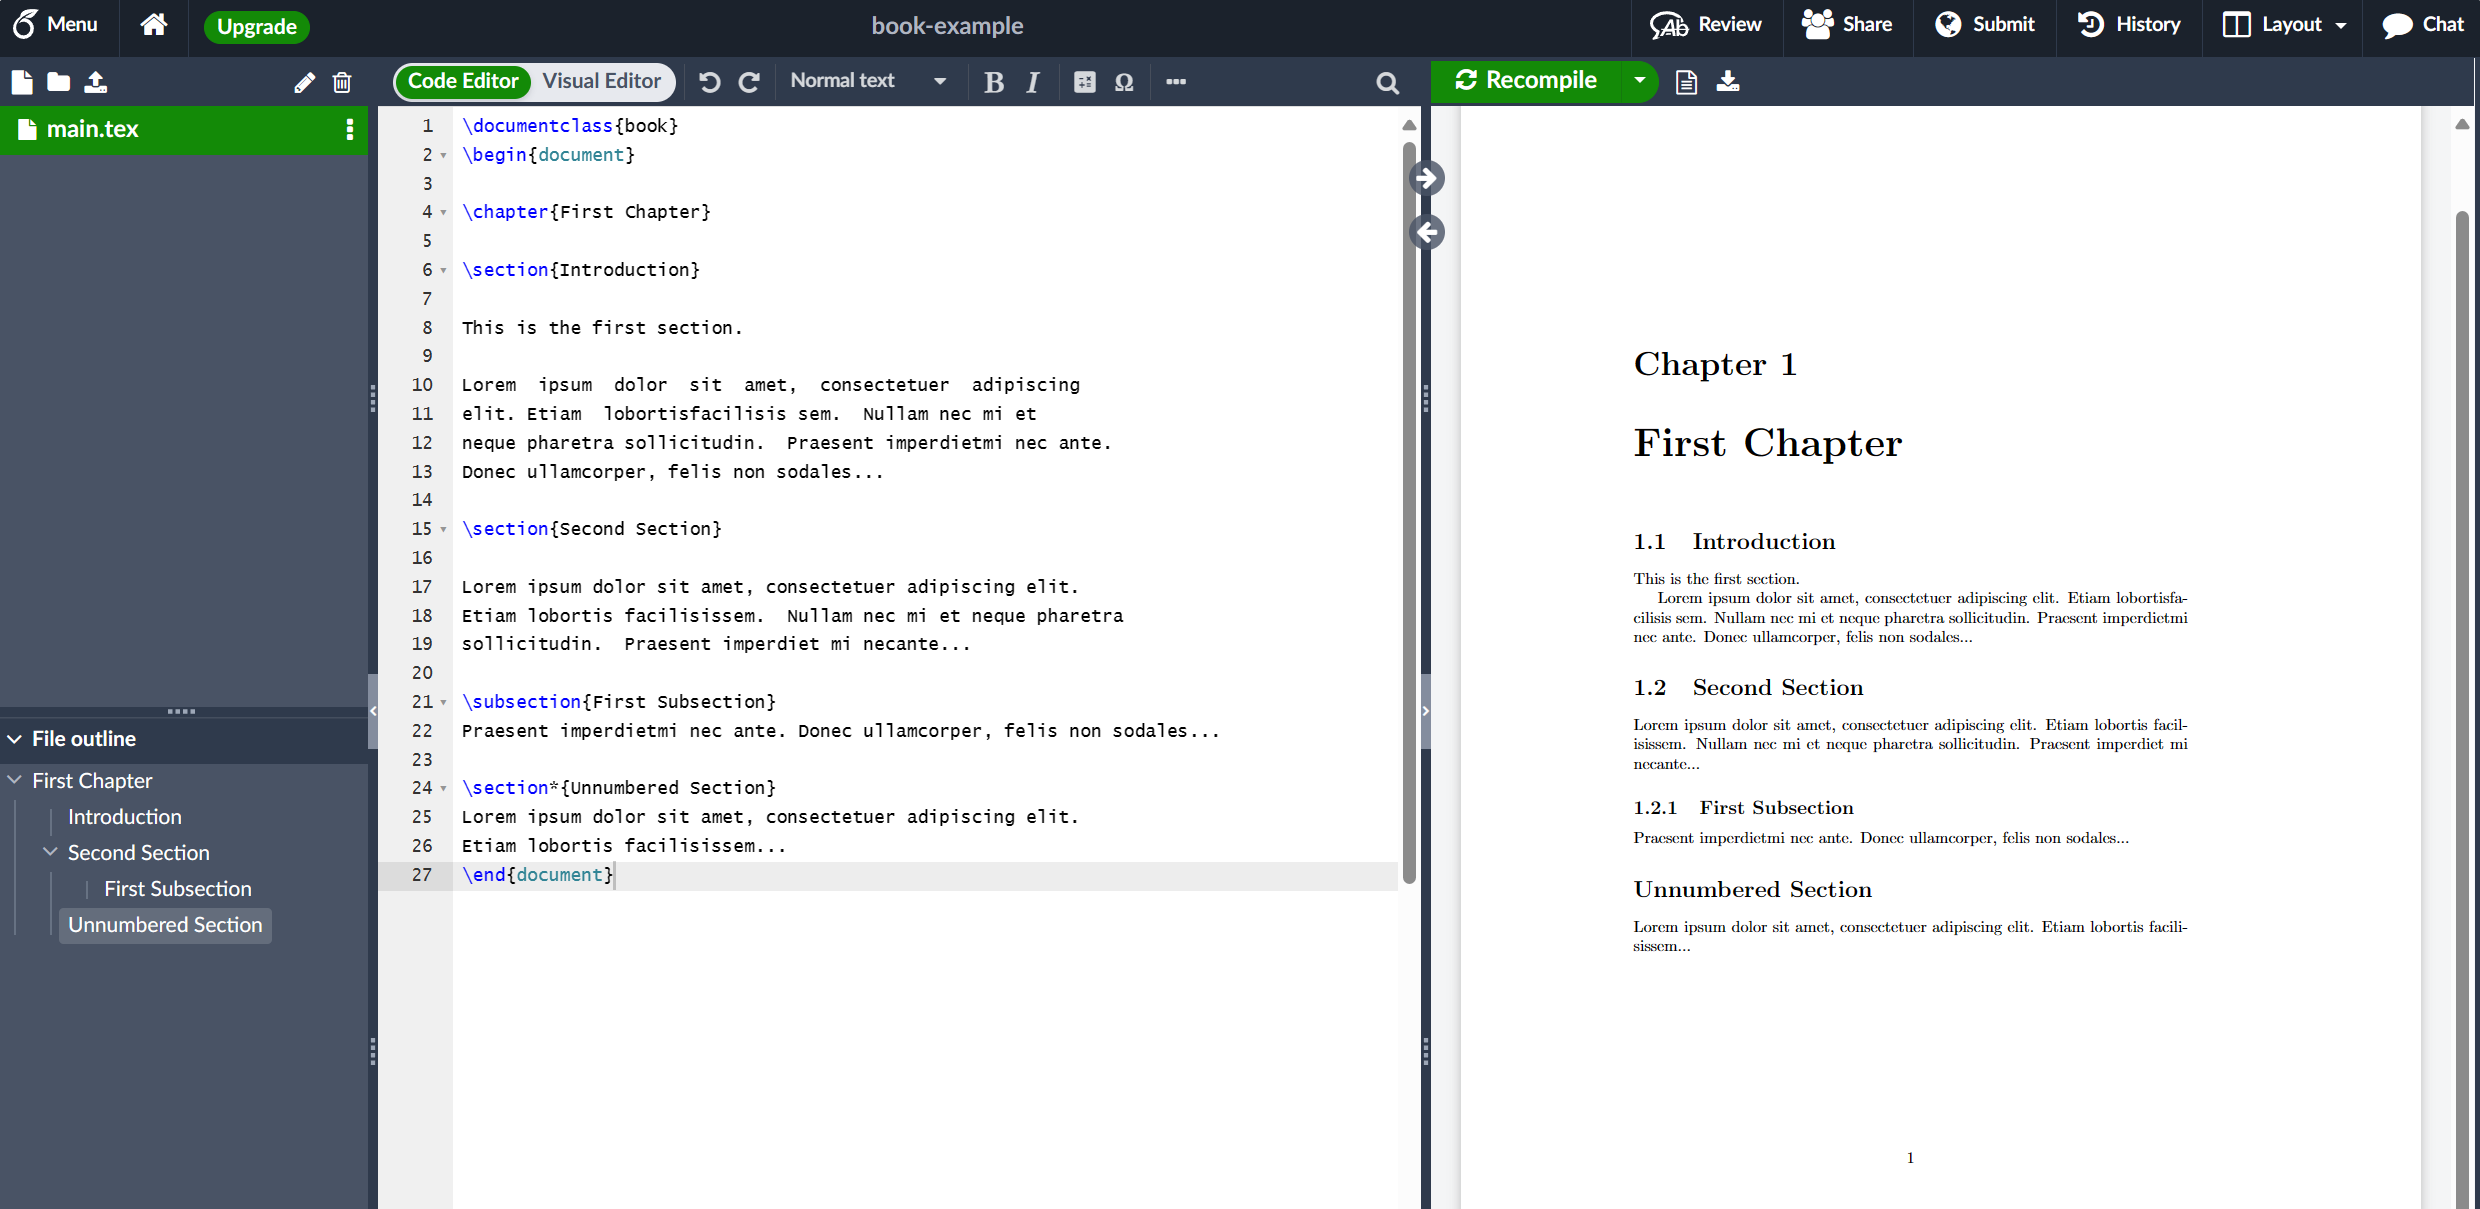
分段命令的名称大多是不言自明的;例如,\chapter{First Chapter} 创建一个名为 First Chapter 的新章,\section{Introduction} 生成一个名为 Introduction 的节,等等。节还可以进一步分为 \subsection{...} 甚至 \subsubsection{...}。章节、小节等的编号是自动的,但可以通过使用适当命令的所谓星号版本来禁用,该命令末尾有星号(*),例如 \section*{...} 和 \subsection*{...}。
总的来说,LaTeX 文档类提供以下分段命令,每个特定类都支持相关子集:
\part{part}\chapter{chapter}\section{section}\subsection{subsection}\subsubsection{subsubsection}\paragraph{paragraph}\subparagraph{subparagraph}
特别是,\part 和 \chapter 命令仅在 report 和 book 文档类中可用。
有关文档结构命令的更多信息,请访问 Overleaf 的相关文章。
创建表格
以下示例展示了如何在LaTeX中创建表,包括添加行(规则)和标题。
- 在 LaTeX 中创建基本表
我们从一个展示如何排版基本表的示例开始:
\documentclass{book}
\begin{document}

\chapter{First Chapter}

\section{Introduction}

This is the first section.

Lorem  ipsum  dolor  sit  amet,  consectetuer  adipiscing
elit. Etiam  lobortisfacilisis sem.  Nullam nec mi et
neque pharetra sollicitudin.  Praesent imperdietmi nec ante.
Donec ullamcorper, felis non sodales...

\section{Second Section}

Lorem ipsum dolor sit amet, consectetuer adipiscing elit.
Etiam lobortis facilisissem.  Nullam nec mi et neque pharetra
sollicitudin.  Praesent imperdiet mi necante...

\subsection{First Subsection}
Praesent imperdietmi nec ante. Donec ullamcorper, felis non sodales...

\section*{Unnumbered Section}
Lorem ipsum dolor sit amet, consectetuer adipiscing elit.
Etiam lobortis facilisissem...

+ \begin{center}
+ \begin{tabular}{c c c}
+  cell1 & cell2 & cell3 \\
+  cell4 & cell5 & cell6 \\
+  cell7 & cell8 & cell9
+ \end{tabular}
+ \end{center}

\end{document}
此示例生成以下输出:
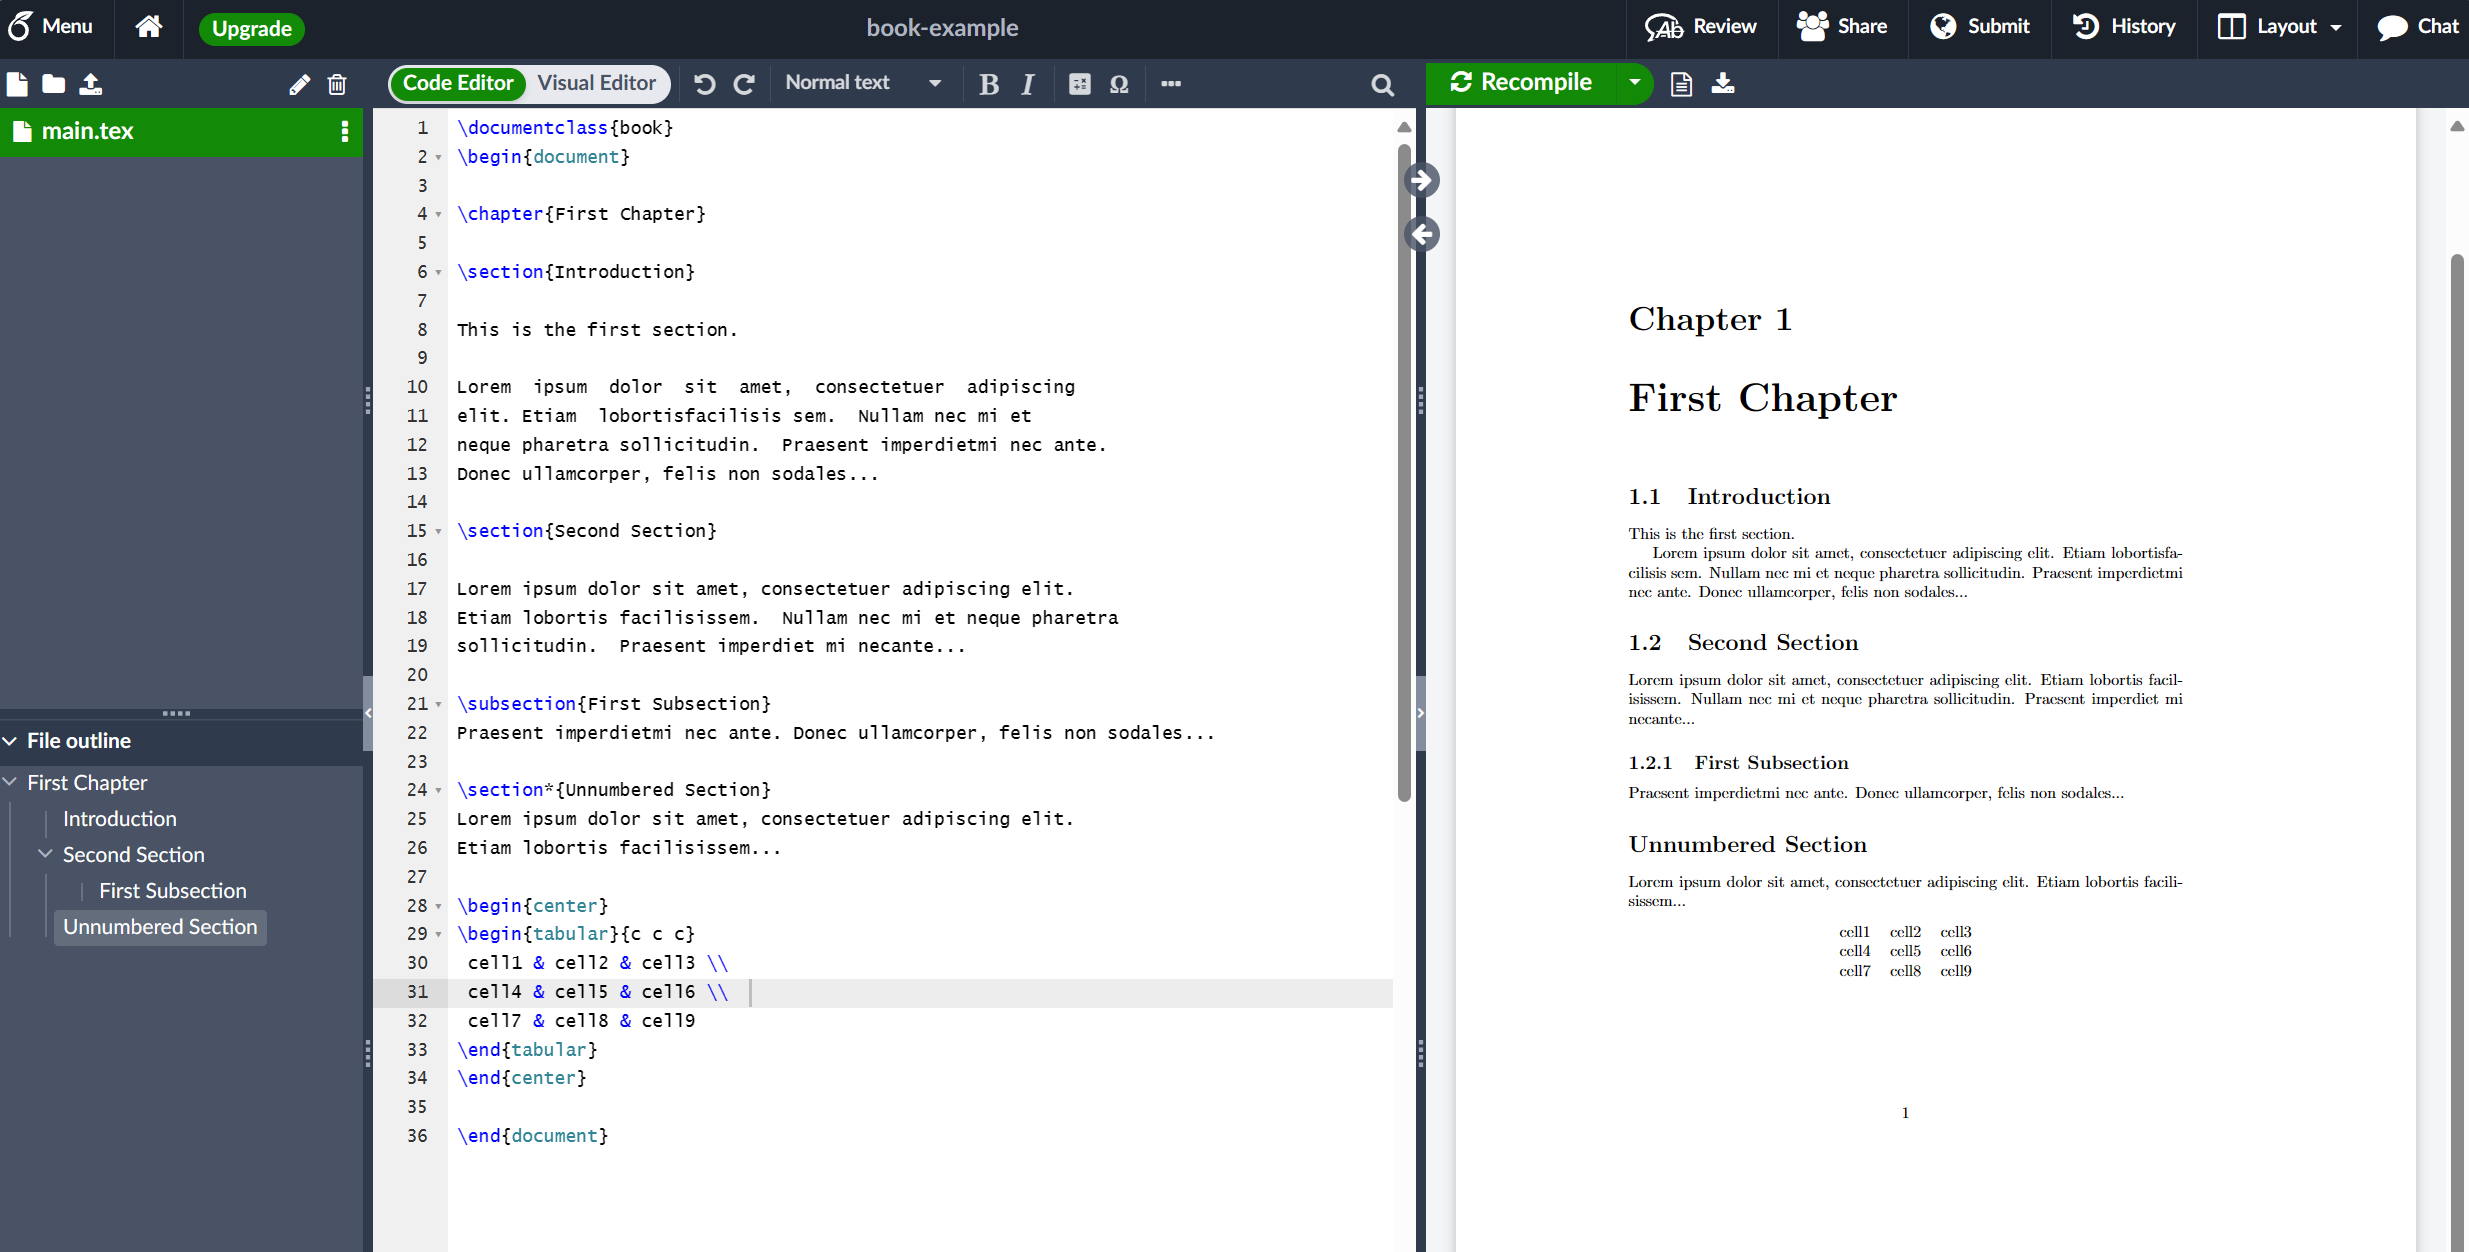
tabular 环境是创建表的默认 LaTeX 方法。您必须为此环境指定一个参数,在这种情况下 {c c c} 它建议 LaTeX 将有三列,并且每列中的文本必须居中。您还可以使用 r 对文本进行右对齐,使用 l 对文本进行左对齐。对齐符号 & 用于标定表格行内的单个表格单元格。要结束表行,请使用新的行命令 \\ 。我们的表格包含在 center 环境中,使其在页面的文本宽度内居中。
- 添加边框
tabular 环境支持将水平线和垂直线(规则)作为表的一部分:
- 要在行上方和下方添加水平规则,请使用
\hline命令 - 要在列之间添加垂直规则,请使用垂直线参数
|
在这个例子中,参数是 {|c|c|c|},它声明了三个(居中)列,每个列由一条垂直线(规则)分隔;此外,我们使用 \hline 在第一行上方和最后一行下方放置一个水平规则:
\documentclass{book}
\begin{document}

\chapter{First Chapter}

\section{Introduction}

This is the first section.

Lorem  ipsum  dolor  sit  amet,  consectetuer  adipiscing
elit. Etiam  lobortisfacilisis sem.  Nullam nec mi et
neque pharetra sollicitudin.  Praesent imperdietmi nec ante.
Donec ullamcorper, felis non sodales...

\section{Second Section}

Lorem ipsum dolor sit amet, consectetuer adipiscing elit.
Etiam lobortis facilisissem.  Nullam nec mi et neque pharetra
sollicitudin.  Praesent imperdiet mi necante...

\subsection{First Subsection}
Praesent imperdietmi nec ante. Donec ullamcorper, felis non sodales...

\section*{Unnumbered Section}
Lorem ipsum dolor sit amet, consectetuer adipiscing elit.
Etiam lobortis facilisissem...

\begin{center}
\begin{tabular}{c c c}
 cell1 & cell2 & cell3 \\
 cell4 & cell5 & cell6 \\
 cell7 & cell8 & cell9
\end{tabular}
\end{center}

+ \begin{center}
+ \begin{tabular}{|c|c|c|}
+  \hline
+  cell1 & cell2 & cell3 \\
+  cell4 & cell5 & cell6 \\
+  cell7 & cell8 & cell9 \\
+  \hline
+ \end{tabular}
+ \end{center}

\end{document}
此示例生成以下输出:
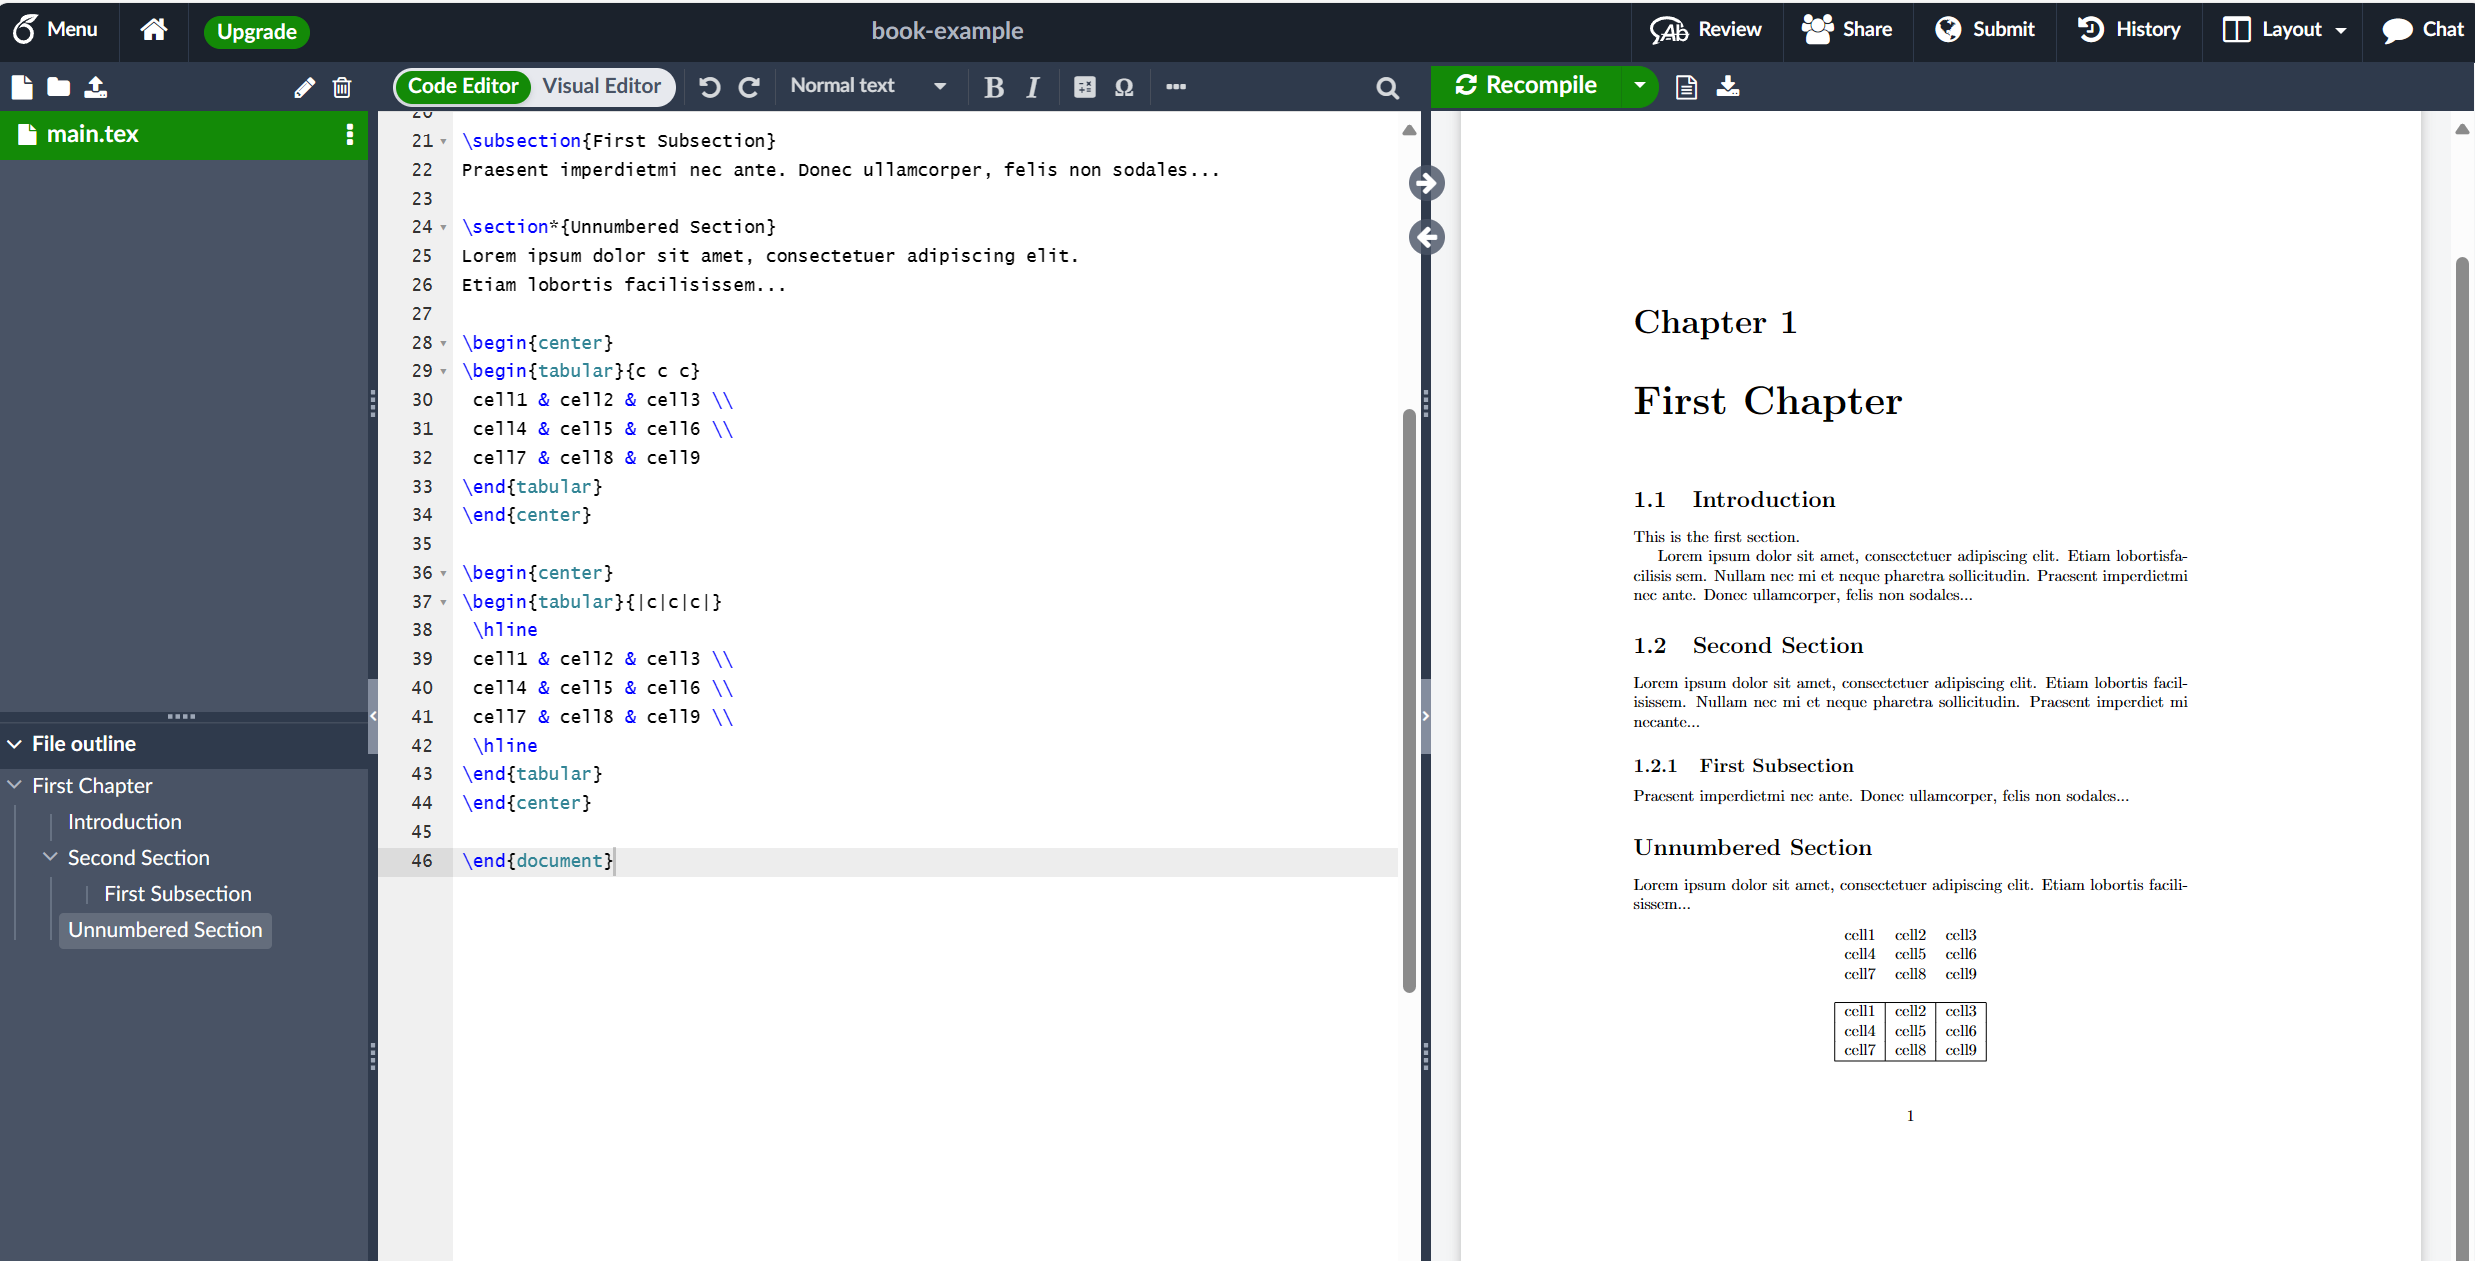
下面是另一个例子:
\documentclass{book}
\begin{document}

\chapter{First Chapter}

\section{Introduction}

This is the first section.

Lorem  ipsum  dolor  sit  amet,  consectetuer  adipiscing
elit. Etiam  lobortisfacilisis sem.  Nullam nec mi et
neque pharetra sollicitudin.  Praesent imperdietmi nec ante.
Donec ullamcorper, felis non sodales...

\section{Second Section}

Lorem ipsum dolor sit amet, consectetuer adipiscing elit.
Etiam lobortis facilisissem.  Nullam nec mi et neque pharetra
sollicitudin.  Praesent imperdiet mi necante...

\subsection{First Subsection}
Praesent imperdietmi nec ante. Donec ullamcorper, felis non sodales...

\section*{Unnumbered Section}
Lorem ipsum dolor sit amet, consectetuer adipiscing elit.
Etiam lobortis facilisissem...

\begin{center}
\begin{tabular}{c c c}
 cell1 & cell2 & cell3 \\
 cell4 & cell5 & cell6 \\
 cell7 & cell8 & cell9
\end{tabular}
\end{center}

\begin{center}
\begin{tabular}{|c|c|c|}
 \hline
 cell1 & cell2 & cell3 \\
 cell4 & cell5 & cell6 \\
 cell7 & cell8 & cell9 \\
 \hline
\end{tabular}
\end{center}

+ \begin{center}
+  \begin{tabular}{||c c c c||}
+  \hline
+  Col1 & Col2 & Col2 & Col3 \\ [0.5ex]
+  \hline\hline
+  1 & 6 & 87837 & 787 \\
+  \hline
+  2 & 7 & 78 & 5415 \\
+  \hline
+  3 & 545 & 778 & 7507 \\
+  \hline
+  4 & 545 & 18744 & 7560 \\
+  \hline
+  5 & 88 & 788 & 6344 \\ [1ex]
+  \hline
+ \end{tabular}
+ \end{center}

\end{document}
此示例生成以下输出:
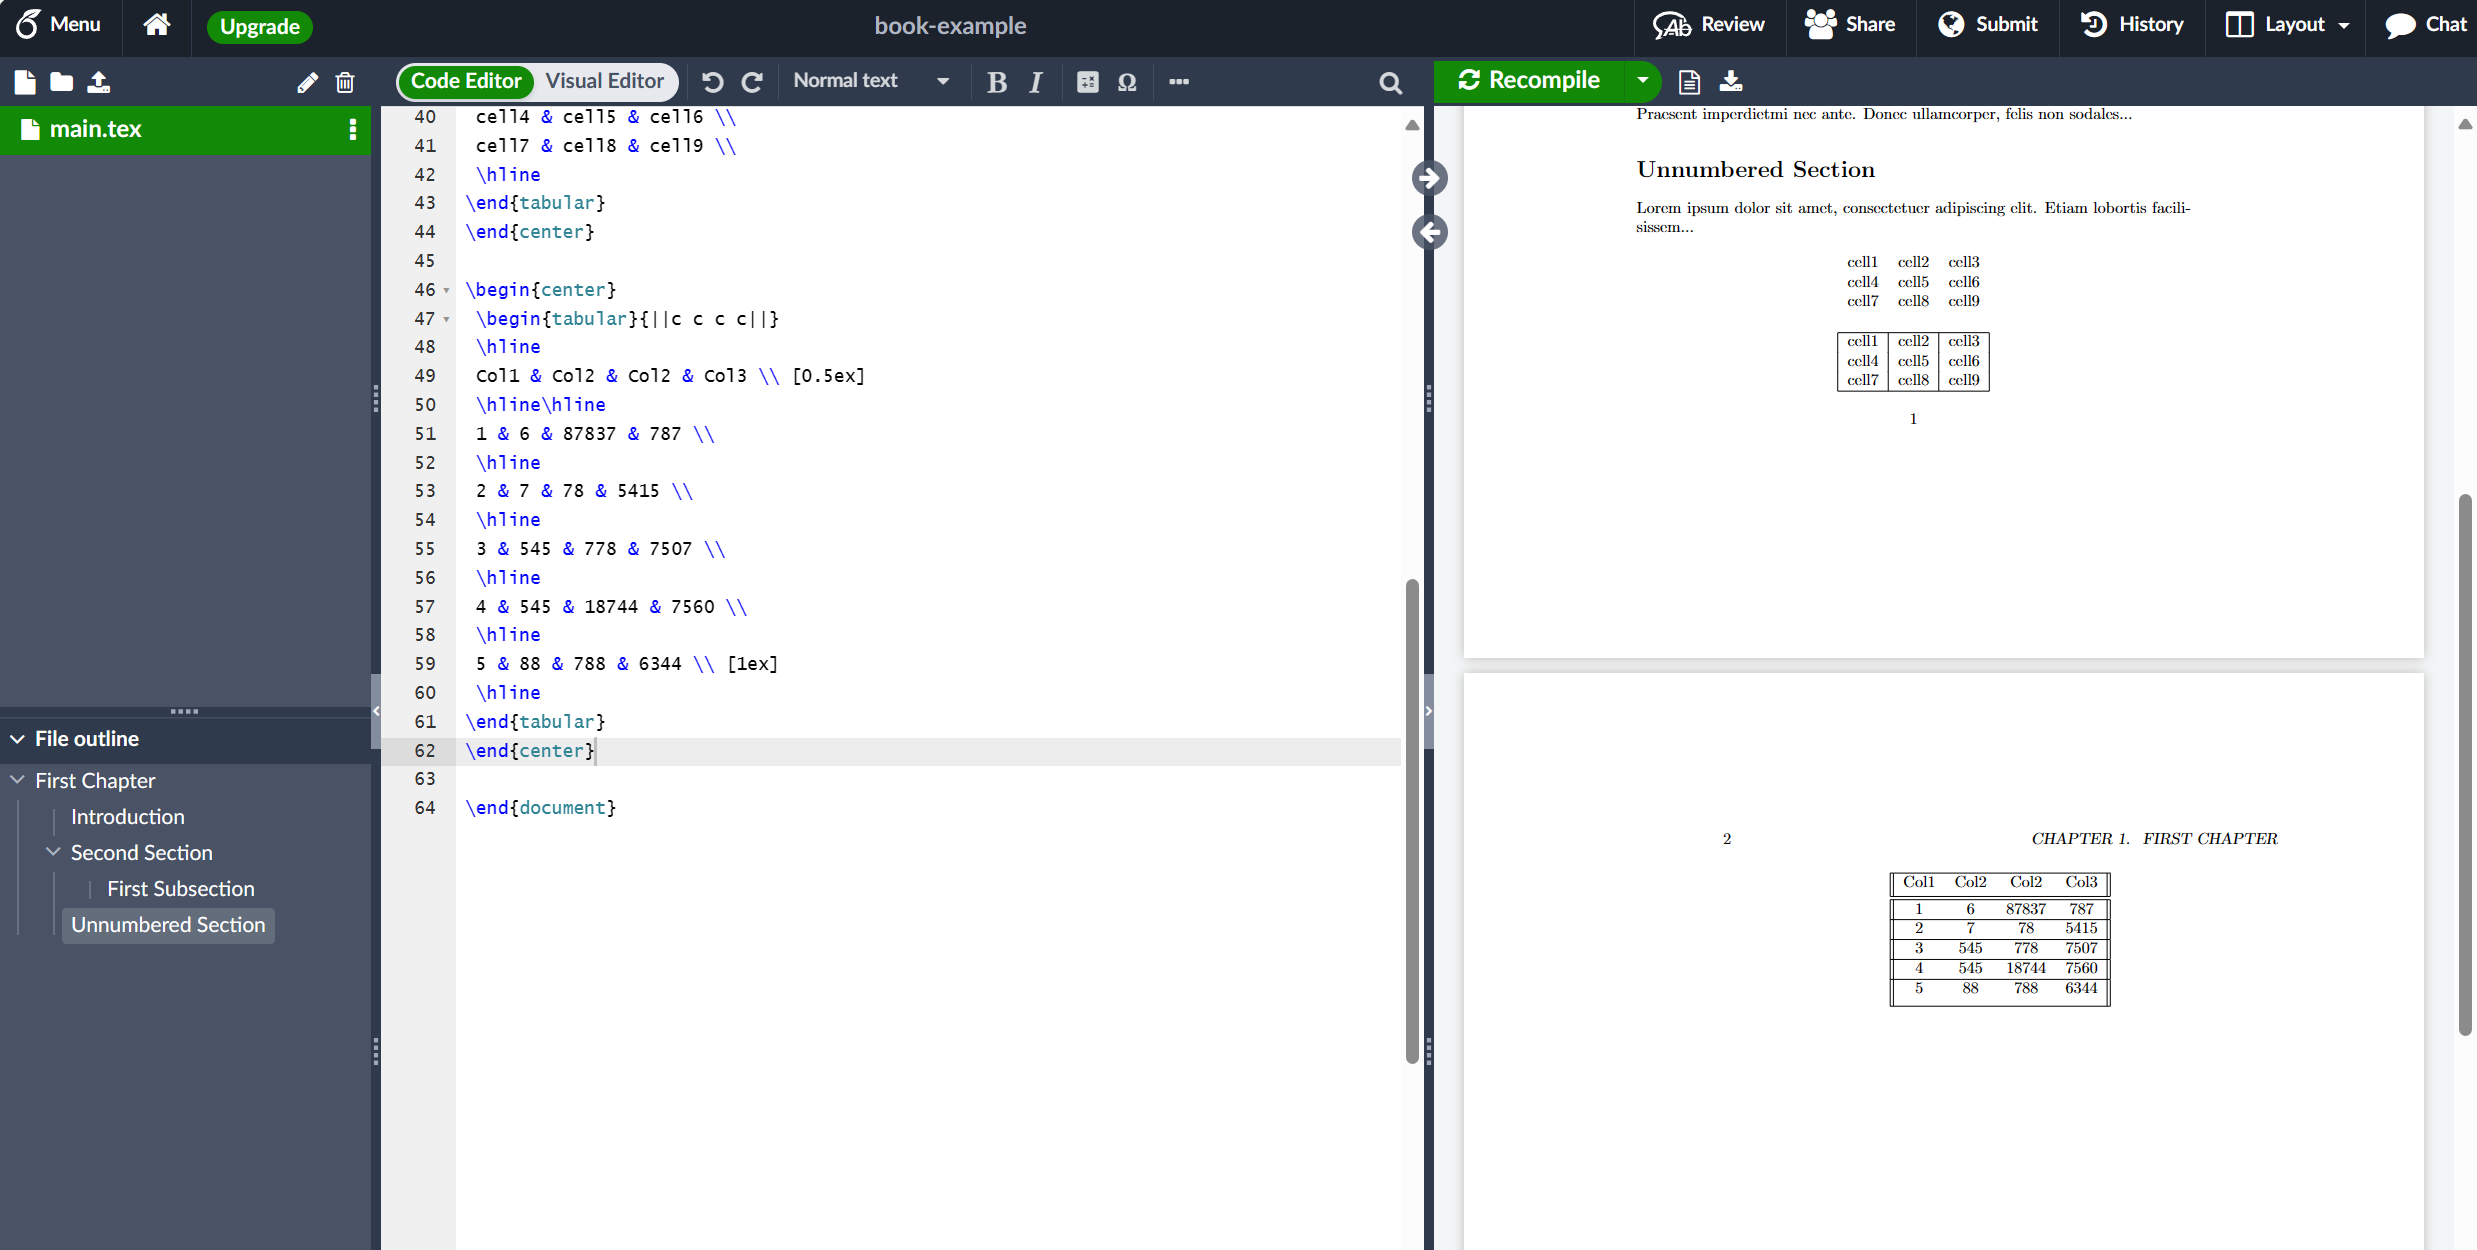
在 LaTeX 中创建表可能很耗时,因此您可能希望使用 TablesGenerator.com 在线工具为表格导出 LaTeX 代码。
- 标题、标签和参考文献
您可以像图像一样添加标题和引用表格。唯一的区别是,您使用的不是 figure 环境,而是 table 环境。
\documentclass{book}
\begin{document}

\chapter{First Chapter}

\section{Introduction}

This is the first section.

Lorem  ipsum  dolor  sit  amet,  consectetuer  adipiscing
elit. Etiam  lobortisfacilisis sem.  Nullam nec mi et
neque pharetra sollicitudin.  Praesent imperdietmi nec ante.
Donec ullamcorper, felis non sodales...

\section{Second Section}

Lorem ipsum dolor sit amet, consectetuer adipiscing elit.
Etiam lobortis facilisissem.  Nullam nec mi et neque pharetra
sollicitudin.  Praesent imperdiet mi necante...

\subsection{First Subsection}
Praesent imperdietmi nec ante. Donec ullamcorper, felis non sodales...

\section*{Unnumbered Section}
Lorem ipsum dolor sit amet, consectetuer adipiscing elit.
Etiam lobortis facilisissem...

\begin{center}
\begin{tabular}{c c c}
 cell1 & cell2 & cell3 \\
 cell4 & cell5 & cell6 \\
 cell7 & cell8 & cell9
\end{tabular}
\end{center}

\begin{center}
\begin{tabular}{|c|c|c|}
 \hline
 cell1 & cell2 & cell3 \\
 cell4 & cell5 & cell6 \\
 cell7 & cell8 & cell9 \\
 \hline
\end{tabular}
\end{center}

\begin{center}
 \begin{tabular}{||c c c c||}
 \hline
 Col1 & Col2 & Col2 & Col3 \\ [0.5ex]
 \hline\hline
 1 & 6 & 87837 & 787 \\
 \hline
 2 & 7 & 78 & 5415 \\
 \hline
 3 & 545 & 778 & 7507 \\
 \hline
 4 & 545 & 18744 & 7560 \\
 \hline
 5 & 88 & 788 & 6344 \\ [1ex]
 \hline
\end{tabular}
\end{center}

+ Table \ref{table:data} shows how to add a table caption and reference a table.
+ \begin{table}[h!]
+ \centering
+ \begin{tabular}{||c c c c||}
+  \hline
+  Col1 & Col2 & Col2 & Col3 \\ [0.5ex]
+  \hline\hline
+  1 & 6 & 87837 & 787 \\
+  2 & 7 & 78 & 5415 \\
+  3 & 545 & 778 & 7507 \\
+  4 & 545 & 18744 & 7560 \\
+  5 & 88 & 788 & 6344 \\ [1ex]
+  \hline
+ \end{tabular}
+ \caption{Table to test captions and labels.}
+ \label{table:data}
+ \end{table}

\end{document}
此示例生成以下输出:
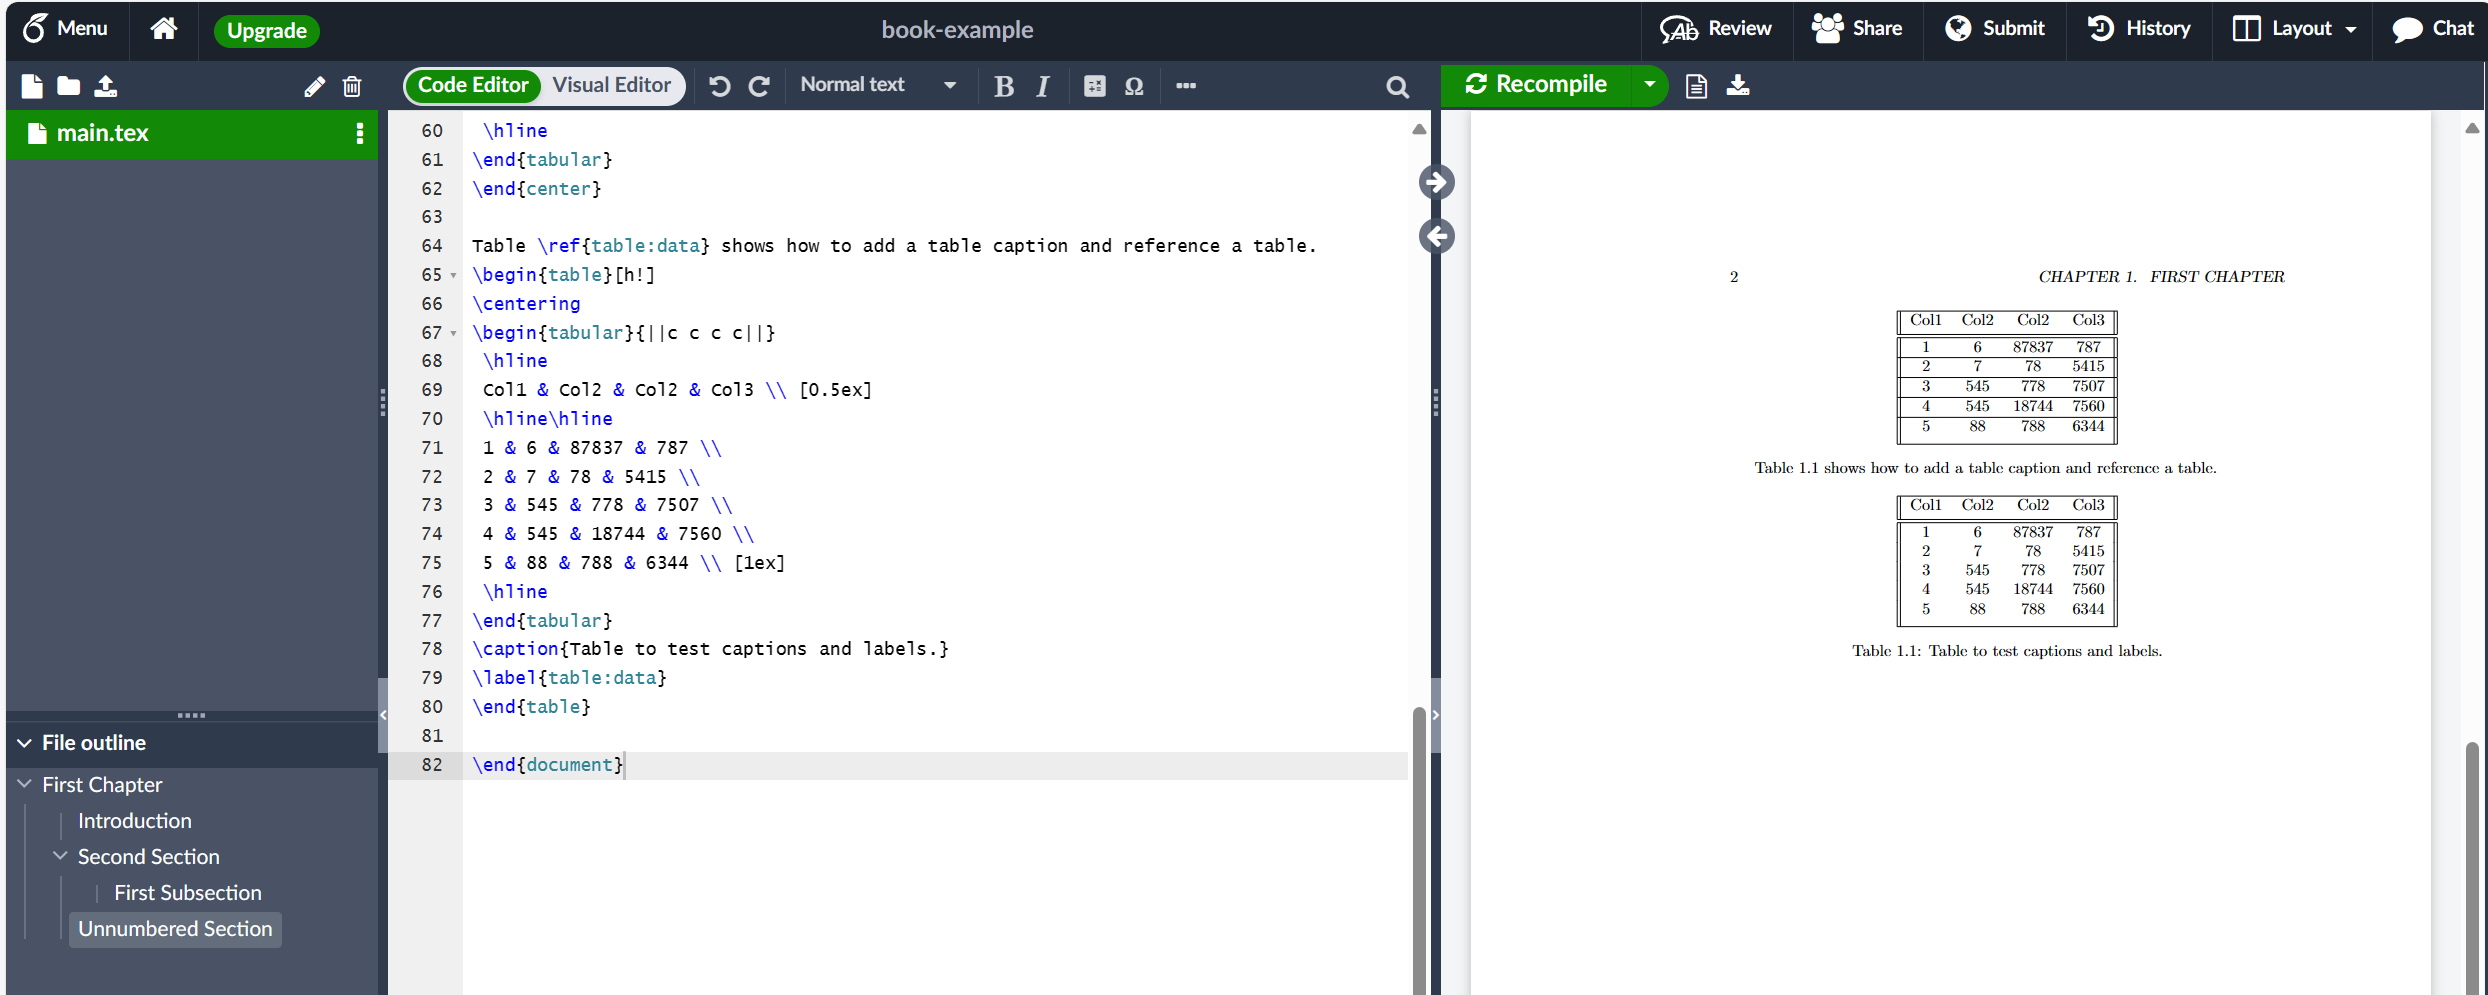
添加目录
创建目录很简单,因为命令 \tableofcontents 几乎为您完成所有工作:
\documentclass{article}
\title{Sections and Chapters}
\author{Gubert Farnsworth}
\date{August 2022}
\begin{document}

\maketitle

\tableofcontents

\section{Introduction}

This is the first section.

Lorem  ipsum  dolor  sit  amet,  consectetuer  adipiscing
elit.   Etiam  lobortisfacilisis sem.  Nullam nec mi et
neque pharetra sollicitudin.  Praesent imperdietmi nec ante.
Donec ullamcorper, felis non sodales...

\section*{Unnumbered Section}
\addcontentsline{toc}{section}{Unnumbered Section}

Lorem ipsum dolor sit amet, consectetuer adipiscing elit.
Etiam lobortis facilisissem.  Nullam nec mi et neque pharetra
sollicitudin.  Praesent imperdiet mi necante...

\section{Second Section}

Lorem ipsum dolor sit amet, consectetuer adipiscing elit.
Etiam lobortis facilisissem.  Nullam nec mi et neque pharetra
sollicitudin.  Praesent imperdiet mi necante...
\end{document}
此示例生成以下输出:
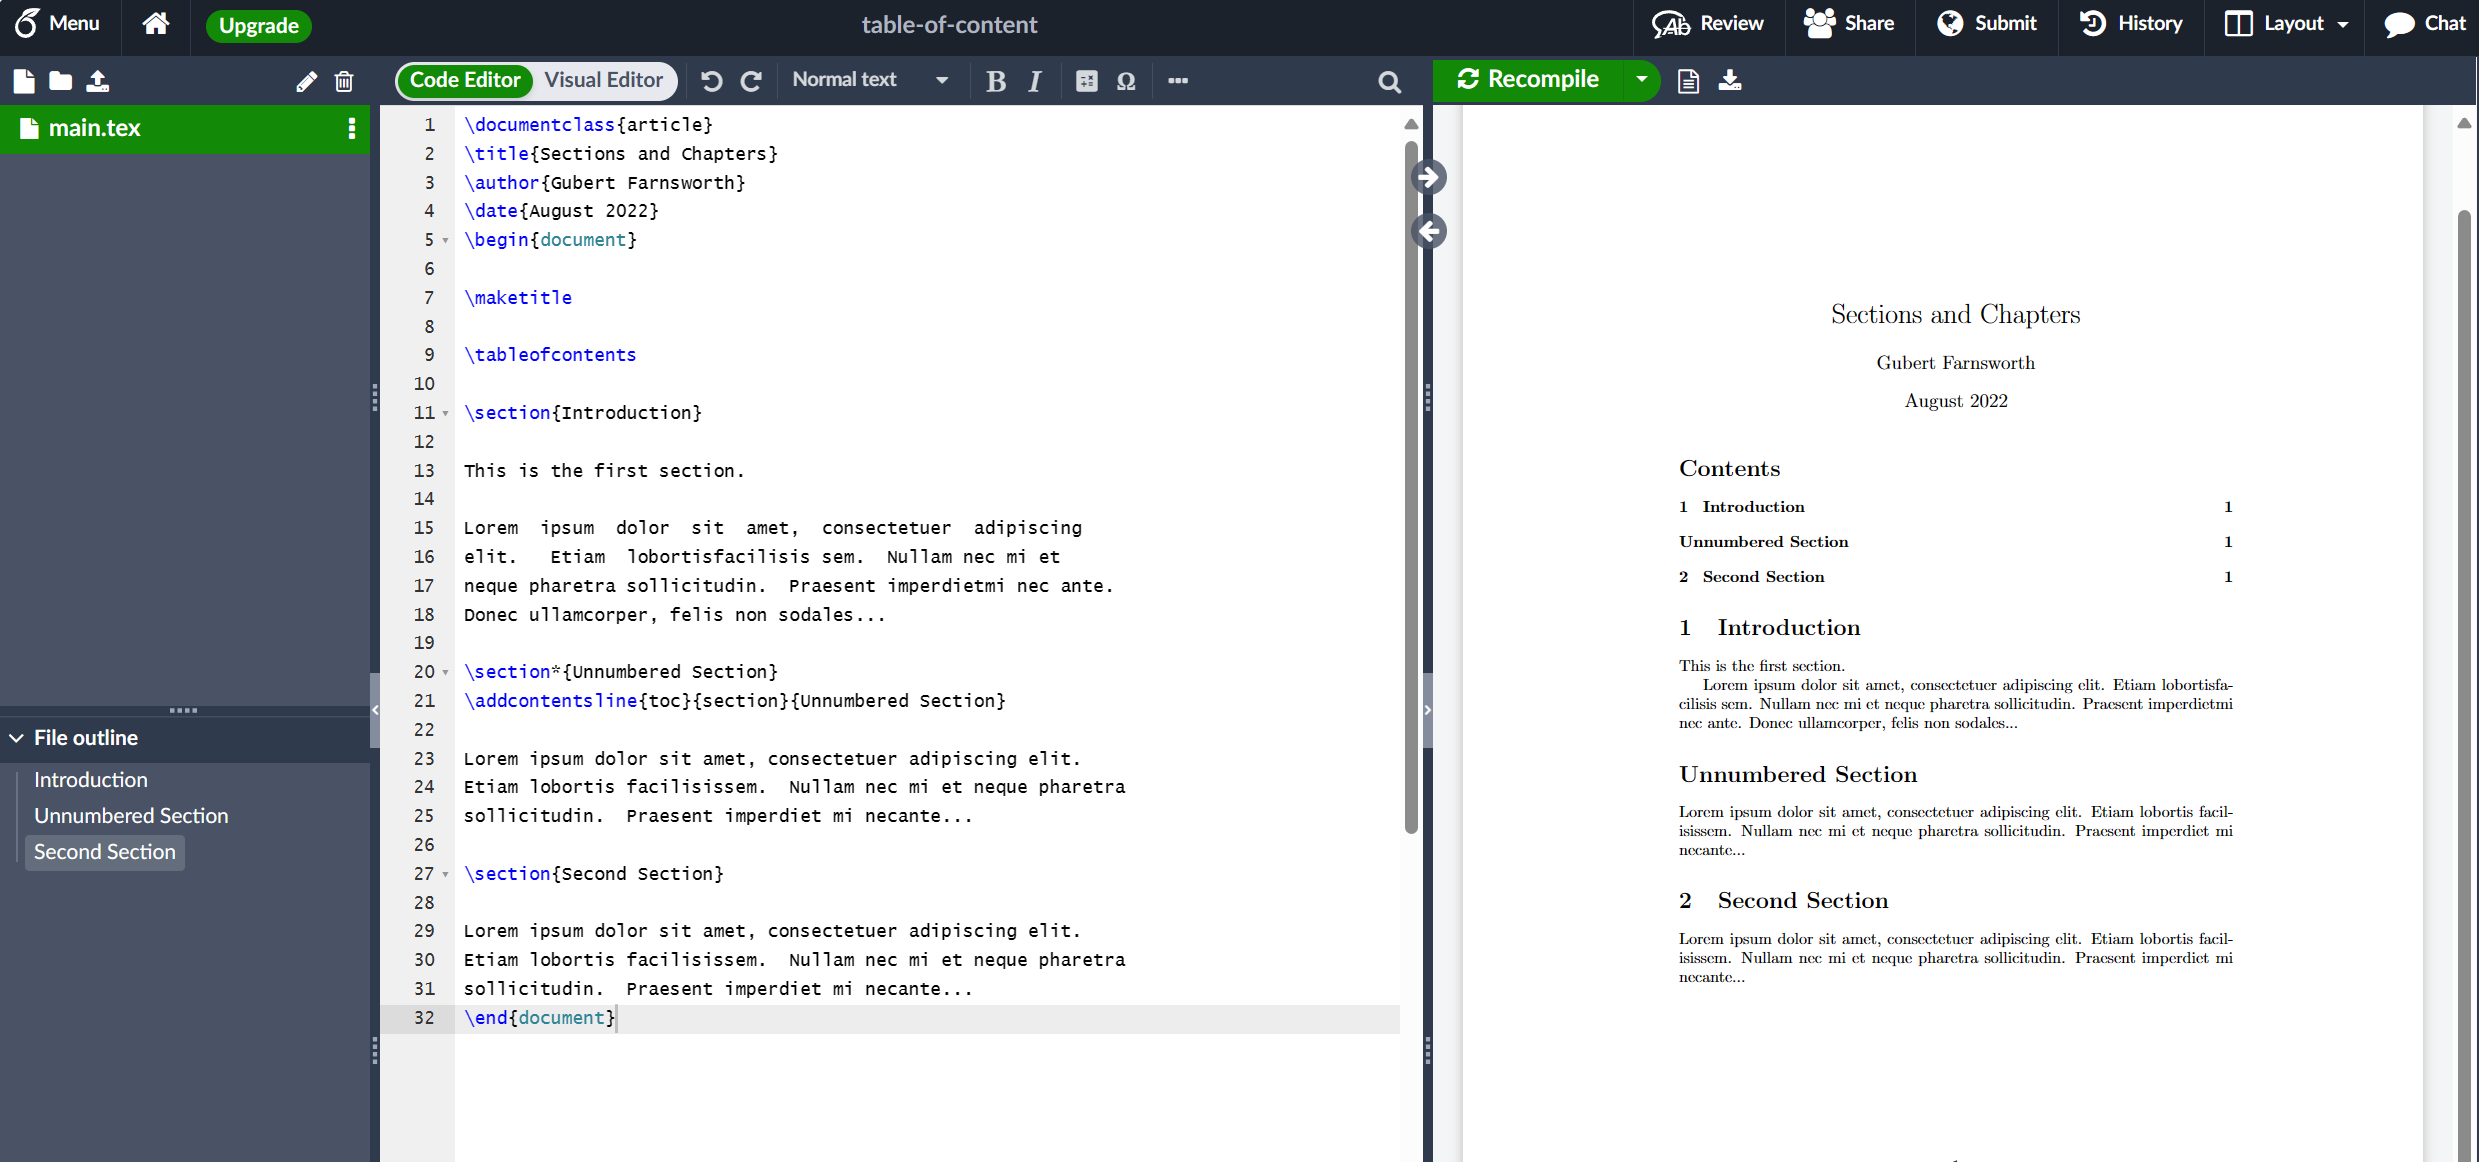
Sections、subsections 和 chapters 会自动包含在目录中。要手动添加条目,例如 unnumbered section,请使用命令 \addcontentsline,如示例所示。
查找和使用 LaTeX 包
LaTeX 不仅提供了重要的排版功能,还通过使用附加包提供了可扩展性框架。LaTeX 不是试图提供“尝试做所有事情”的命令和功能,而是设计为可扩展的,允许用户加载提供更专业排版功能或扩展 LATEX 内置功能(如排版表)的外部代码体(包)。正如添加图像部分所观察到的,graphicx 包通过提供导入图形文件的命令来扩展 LaTeX,并通过编写加载(在序言中)
\usepackage{graphicx}- 加载包
如上所述,包通过 \usepackage 命令加载到文档序言中,但由于(许多)LaTeX 包提供了一组选项,可用于配置其行为,\usepackage 命令通常如下所示:
\usepackage[options]{somepackage}方括号“[…]”通知 LaTeX 在加载 somepackage 时应应用哪组选项。在用户请求的选项集中,单个选项或设置通常用逗号分隔;例如,geometry 包提供了许多选项来配置 LaTeX 中的页面布局,因此 geometry 的典型用法如下所示:
\usepackage[total={6.5in,8.75in},
top=1.2in, left=0.9in, includefoot]{geometry}
geometry 包是由全球 LaTeX 社区成员编写和贡献的包的一个示例,并且免费提供给任何想要使用它的人。
如果 LaTeX 包不提供任何选项,或者用户想要使用包选项的默认值,它将像这样加载:
\usepackage{somepackage}当您编写 \usepackage[...]{somepackage} LaTeX 会查找一个名为 somepackage.sty 的相应文件,它需要加载和处理该文件-以使包命令可用并执行该包提供的任何其他代码。如果 LaTeX 找不到 somepackage.sty,它将以错误终止,如下 Overleaf 示例所示:
\documentclass[12pt, letterpaper]{article}
\usepackage{somepackage}% a NON-EXISTENT package
\begin{document}
This will fail!
\end{document}
此示例生成以下输出:
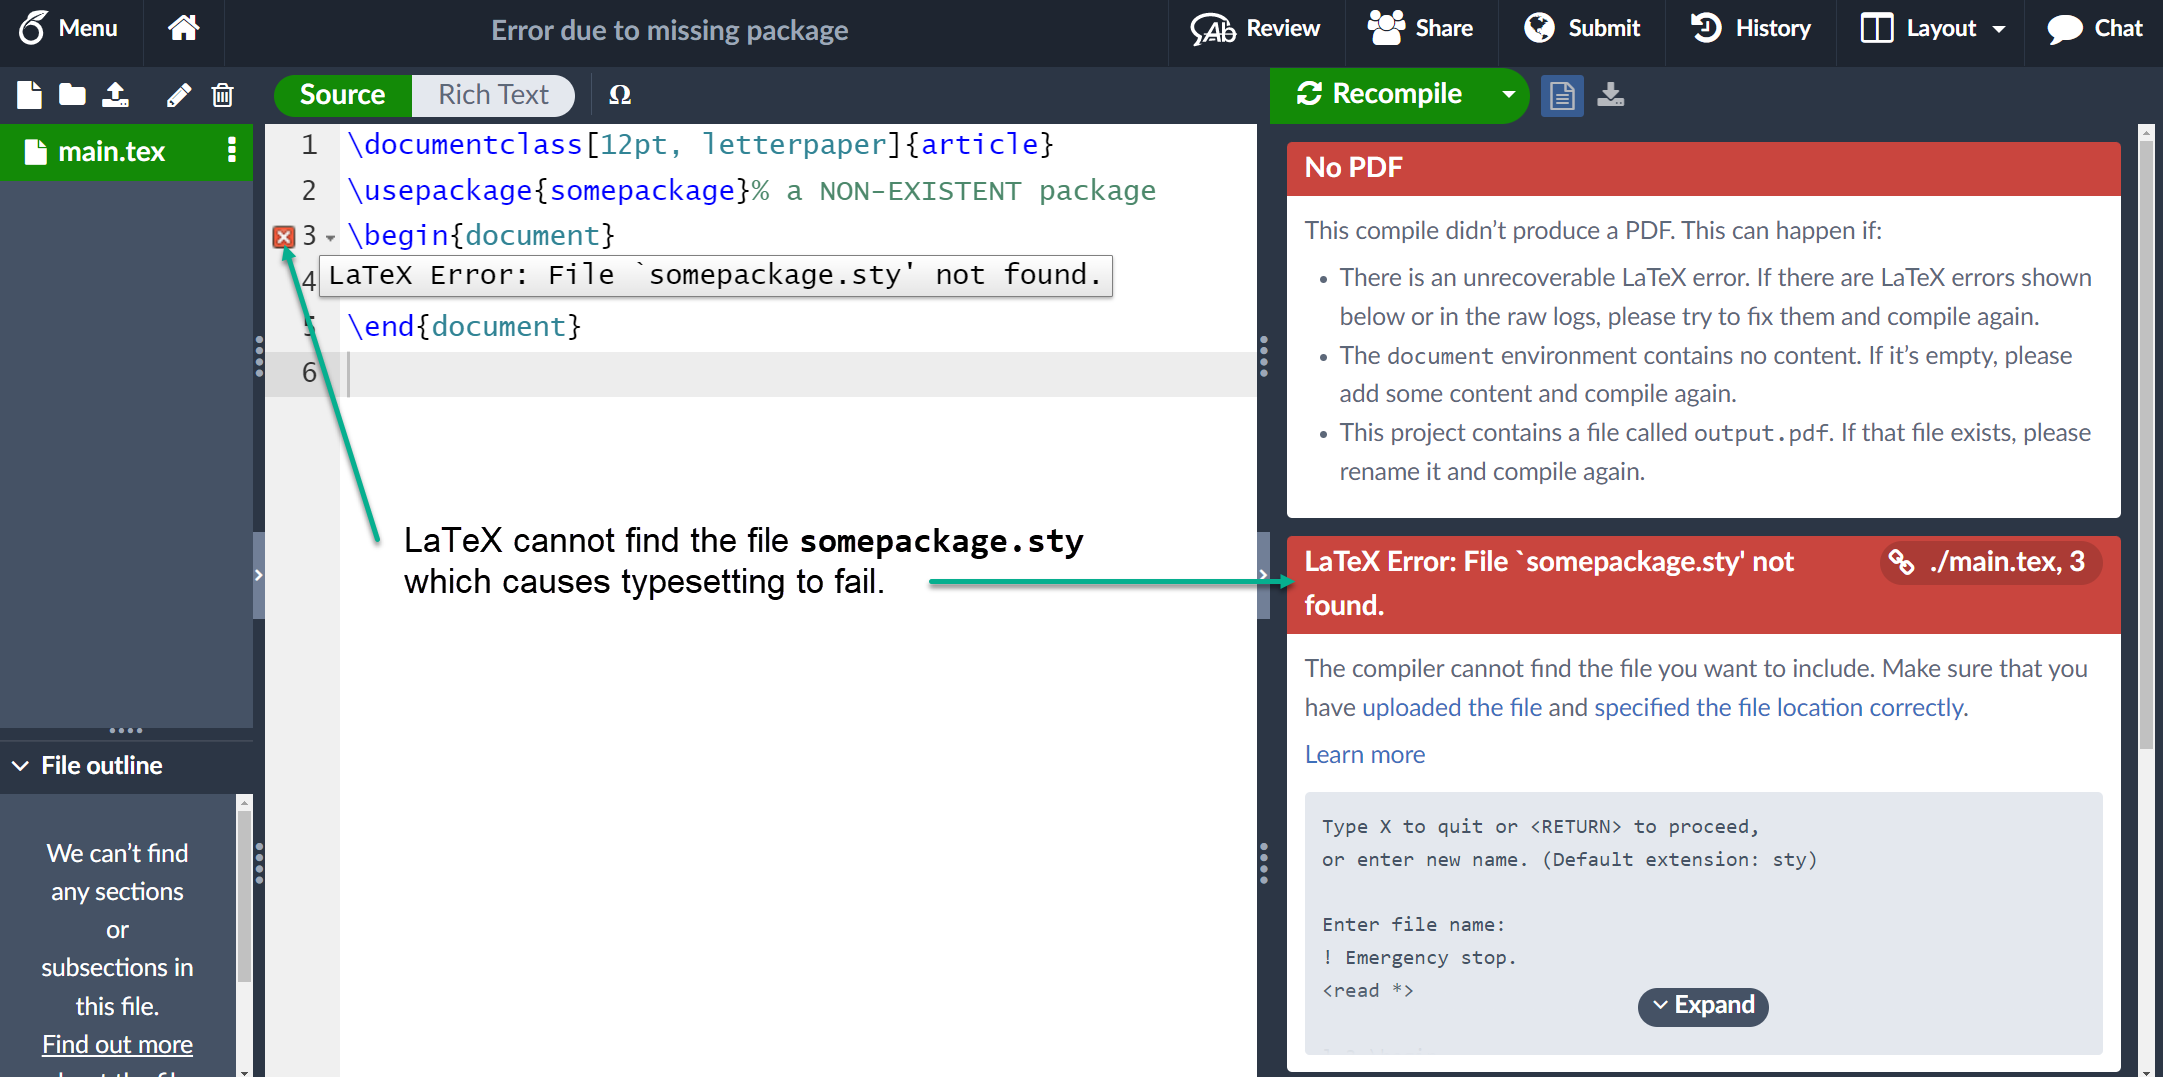
- 查找有关包的信息:CTAN
包通过综合 TeX 存档网络分发,通常称为 CTAN,在撰写本文时,该网络托管来自 2881 名贡献者的 6287 个包。CTAN 将自己描述为
… a set of Internet sites around the world that offer TEX-related material for download.
您可以浏览 CTAN 以查找有用的包;例如:
您还可以使用搜索工具(在页面顶部)。
- Overleaf 提供的套餐:介绍 TeX Live
每年一次,托管在 CTAN 上的(大量)软件包子集,以及与 LaTeX 相关的字体和其他软件,作为一个名为 TeX Live 的系统进行整理和分发,该系统可用于安装您自己的(本地)LaTeX 设置。事实上,Overleaf 的服务器也使用 TeX Live,并在新版本的 TeX Live 发布时进行更新。Overleaf 的 TeX Live 更新不是即时的,而是在发布后几个月进行的,这让我们有时间对新的 TeX Live 版本与我们图库中包含的数千个模板进行兼容性测试。
虽然 TeX Live 包含 CTAN 包的(大)子集,但可以找到一个有趣的包,例如用于排版 Go 图表的 igo,它托管在 CTAN 上,但不包含在(由) TeX Live 中,因此在 Overleaf 上不可用。由于各种原因,CTAN 上托管的一些包不是 TeX Live 的一部分:可能一个包已经过时,有许可问题,非常新(最近上传)或具有平台依赖关系,例如在 Windows 上工作但在 Linux 不工作。
新软件包和对现有软件包的更新全年都上传到 CTAN,但 TeX Live 的更新一年一次地分发;因此,TeX Live 当前版本中包含的软件包不会像 CTAN 上托管的软件包那样最新。因为 Overleaf 的服务器使用 TeX Live,所以安装在 Overleaf 服务器上的软件包——即 Overleaf 用户可以使用的软件包——可能不是 CTAN 上可用的最新版本,但一般来说,这不太可能有问题。
结语
第一百一十四篇博文写完,开心!!!!
今天,也是充满希望的一天。
