前言
个人博客对于每个程序员都相当重要。
这里选择 Hexo 作为搭建博客的框架。
A fast, simple & powerful blog framework
Hexo 是一款基于 Node.js 的静态博客框架,依赖少易于安装使用,可以方便的生成静态网页托管在 GitHub 上,是搭建博客的首选框架。
操作系统:Ubuntu 20.04.4 LTS
参考文档
环境版本
git         2.25.1
node        v18.2.0
npm         8.9.0

cnpm -v
cnpm@7.1.1 (/usr/local/lib/node_modules/cnpm/lib/parse_argv.js)
npm@6.14.17 (/usr/local/lib/node_modules/cnpm/node_modules/npm/lib/npm.js)
node@18.2.0 (/usr/bin/node)
npminstall@5.8.1 (/usr/local/lib/node_modules/cnpm/node_modules/npminstall/lib/index.js)
prefix=/usr/local
linux x64 5.13.0-41-generic
registry=https://registry.npmmirror.com

hexo -v
INFO  Validating config
INFO
  ===================================================================

      #####  #    # ##### ##### ###### #####  ###### #      #   #
      #    # #    #   #     #   #      #    # #      #       # #
      #####  #    #   #     #   #####  #    # #####  #        #
      #    # #    #   #     #   #      #####  #      #        #
      #    # #    #   #     #   #      #   #  #      #        #
      #####   ####    #     #   ###### #    # #      ######   #

                            4.2.0
  ===================================================================
hexo: 6.1.0
hexo-cli: 4.3.0
os: linux 5.13.0-41-generic Ubuntu 20.04.4 LTS (Focal Fossa)
node: 18.2.0
v8: 10.1.124.8-node.13
uv: 1.43.0
zlib: 1.2.11
brotli: 1.0.9
ares: 1.18.1
modules: 108
nghttp2: 1.47.0
napi: 8
llhttp: 6.0.6
openssl: 3.0.3+quic
cldr: 41.0
icu: 71.1
tz: 2022a
unicode: 14.0
ngtcp2: 0.1.0-DEV
nghttp3: 0.1.0-DEV

# 轻量应用服务器信息

实例规格                 CPU: 2核 内存: 2GB
系统盘                   40GB SSD云硬盘
带宽                    4Mbps
镜像名称                 宝塔Linux面板
镜像类型                 应用镜像
操作系统                 CentOS 7.9 64bit
预装应用软件              宝塔Linux面板 7.8.0 腾讯云专享版
搭建博客
安装 Git
# ubuntu
sudo apt-get install git

git --version
安装 nodejs
# 安装最新版本的 nodejs
# 去官网查看最新的版本号,这篇博文创作时,版本为:16.15.0 LTS,18.1.0 Current
# 所以最新版本的源为 https://deb.nodesource.com/setup_18.x
curl -sL https://deb.nodesource.com/setup_18.x | sudo -E bash -

sudo apt-get install -y nodejs
sudo apt-get install npm

node -v
npm -v

# 将 npm 改为淘宝镜像
npm config list
npm config set registry https://registry.npm.taobao.org
npm config get registry
sudo npm install -g cnpm --registry=https://registry.npm.taobao.org
cnpm -v
安装 hexo
sudo cnpm install -g hexo-cli

hexo -v

# 创建 blog 目录
mkdir blog
cd blog

hexo init
npm install

# 启动本地博客服务
hexo s
通过 http://localhost:4000/ 访问你的博客
# 关闭本地化服务
Ctrl + C

# 以后的 hexo s, hexo clean, hexo g, hexo d 等命令都是在博客目录下运行

# 尝试写第一篇文章,会在 source/_posts 目录下,生成一个 .md 文件,该文件即是你的博文
hexo new "第一篇博客文章" # new 可以简写为 n
hexo clean # 可以缩写为 hexo cl
hexo g

# 每次修改完博客都要运行 hexo cl, hexo g
hexo s
部署到 Github
在 Github 上创建一个名字为 你的用户名.github.io ( 如 LuYF-Lemon-love.github.io )的 Public 仓库,用户名一定要和你的用户名相同。
# 在 blog 目录下安装 git 部署的插件
cnpm install --save hexo-deployer-git

# yourname 是你的 Github 的用户名,youremail 是你注册 Github 的邮箱
git config --global user.name "yourname"
git config --global user.email "youremail"
git config --global core.autocrlf false

# 例子
git config --global user.email "3555028709@qq.com"
git config --global user.name "LuYF-Lemon-love"
git config --global core.autocrlf false

# 检查
git config user.name
git config user.email

# 创建 SSH,一路回车
ssh-keygen -t rsa -C "youremail"

# 例子
ssh-keygen -t rsa -C "3555028709@qq.com"

# 在当前用户的 home 目录下生成了 .ssh 目录,里面包含 id_rsa,id_rsa.pub,known_hosts 三个文件
SSH,是一个密钥,id_rsa 是这台电脑的私人密钥,不能给别人看,id_rsa.pub 是公共密钥,可以随便给别人看。把这个公钥放到 Github 上,这样当你链接到 Github 自己的用户时,它就会根据公钥匹配你的私钥匙,当匹配成功时,就可以通过 git 上传文件到 Github上了。
cat ~/.ssh/id_rsa.pub

# 复制 cat 输出的文本

# 第一步:点击 Github 的 Setting
# 第二步:点击 SSH and GPG Keys
# 第三步:点击 New SSH key
# 第四步:把上面复制的内容粘贴 Key 中,Title 随便填
# 第五步:点击 Add SSH key,输入 Github 密码进行验证

# 验证
ssh -T git@github.com

# 进入 blog 目录
vim _config.yml
将 _config.yml 文件中的最底部的 # Deployment 模块修改为下面内容
# Deployment
## Docs: https://hexo.io/docs/one-command-deployment
deploy:
  type: git
  repo: git@github.com:用户名/用户名.github.io.git
  branch: master

# 例子
# Deployment
## Docs: https://hexo.io/docs/one-command-deployment
deploy:
  type: git
  repo: git@github.com:LuYF-Lemon-love/LuYF-Lemon-love.github.io.git
  branch: master
部署到 Github 上
hexo cl
hexo generate # 可以缩写为 hexo g
hexo deploy # 可以缩写为 hexo d
现在 Github 中默认分支改为 main,因此我们需要到上面创建的仓库主页的 Setting 中的 Branches 中修改默认分支为 master,然后回到仓库主页,点击 branch,删除掉 main 分支。
之后可以在 https://yourname.github.io 访问你的博客,用户名的大小写没有影响,如:https://luyf-lemon-love.github.io/
删除博客
直接在 source/_posts 目录下删除你想要删除的博客即可。
然后重新生成部署
hexo cl
hexo g
hexo d
基本设置
_config.yml 文件是 hexo 的配置文件,官方配置文件的链接:https://hexo.io/zh-cn/docs/configuration
| 参数 | title | subtitle | description | keywords | author | language | url | theme |
|---|---|---|---|---|---|---|---|---|
| 描述 | 网站标题 | 网站副标题 | 网站描述 | 网站关键词(多个关键词如:LuYF-Lemon-love, Blog, 博客) | 您的名字 | zh-CN代表简体中文 | 网址:你的首页网址 | 主题名称,false 禁用主题 |
每一篇博文的 .md 文件开头 tags 可以设置多个标签
tags:
- Github
- Git
更换主题
hexo 有很多种主题,链接:https://hexo.io/themes/
进入到 blog 目录,下载主题,git clone 主题地址.git themes/目录, 这里以 yilia 主题为例:
git clone https://github.com/litten/hexo-theme-yilia.git themes/yilia修改 blog 目录下的 _config.yml 文件,找到 # Extensions 模块下的theme 标签(默认为 landscape),修改为 yilia
theme: yilia然后运行下面命令
hexo cl
hexo g
hexo d
添加目录
# 在 blog 目录下运行
npm i hexo-generator-json-content --save
在 _config.yml 文件中添加
jsonContent:
  meta: false
  pages: false
  posts:
    title: true
    date: true
    path: true
    text: false
    raw: false
    content: false
    slug: false
    updated: false
    comments: false
    link: false
    permalink: false
    excerpt: false
    categories: false
    tags: true
Butterfly 官方文档精要
Front-matter
Front-matter 是 Markdown 文件最上方以 — 分隔的区域,用于指定个别档案的变数
- Page Front-matter 用于页面配置
- Post Front-matter 用于文章页配置
Page Front-matter
| 参数 | title | date | type | updated | description | top_img |
|---|---|---|---|---|---|---|
| 解释 | [必]页面标题 | [必]页面创建日期 | [必]标签、分类和友情链接三个页面需要配置 | 页面更新日期 | 页面描述 | 页面顶部图片 |
Post Front-matter
| 参数 | title | date | updated | tags | categories | description | top_img | cover |
|---|---|---|---|---|---|---|---|---|
| 解释 | [必]文章标题 | [必]文章创建日期 | 文章更新日期 | 文章标签 | 文章分类 | 文章描述 | 文章顶部图片 | 缩略图 |
图库
在 blog 目录下运行下面命令
hexo n page Gallery然后打开 blog/source/Gallery/index.md 文件,写入下面内容
---
title: Gallery
date: 2022-05-14 21:29:55
type: "Gallery"
top_img: https://cdn.jsdelivr.net/gh/LuYF-Lemon-love/PicBed@main/blogs/pictures/20220511161548.png
---

<div class="gallery-group-main">
{% galleryGroup '壁纸' '收藏的一些壁纸' '/Gallery/wallpaper' https://i.loli.net/2019/11/10/T7Mu8Aod3egmC4Q.png %}
{% galleryGroup 'OH MY GIRL' '关于OH MY GIRL的图片' '/Gallery/ohmygirl' https://i.loli.net/2019/12/25/hOqbQ3BIwa6KWpo.jpg %}
</div>
在 blog 目录下运行下面命令
hexo n page ohmygirl

mv ./source/ohmygirl/ ./source/Gallery/
然后打开 blog/source/Gallery/ohmygirl/index.md 文件,写入下面内容
---
title: Ohmygirl
date: 2022-05-14 21:55:30
---
{% gallery %}


{% endgallery %}复制相关设置
在 _config.butterfly.yml 文件中设置
# copy settings
# copyright: Add the copyright information after copied content (複製的內容後面加上版權信息)
copy:
  enable: true
  copyright:
    enable: true
    limit_count: 50
页脚设置
在 _config.butterfly.yml 文件设置
# Footer Settings
# --------------------------------------
footer:
  owner:
    enable: true
    since: 2022
  custom_text: 感谢光临小破站,欢迎您提出宝贵的意见!
  copyright: true # Copyright of theme and framework
主页标签彩色
在 _config.butterfly.yml 文件设置
card_tags:
  enable: true
  limit: 40 # if set 0 will show all
  color: true
  sort_order: # Don't modify the setting unless you know how it works
中英文之间添加空格
在 _config.butterfly.yml 文件设置
# https://github.com/vinta/pangu.js
# Insert a space between Chinese character and English character (中英文之间添加空格)
pangu:
  enable: true
  field: post # site/post
访问人数 busuanzi (UV 和 PV)
在 _config.butterfly.yml 文件中,设置
# busuanzi count for PV / UV in site
# 訪問人數
busuanzi:
  site_uv: true
  site_pv: true
  page_pv: true
运行时间
在 _config.butterfly.yml 文件中,设置
runtimeshow:
  enable: true
  publish_date: 5/6/2022 00:00:00
  ##网页开通时间
  #格式: 月/日/年 时间
  #也可以写成 年/月/日 时间
访客地图(进阶)
- 获取访客地图的 html 代码
<script type="text/javascript" id="clstr_globe" src="//clustrmaps.com/globe.js?d=tZmOqhEgNYZZabN7nRUd-2bAEXcDNOKlXd4dKdcaF6Y"></script>- 在 blog/source/_data 目录下创建一个 widget.yml 文件,写入下面代码
bottom:
    - class_name: user-map
      id_name: user-map
      name: 访客地图
      icon: fas fa-heartbeat
      order:
      html: '<script type="text/javascript" id="clstr_globe" src="//clustrmaps.com/globe.js?d=tZmOqhEgNYZZabN7nRUd-2bAEXcDNOKlXd4dKdcaF6Y"></script>'
标签外挂
用法 1
{% note [class] [no-icon] [style] %}
Any content (support inline tags too.io).
{% endnote %}| 名称 | class | no-icon | style |
|---|---|---|---|
| 用法 | 【可选】标识,不同的标识有不同的配色( default / primary / success / info / warning / danger ) | 【可选】不显示 icon | 【可选】可以覆盖配置中的 style(simple/modern/flat/disabled) |
simple
{% note simple %}
默认 提示块标籤
{% endnote %}

{% note default simple %}
default 提示块标籤
{% endnote %}

{% note primary simple %}
primary 提示块标籤
{% endnote %}

{% note success simple %}
success 提示块标籤
{% endnote %}

{% note info simple %}
info 提示块标籤
{% endnote %}

{% note warning simple %}
warning 提示块标籤
{% endnote %}

{% note danger simple %}
danger 提示块标籤
{% endnote %}
modern
{% note modern %}
默认 提示块标籤
{% endnote %}

{% note default modern %}
default 提示块标籤
{% endnote %}

{% note primary modern %}
primary 提示块标籤
{% endnote %}

{% note success modern %}
success 提示块标籤
{% endnote %}

{% note info modern %}
info 提示块标籤
{% endnote %}

{% note warning modern %}
warning 提示块标籤
{% endnote %}

{% note danger modern %}
danger 提示块标籤
{% endnote %}
flat
{% note flat %}
默认 提示块标籤
{% endnote %}

{% note default flat %}
default 提示块标籤
{% endnote %}

{% note primary flat %}
primary 提示块标籤
{% endnote %}

{% note success flat %}
success 提示块标籤
{% endnote %}

{% note info flat %}
info 提示块标籤
{% endnote %}

{% note warning flat %}
warning 提示块标籤
{% endnote %}

{% note danger flat %}
danger 提示块标籤
{% endnote %}
disabled
{% note disabled %}
默认 提示块标籤
{% endnote %}

{% note default disabled %}
default 提示块标籤
{% endnote %}

{% note primary disabled %}
primary 提示块标籤
{% endnote %}

{% note success disabled %}
success 提示块标籤
{% endnote %}

{% note info disabled %}
info 提示块标籤
{% endnote %}

{% note warning disabled %}
warning 提示块标籤
{% endnote %}

{% note danger disabled %}
danger 提示块标籤
{% endnote %}
no-icon
{% note no-icon %}
默认 提示块标籤
{% endnote %}

{% note default no-icon %}
default 提示块标籤
{% endnote %}

{% note primary no-icon %}
primary 提示块标籤
{% endnote %}

{% note success no-icon %}
success 提示块标籤
{% endnote %}

{% note info no-icon %}
info 提示块标籤
{% endnote %}

{% note warning no-icon %}
warning 提示块标籤
{% endnote %}

{% note danger no-icon %}
danger 提示块标籤
{% endnote %}
用法 2(自定义 icon)
{% note [color] [icon] [style] %}
Any content (support inline tags too.io).
{% endnote %}| 名称 | color | icon | style |
|---|---|---|---|
| 用法 | 【可选】顔色 (default / blue / pink / red / purple / orange / green) | 【可选】可配置自定义 icon (只支持 fontawesome 图标, 也可以配置 no-icon ) | 【可选】可以覆盖配置中的 style(simple/modern/flat/disabled) |
simple
{% note 'fab fa-cc-visa' simple %}
你是刷 Visa 还是 UnionPay
{% endnote %}
{% note blue 'fas fa-bullhorn' simple %}
2021年快到了....
{% endnote %}
{% note pink 'fas fa-car-crash' simple %}
小心开车 安全至上
{% endnote %}
{% note red 'fas fa-fan' simple%}
这是三片呢?还是四片?
{% endnote %}
{% note orange 'fas fa-battery-half' simple %}
你是刷 Visa 还是 UnionPay
{% endnote %}
{% note purple 'far fa-hand-scissors' simple %}
剪刀石头布
{% endnote %}
{% note green 'fab fa-internet-explorer' simple %}
前端最讨厌的浏览器
{% endnote %}
modern
{% note 'fab fa-cc-visa' modern %}
你是刷 Visa 还是 UnionPay
{% endnote %}
{% note blue 'fas fa-bullhorn' modern %}
2021年快到了....
{% endnote %}
{% note pink 'fas fa-car-crash' modern %}
小心开车 安全至上
{% endnote %}
{% note red 'fas fa-fan' modern%}
这是三片呢?还是四片?
{% endnote %}
{% note orange 'fas fa-battery-half' modern %}
你是刷 Visa 还是 UnionPay
{% endnote %}
{% note purple 'far fa-hand-scissors' modern %}
剪刀石头布
{% endnote %}
{% note green 'fab fa-internet-explorer' modern %}
前端最讨厌的浏览器
{% endnote %}
flat
{% note 'fab fa-cc-visa' flat %}
你是刷 Visa 还是 UnionPay
{% endnote %}
{% note blue 'fas fa-bullhorn' flat %}
2021年快到了....
{% endnote %}
{% note pink 'fas fa-car-crash' flat %}
小心开车 安全至上
{% endnote %}
{% note red 'fas fa-fan' flat%}
这是三片呢?还是四片?
{% endnote %}
{% note orange 'fas fa-battery-half' flat %}
你是刷 Visa 还是 UnionPay
{% endnote %}
{% note purple 'far fa-hand-scissors' flat %}
剪刀石头布
{% endnote %}
{% note green 'fab fa-internet-explorer' flat %}
前端最讨厌的浏览器
{% endnote %}
disabled
{% note 'fab fa-cc-visa' disabled %}
你是刷 Visa 还是 UnionPay
{% endnote %}
{% note blue 'fas fa-bullhorn' disabled %}
2021年快到了....
{% endnote %}
{% note pink 'fas fa-car-crash' disabled %}
小心开车 安全至上
{% endnote %}
{% note red 'fas fa-fan' disabled %}
这是三片呢?还是四片?
{% endnote %}
{% note orange 'fas fa-battery-half' disabled %}
你是刷 Visa 还是 UnionPay
{% endnote %}
{% note purple 'far fa-hand-scissors' disabled %}
剪刀石头布
{% endnote %}
{% note green 'fab fa-internet-explorer' disabled %}
前端最讨厌的浏览器
{% endnote %}
no-icon
{% note no-icon %}
你是刷 Visa 还是 UnionPay
{% endnote %}
{% note blue no-icon %}
2021年快到了....
{% endnote %}
{% note pink no-icon %}
小心开车 安全至上
{% endnote %}
{% note red no-icon %}
这是三片呢?还是四片?
{% endnote %}
{% note orange no-icon %}
你是刷 Visa 还是 UnionPay
{% endnote %}
{% note purple no-icon %}
剪刀石头布
{% endnote %}
{% note green no-icon %}
前端最讨厌的浏览器
{% endnote %}
Gallery 相册图库
语法
<div class="gallery-group-main">
{% galleryGroup name description link img-url %}
{% galleryGroup name description link img-url %}
{% galleryGroup name description link img-url %}
</div><div class="gallery-group-main">
{% galleryGroup '壁纸' '收藏的一些壁纸' '/Gallery/wallpaper' https://i.loli.net/2019/11/10/T7Mu8Aod3egmC4Q.png %}
{% galleryGroup '漫威' '关于漫威的图片' '/Gallery/marvel' https://i.loli.net/2019/12/25/8t97aVlp4hgyBGu.jpg %}
{% galleryGroup 'OH MY GIRL' '关于OH MY GIRL的图片' '/Gallery/ohmygirl' https://i.loli.net/2019/12/25/hOqbQ3BIwa6KWpo.jpg %}
</div>Gallery 相册
语法
{% gallery %}
markdown 图片格式
{% endgallery %}
{% gallery %}


{% endgallery %}tag-hide
inline
inline 在文本里面添加按钮隐藏内容,只限文字( content不能包含英文逗号,可用‚){% hideInline content,display,bg,color %}- content: 文本内容
- display: 按钮显示的文字(可选)
- bg: 按钮的背景颜色(可选)
- color: 按钮文字的颜色(可选)
Demo
哪个英文字母最酷? {% hideInline 因为西装裤(C装酷),查看答案,#FF7242,#fff %}

门里站着一个人? {% hideInline 闪 %}
block
block 独立的 block 隐藏内容,可以隐藏很多内容,包括图片,代码块等等

( display 不能包含英文逗号,可用‚)
{% hideBlock display,bg,color %}
content
{% endhideBlock %}- content: 文本内容
- display: 按钮显示的文字(可选)
- bg: 按钮的背景颜色(可选)
- color: 按钮文字的颜色(可选)
Demo
{% hideBlock display,bg,color %}
content
{% endhideBlock %}Toggle
如果你需要展示的内容太多,可以把它隐藏在收缩框里,需要时再把它展开。

( display 不能包含英文逗号,可用‚)
{% hideToggle display,bg,color %}
content
{% endhideToggle %}- content: 文本内容
- display: 按钮显示的文字(可选)
- bg: 按钮的背景颜色(可选)
- color: 按钮文字的颜色(可选)
Demo
{% hideToggle Butterfly安装方法 %}
在你的博客根目录里

git clone -b master https://github.com/jerryc127/hexo-theme-butterfly.git themes/Butterfly

如果想要安装比较新的dev分支,可以

git clone -b dev https://github.com/jerryc127/hexo-theme-butterfly.git themes/Butterfly

{% endhideToggle %}
mermaid
使用 mermaid 标签可以绘制 Flowchart(流程图)、Sequence diagram(时序图 )、Class Diagram(类别图)、State Diagram(状态图)、Gantt(甘特图)和Pie Chart(圆形图)。
配置 _config.butterfly.yml 文件
# mermaid
# see https://github.com/mermaid-js/mermaid
mermaid:
  enable: true
  # built-in themes: default/forest/dark/neutral
  theme:
    light: default
    dark: dark
写法
{% mermaid %}
内容
{% endmermaid %}
{% mermaid %}
pie
title Key elements in Product X
"Calcium" : 42.96
"Potassium" : 50.05
"Magnesium" : 10.01
"Iron" : 5
{% endmermaid %}Tabs
使用方法
{% tabs Unique name, [index] %}
<!-- tab [Tab caption] [@icon] -->
Any content (support inline tags too).
<!-- endtab -->
{% endtabs %}

Unique name   : Unique name of tabs block tag without comma.
                Will be used in #id's as prefix for each tab with their index numbers.
                If there are whitespaces in name, for generate #id all whitespaces will replaced by dashes.
                Only for current url of post/page must be unique!
[index]       : Index number of active tab.
                If not specified, first tab (1) will be selected.
                If index is -1, no tab will be selected. It's will be something like spoiler.
                Optional parameter.
[Tab caption] : Caption of current tab.
                If not caption specified, unique name with tab index suffix will be used as caption of tab.
                If not caption specified, but specified icon, caption will empty.
                Optional parameter.
[@icon]       : FontAwesome icon name (full-name, look like 'fas fa-font')
                Can be specified with or without space; e.g. 'Tab caption @icon' similar to 'Tab caption@icon'.
                Optional parameter.
Demo 1 - 预设选择第一个【默认】
{% tabs test1 %}
<!-- tab -->
**This is Tab 1.**
<!-- endtab -->

<!-- tab -->
**This is Tab 2.**
<!-- endtab -->

<!-- tab -->
**This is Tab 3.**
<!-- endtab -->
{% endtabs %}
Demo 2 - 预设选择 tabs
{% tabs test2, 3 %}
<!-- tab -->
**This is Tab 1.**
<!-- endtab -->

<!-- tab -->
**This is Tab 2.**
<!-- endtab -->

<!-- tab -->
**This is Tab 3.**
<!-- endtab -->
{% endtabs %}
Demo 3 - 没有预设值
{% tabs test3, -1 %}
<!-- tab -->
**This is Tab 1.**
<!-- endtab -->

<!-- tab -->
**This is Tab 2.**
<!-- endtab -->

<!-- tab -->
**This is Tab 3.**
<!-- endtab -->
{% endtabs %}
Demo 4 - 自定义Tab名 + 只有icon + icon和Tab名
{% tabs test4 %}
<!-- tab 第一个Tab -->
**tab名字为第一个Tab**
<!-- endtab -->

<!-- tab @fab fa-apple-pay -->
**只有图标 没有Tab名字**
<!-- endtab -->

<!-- tab 炸弹@fas fa-bomb -->
**名字+icon**
<!-- endtab -->
{% endtabs %}
inlineImg
{% inlineImg [src] [height] %}

[src]      :    图片链接
[height]   :   图片高度限制【可选】
Demon
你看我长得漂亮不

我觉得很漂亮 {% inlineImg https://i.loli.net/2021/03/19/5M4jUB3ynq7ePgw.png 150px %}label
{% label text color %}- text: 文字
- color: 【可选】背景颜色,默认为 default default/blue/pink/red/purple/orange/green
Demo
臣亮言:{% label 先帝 %}创业未半,而{% label 中道崩殂 blue %}。今天下三分,{% label 益州疲敝 pink %},此诚{% label 危急存亡之秋 red %}也!然侍衞之臣,不懈于内;{% label 忠志之士 purple %},忘身于外者,盖追先帝之殊遇,欲报之于陛下也。诚宜开张圣听,以光先帝遗德,恢弘志士之气;不宜妄自菲薄,引喻失义,以塞忠谏之路也。
宫中、府中,俱为一体;陟罚臧否,不宜异同。若有{% label 作奸 orange %}、{% label 犯科 green %},及为忠善者,宜付有司,论其刑赏,以昭陛下平明之治;不宜偏私,使内外异法也。
timeline
{% timeline title,color %}
<!-- timeline title -->
xxxxx
<!-- endtimeline -->
<!-- timeline title -->
xxxxx
<!-- endtimeline -->
{% endtimeline %}- title: 标题/时间线
- color: timeline 颜色 default(留空) / blue / pink / red / purple / orange / green
{% timeline 2022 %}
<!-- timeline 01-02 -->
这是测试页面
<!-- endtimeline -->
{% endtimeline %}
{% timeline 2022,blue %}
<!-- timeline 01-02 -->
这是测试页面
<!-- endtimeline -->
{% endtimeline %}{% timeline 2022,green %}
<!-- timeline 01-02 -->
这是测试页面
<!-- endtimeline -->
{% endtimeline %}flink
{% flink %}
xxxxxx
{% endflink %}
{% flink %}
- class_name: 友情链接
class_desc: 那些人,那些事
link_list:
- name: JerryC
link: https://jerryc.me/
avatar: https://jerryc.me/img/avatar.png
descr: 今日事,今日毕
- name: Hexo
link: https://hexo.io/zh-tw/
avatar: https://d33wubrfki0l68.cloudfront.net/6657ba50e702d84afb32fe846bed54fba1a77add/827ae/logo.svg
descr: 快速、简单且强大的网誌框架
- class_name: 网站
class_desc: 值得推荐的网站
link_list:
- name: Youtube
link: https://www.youtube.com/
avatar: https://i.loli.net/2020/05/14/9ZkGg8v3azHJfM1.png
descr: 视频网站
- name: Weibo
link: https://www.weibo.com/
avatar: https://i.loli.net/2020/05/14/TLJBum386vcnI1P.png
descr: 中国最大社交分享平台
- name: Twitter
link: https://twitter.com/
avatar: https://i.loli.net/2020/05/14/5VyHPQqR6LWF39a.png
descr: 社交分享平台
{% endflink %}打字特效
修改 _config.butterfly.yml 文件
# Typewriter Effect (打字效果)
# https://github.com/disjukr/activate-power-mode
activate_power_mode:
  enable: true
  colorful: true # open particle animation (冒光特效)
  shake: false #  open shake (抖動特效)
  mobile: true
背景特效
修改 _config.butterfly.yml 文件
静止条带
# canvas_ribbon (靜止彩帶背景)
# See: https://github.com/hustcc/ribbon.js
canvas_ribbon:
  enable: false
  size: 150
  alpha: 0.6
  zIndex: -1
  click_to_change: false
  mobile: false
动态条带
# Fluttering Ribbon (動態彩帶)
canvas_fluttering_ribbon:
  enable: true
  mobile: false
canvas-nest
注:建议去掉之前加的动态线条效果
# canvas_nest
# https://github.com/hustcc/canvas-nest.js
canvas_nest:
  enable: true
  color: '0,0,255' #color of lines, default: '0,0,0'; RGB values: (R,G,B).(note: use ',' to separate.)
  opacity: 0.7 # the opacity of line (0~1), default: 0.5.
  zIndex: -1 # z-index property of the background, default: -1.
  count: 99 # the number of lines, default: 99.
  mobile: false
鼠标点击效果
修改 _config.butterfly.yml 文件
# Mouse click effects: fireworks (鼠標點擊效果: 煙火特效)
fireworks:
  enable: true
  zIndex: 9999 # -1 or 9999
  mobile: false

# Mouse click effects: Heart symbol (鼠標點擊效果: 愛心)
click_heart:
  enable: false
  mobile: false

# Mouse click effects: words (鼠標點擊效果: 文字)
ClickShowText:
  enable: false
  text:
    # - I
    # - LOVE
    # - YOU
  fontSize: 15px
  random: false
  mobile: false
页面美化
会改变ol、ul、h1-h5的样式
修改 _config.butterfly.yml 文件
# Beautify (美化頁面顯示)
beautify:
  enable: true
  field: site # site/post
  title-prefix-icon: '\f0c1' # '\f863'
  title-prefix-icon-color: '#F47466'
Snackbar 弹窗
修改 _config.butterfly.yml 文件
# Snackbar (Toast Notification 彈窗)
# https://github.com/polonel/SnackBar
# position 彈窗位置
# 可選 top-left / top-center / top-right / bottom-left / bottom-center / bottom-right
snackbar:
  enable: true
  position: bottom-left
  bg_light: '#49b1f5' # The background color of Toast Notification in light mode
  bg_dark: '#1f1f1f' # The background color of Toast Notification in dark mode
Instantpage
当鼠标悬停到链接上超过 65 毫秒时,Instantpage 会对该链接进行预加载,可以提升访问速度。
修改 _config.butterfly.yml 文件
# https://instant.page/
# prefetch (預加載)
instantpage: true
全局 Aplayer 播放
参考文档:
- 进入 blog 目录进行插件安装
npm install --save hexo-tag-aplayer- 关闭 asset_inject
在 _config.yml 文件中添加
aplayer:
  meting: true
asset_inject: false- 开启主题的 aplayerInject
在 _config.butterfly.yml 文件中设置
# Inject the css and script (aplayer/meting)
aplayerInject:
  enable: true
per_page: true- 插入 Aplayer html
分享歌单的链接的最后一串数字是 id 号,如
https://y.qq.com/n/ryqq/playlist/8476474722| 参数 | data-id | data-server | data-type | data-fixed | data-autoplay |
|---|---|---|---|---|---|
| 解释 | song id / playlist id / album id / search keyword | music platform: netease, tencent, kugou, xiami, baidu | song, playlist, album, search, artist | enable fixed mode | audio autoplay |
在 _config.butterfly.yml 文件的 inject 的 bottom 导入
- <div class="aplayer no-destroy" data-id="8476474722" data-server="tencent" data-type="playlist" data-fixed="true" data-autoplay="true"> </div>注:歌单中不要有 vip 音乐,如果你想切换页面时,音乐不会中断。请把主题配置文件的 pjax 设为 true。如果使用 Pjax,则在 class 里需添加 no-destroy,这样防止切换页面时 Aplayer 被销毁
# Pjax
# It may contain bugs and unstable, give feedback when you find the bugs.
# https://github.com/MoOx/pjax
pjax:
  enable: true
  exclude:
    # - xxxx
# - xxxx- 创建页面
hexo n page "music"- MeingJS 支持(3.0 新功能)
<!-- 简单示例 (id, server, type)  -->
{% meting "60198" "netease" "playlist" %}

<!-- 进阶示例 -->
{% meting "60198" "netease" "playlist" "autoplay" "mutex:false" "listmaxheight:340px" "preload:none" "theme:#ad7a86"%}| 选项 | 默认值 | 描述 |
|---|---|---|
| id | 必须值 | 歌曲 id / 播放列表 id / 相册 id / 搜索关键字 |
| server | 必须值 | 音乐平台: netease, tencent, kugou, xiami, baidu |
| type | 必须值 | song, playlist, album, search, artist |
| fixed | false |
开启固定模式 |
| mini | false |
开启迷你模式 |
| loop | all |
列表循环模式:all, one,none |
| order | list |
列表播放模式: list, random |
| volume | 0.7 | 播放器音量 |
| lrctype | 0 | 歌词格式类型 |
| listfolded | false |
指定音乐播放列表是否折叠 |
| storagename | metingjs |
LocalStorage 中存储播放器设定的键名 |
| autoplay | true |
自动播放,移动端浏览器暂时不支持此功能 |
| mutex | true |
该选项开启时,如果同页面有其他 aplayer 播放,该播放器会暂停 |
| listmaxheight | 340px |
播放列表的最大长度 |
| preload | auto |
音乐文件预载入模式,可选项: none, metadata, auto |
| theme | #ad7a86 |
播放器风格色彩设置 |
- 修改 blog/source/music/index.md 内容为
---
title: Music
date: 2022-05-16 11:50:58
type: "music"
top_img: https://cdn.jsdelivr.net/gh/LuYF-Lemon-love/PicBed@main/blogs/pictures/20220513171354.png
---

{% meting "8476474722" "tencent" "playlist" "theme:#3F51B5" "mutex:true" "preload:auto" %}
说说
安装插件 hexo-butterfly-artitalk,具体配置查看 插件文档。
- 在 blog 目录下安装插件
npm install hexo-butterfly-artitalk配置数据库
参考官方配置教程
建议使用国际版的
因为国际版的 LeanCloud 不需要配置 serverurl,所以推荐使用国际版,速度没有区别,如果使用国内版的 LeanCloud 别忘了填写 serverurl 即可。
1. 前往 [LeanCloud国际版](https://leancloud.app/) ,注册账号。
2. 注册完成之后根据 LeanCloud 的提示绑定手机号和邮箱。
3. 绑定完成之后点击创建应用,应用名称随意,接着在结构化数据中创建 class,命名为 shuoshuo。
4. 在你新建的应用中,内建账号 > 用户管理 > 添加用户。点击添加用户,输入想用的用户名及密码。
5. 回到结构化数据中,点击 class 下的 shuoshuo。找到权限,在 Class 访问权限中将 add_fields 以及 create 权限设置为指定用户,输入你刚才输入的用户名会自动匹配。为了安全起见,将 delete 和 update 也设置为跟它们一样的权限。
6. 然后新建一个名为 atComment 的 class,权限什么的使用默认的即可。
7. 点击 class 下的 _User 添加列,列名称为 img,默认值填上你这个账号想要用的发布说说的头像 url,这一项不进行配置,说说头像会显示为默认头像 —— Artitalk 的 logo。
8. 在最菜单栏中找到设置-> 应用 keys,记下来 AppID 和 AppKey ,一会会用。
9. 最后将 _User 中的权限全部调为指定用户,或者数据创建者,为了保证不被篡改用户数据以达到强制发布说说。- 在 _config.butterfly.yml 文件中添加
# Artitalk
# see https://artitalk.js.org/
artitalk:
  enable: true
  appId: #LeanCloud 创建的应用中的 AppID
  appKey: #LeanCloud 创建的应用中的 AppKEY
  path:
  js:
  option:
    pageSize: 10
  front_matter:
    title: ShuoShuo
top_img: https://cos.luyf-lemon-love.space/images/mttargon-caverns-of-stone..jpg| 参数 | 解释 |
|---|---|
| appId | (必选) LeanCloud 创建的应用中的 AppID |
| appKey | (必选) LeanCloud 创建的应用中的 AppKEY |
| path | (可选) Artitalk 的路径名称 (默认为 artitalk,生成的页面为 artitalk/index.html) |
| js | (可选) 更换 Artitalk 的 js CDN (默认为 https://cdn.jsdelivr.net/npm/artitalk) |
| option | (可选) Artitalk 需要的额外配置 |
| front_matter | (可选) Artitalk 页面的 front_matter 配置 |
- 在 _config.butterfly.yml 文件中的 menu 处添加
ShuoShuo: /artitalk/ || fas fa-comment- 因为 Artitalk 对 Pjax 的支持不友善,如果使用 Valine 评论的话,请把说说页面添加到主题配置文件中的 Pjax 的 exclude 去,不然会引起 Artitalk 和 Valine 都加载出错。修改 _config.butterfly.yml 文件
pjax:
  enable: true
  exclude:
- /artitalk/- 成功页面
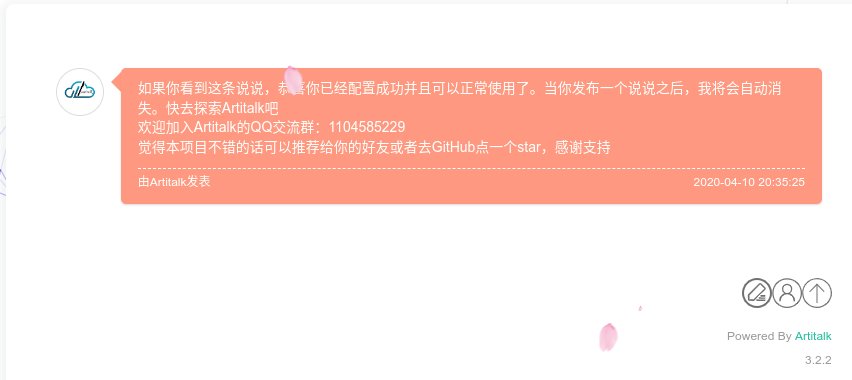
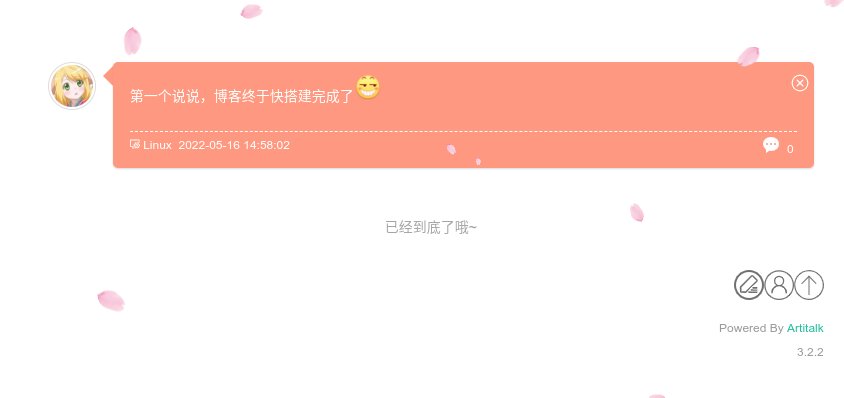
hexo-filter-nofollow
自动向所有外部链接添加 nofollow 属性。
hexo-filter-nofollow添加到所有外部链接,以确保安全,隐私和SEO。
npm i hexo-filter-nofollow --save在 _config.yml 文件中配置
nofollow:
  enable: true
  field: site
  exclude:
    - 'exclude1.com'
    - 'exclude2.com'
jsdelivr 刷新缓存
https://cdn.jsdelivr.net/...换成
https://purge.jsdelivr.net/...图片懒加载
注:图片的懒加载可能导致图片加载不出来。
配置 _config.butterfly.yml 文件
# Lazyload (圖片懶加載)
# https://github.com/verlok/vanilla-lazyload
lazyload:
  enable: true
  field: site # site/post
  placeholder:
  blur: false
Github 和 Gitee 分流
设置 Gitee 的 SSH 公钥
首先登录 Gitee
进入设置页面
点击 SSH 公钥
将 Github 的 id_rsa.pub 粘贴到公钥区域,标题随便填,点击确定
验证
ssh -T git@github.com
ssh -T git@gitee.com
部署到 Gitee
创建仓库 LuYF-Lemon-love,路径是 用户名(如:LuYF-Lemon-love)
修改 _config.yml 文件 Deployment 部分为
# Deployment
## Docs: https://hexo.io/docs/one-command-deployment
deploy:
  type: git
  repo:
    github: git@github.com:LuYF-Lemon-love/LuYF-Lemon-love.github.io.git
    gitee: git@gitee.com:LuYF-Lemon-love/LuYF-Lemon-love.git
branch: master- 部署到 Github 和 Gitee 上
hexo cl
hexo g
hexo d
点击 LuYF-Lemon-love.gitee.io 仓库主页的管理按钮
点击开源,点击保存
进入到仓库中,选择服务下拉框中的Gitee Pages选项,进入后点击部署,勾选 强制使用 HTTPS。
注:审核时需要身份证,并且需要至少一天时间。每次重新部署代码到gitee时,都需要点击下方的更新按钮重启page服务。
Github 和 Coding 分流
登录Coding
创建项目 LuYF-Lemon-love
点击 代码仓库,创建名为 LuYF-Lemon-love 的公有仓库
复制 ssh 链接地址,
git@e.coding.net:luyanfeng-nlp/luyf-lemon-love/LuYF-Lemon-love.git点击快速初始化仓库
配置 _config.yml 文件
# Deployment
## Docs: https://hexo.io/docs/one-command-deployment
deploy:
  type: git
  repo:
    github: git@github.com:LuYF-Lemon-love/LuYF-Lemon-love.github.io.git
    gitee: git@gitee.com:LuYF-Lemon-love/LuYF-Lemon-love.git
    coding: git@e.coding.net:luyanfeng-nlp/luyf-lemon-love/LuYF-Lemon-love.git
branch: master- 点击个人账号设置,点击 SSH 公钥,添加 Github 的公钥
验证
ssh -T git@e.coding.net- 部署
hexo cl
hexo g
hexo d
注:coding 已经于 2021 年 12 月 30 日起关闭网站托管服务。
腾讯云部署
轻量云服务器配置
登录腾讯云官网
选择轻量应用服务器,购买时可以看看有没有合适的活动,操作系统选择宝塔Linux面板 7.8.0 腾讯云专享版
轻量应用服务器(TencentCloud Lighthouse)是新一代开箱即用、面向轻量应用场景的云服务器产品,助力中小企业和开发者便捷高效的在云端构建网站、Web应用、小程序/小游戏、APP、电商应用、云盘/图床和各类开发测试环境,相比普通云服务器更加简单易用且更贴近应用,以套餐形式整体售卖基础云资源并提供高带宽流量包,将热门开源软件融合打包实现一键构建应用,提供极简上云体验。
登录 轻量应用服务器控制台 后,选择实例卡片右上角的更多 > 重置密码。
使用密码登录。
ssh <username>@<IP address or domain name>

#例子
ssh root@43.142.31.247- 创建密钥
1. 登录轻量应用服务器控制台,并单击左侧导航栏中的 密钥。
2. 在密钥列表页面,单击创建密钥。
3. 在弹出的“创建SSH密钥”窗口中,设置密钥的所属地域,选择密钥的创建方式,单击确定。

注:创建完成后将自动下载私钥,腾讯云不会保管您的私钥信息,请在10分钟内下载和获取私钥。密钥仅有一次下载机会,请您妥善保管。- 密钥绑定/解绑实例
1. 登录 轻量应用服务器控制台。
2. 在左侧导航栏中,单击密钥列表。
3. 在密钥列表页面,选择需要绑定/解绑实例的 SSH 密钥,单击绑定/解绑实例。
4. 在弹出的绑定/解绑实例窗口中,勾选需绑定/解绑的 Linux 实例,单击确定。
5. 为提高轻量应用服务器实例的安全性,Linux 实例绑定密钥后,会默认会禁止通过密码登录 root 用户。如您仍需保留密码登录方式,可参考 修改 SSH 进行修改。- 使用密钥登录
chmod 400 <已下载的与实例关联的私钥的绝对路径>

ssh -i <已下载的与实例关联的私钥文件的路径> <username>@<IP address or domain name>

#例子
chmod 400 ssh
ssh -i ssh root@43.142.31.247
Hexo部署至轻量应用服务器的宝塔面板
- 登录服务器后输入下面命令,记住宝塔面板地址,用户名和密码(面板地址访问需要控制面板的防火墙处开放8888端口)
sudo /etc/init.d/bt default登录宝塔面板,傻瓜式配置完成。注:选择 lnmp,不要选择 lamp
登录 轻量应用服务器,运行下面命令
sudo su root

yum install git

adduser git
chmod 740 /etc/sudoers

vim /etc/sudoers
按i键进入编辑模式,找到root ALL=(ALL) ALL,在其下方加入:
git ALL=(ALL) ALLchmod 400 /etc/sudoers
sudo passwd git
su git
mkdir ~/.ssh
vim ~/.ssh/authorized_keys进入编辑模式,把之前 Github 的id_rsa.pub文件中的公钥粘贴进去,按esc后,输入:wq保存。(注意!!! 最后一行要加回车)
chmod 600 /home/git/.ssh/authorized_keys
chmod 700 /home/git/.ssh

# 本地测试
ssh -v git@服务器ip地址或域名

#例子
ssh -v git@43.142.31.247

sudo su root

mkdir /www/wwwroot/repo
chown -R git:git /www/wwwroot/repo
chmod -R 755 /www/wwwroot/repo

mkdir /www/wwwroot/hexo
chown -R git:git /www/wwwroot/hexo
chmod -R 755 /www/wwwroot/hexo

cd /www/wwwroot/repo/
git init --bare hexo.git
vim /www/wwwroot/repo/hexo.git/hooks/post-receive
按i进入编辑模式,添加下面的代码,按esc输入:wq 保存
#!/bin/bash
git --work-tree=/www/wwwroot/hexo --git-dir=/www/wwwroot/repo/hexo.git checkout -f
chown -R git:git /www/wwwroot/repo/hexo.git/hooks/post-receive
chmod +x /www/wwwroot/repo/hexo.git/hooks/post-receive- 宝塔面板配置
1. 登录宝塔面板

2. 点击网站,然后添加一个 PHP 项目的站点

3. 域名填写:本服务器的IP 地址或者 域名,根目录:/www/wwwroot/hexo,其他的默认,点击提交- 配置博客的 _config.yml 文件
deploy:
  type: git
  repo: git@服务器ip或域名:/www/wwwroot/repo/hexo.git
  branch: master

#例子
# Deployment
## Docs: https://hexo.io/docs/one-command-deployment
deploy:
  type: git
  repo:
    github: git@github.com:LuYF-Lemon-love/LuYF-Lemon-love.github.io.git
    gitee: git@gitee.com:LuYF-Lemon-love/LuYF-Lemon-love.git
    coding: git@e.coding.net:luyanfeng-nlp/luyf-lemon-love/LuYF-Lemon-love.git
    baota: git@43.142.31.247:/www/wwwroot/repo/hexo.git
  branch: master
hexo cl
hexo g
hexo d- 如果报错,请删除/www/wwwroot/hexo下的所有文件. 包括.user.ini(需要通过宝塔面板的文件页面删除)
# 注意通过宝塔面板的文件页面删除 .user.ini文件
rm /www/wwwroot/hexo/*
chown -R git:git /www/wwwroot/repo
chmod -R 755 /www/wwwroot/repo
chown -R git:git /www/wwwroot/hexo
chmod -R 755 /www/wwwroot/hexoBilibili 页面
获取 Bilibili 图标
注册登录 iconfont
添加图标到购物车
点击购物车,将图标添加进项目,如果没有项目点击下面的按钮,新建一个项目
点击 Font class 和 View the Online Link
将显示的链接补全成 css,然后添加到 _config.butterfly.yml 文件的 inject 的 head 处
可以在 _config.butterfly.yml 文件的 menu 处引用,引用的格式为
iconfont icon名字,如 iconfont icon-bilibili
新建 Bilibili 主页
hexo n page "bilibili"修改 blog/source/bilibili/index.md 文件为:
---
title: Bilibili
date: 2022-05-18 18:22:09
type: "bilibili"
top_img: https://cdn.jsdelivr.net/gh/LuYF-Lemon-love/PicBed@main/blogs/pictures/20220513171931.png
---
### 斗破苍穹
{% raw %}
<div style="position: relative; width: 100%; height: 0; padding-bottom: 75%;">
<iframe src="//player.bilibili.com/player.html?aid=209733780&bvid=BV17a411r7AV&cid=462112443&page=1" scrolling="no" border="0" frameborder="no" framespacing="0" allowfullscreen="true" style="position: absolute; width: 100%; height: 100%; Left: 0; top: 0;" ></iframe>
</div>
{% endraw %}注:注意上面视频的 style,否则 Bilibili 窗口非常小。
腾讯云域名绑定到 Github 上
登录腾讯云官网,找到 域名注册 并进入,选择你想要的域名并购买,注意第一次需要用身份证创建信息模板,并进行实名认证,虽然腾讯官网说需要 3-5 日,但实际上只需要 15 分钟左右,效率还是很高的。
然后进入腾讯云 DNS 解析控制台,点击你的域名的解析按钮,点击添加记录按钮,如图
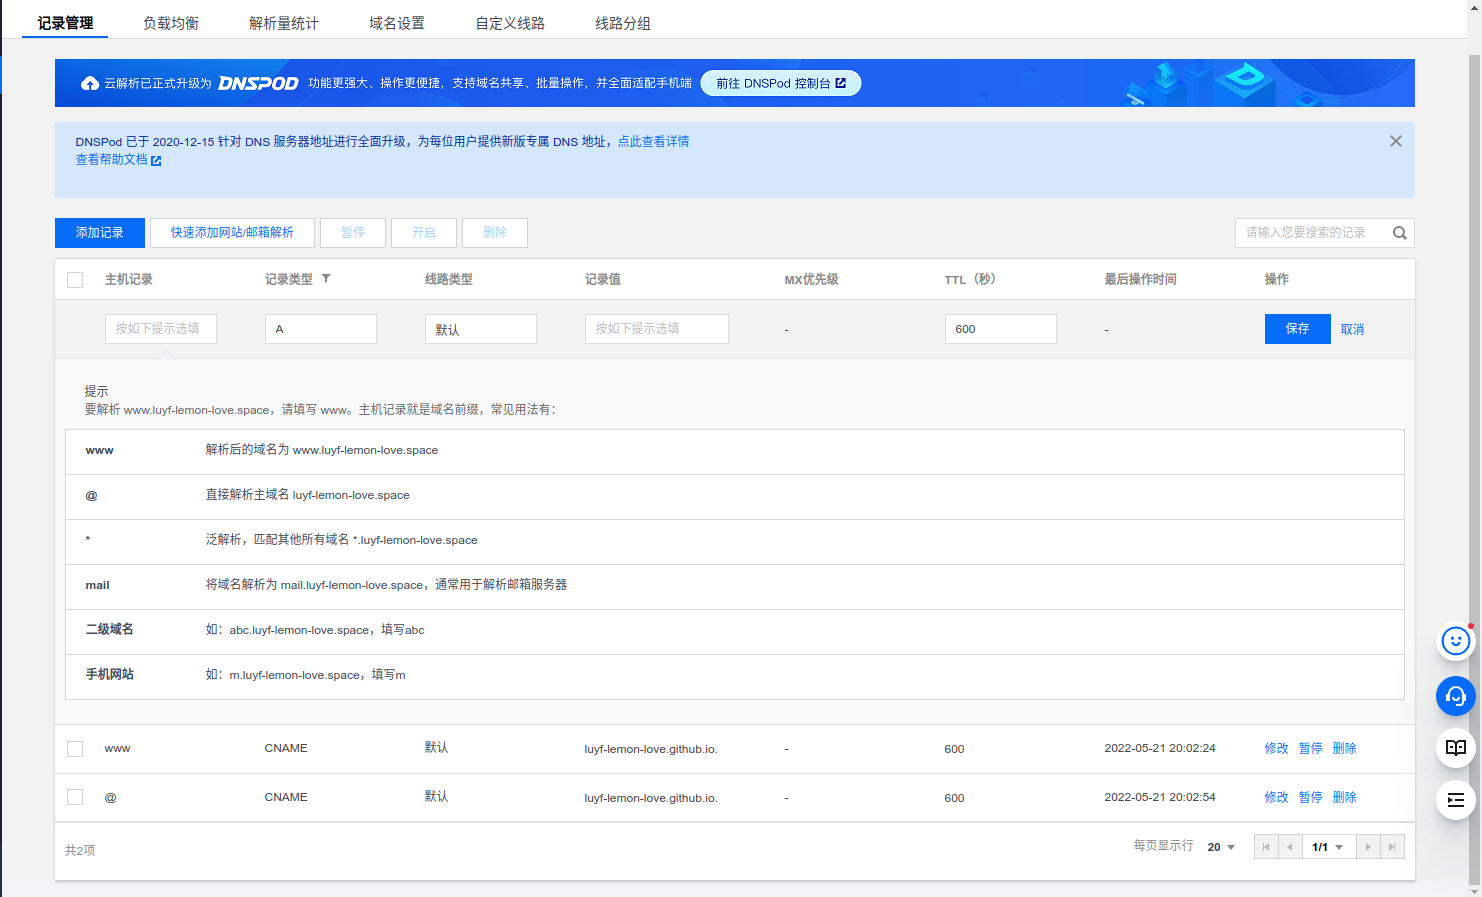
主机记录:填写子域名。例如,添加 www.123.com 的解析,您在 “主机记录” 处选择 “www” 即可。如果只是想添加 123.com 的解析,您在 “主机记录” 处选择 “@” 即可。“@” 的 CNAME 会影响到 MX 记录的正常解析,添加时请您慎重考虑。| 记录类型 | 使用目的 |
|---|---|
| A 记录 | 将域名指向一个 IP 地址(外网地址)。 |
| CNAME 记录 | 将域名指向另一个域名,再由另一个域名提供 IP 地址(外网地址)。 |
| MX 记录 | 设置邮箱,让邮箱能收到邮件。 |
| NS 记录 | 将子域名交给其他 DNS 服务商解析。 |
| AAAA 记录 | 将域名指向一个 IPv6 地址。 |
| SRV 记录 | 用来标识某台服务器使用了某个服务,常见于微软系统的目录管理。 |
| TXT 记录 | 对域名进行标识和说明,绝大多数的 TXT 记录是用来做 SPF 记录(反垃圾邮件)。 |
| 隐、显性 URL 记录 | 将一个域名指向另外一个已经存在的站点。 |
- 为了使访客用不用 www 都可以访问博客,我们添加两条记录,注意:我们选择 CNAME 记录类型,记录值填写 你的 Github 用户名.github.io,如图

- 进入你的 Github 博客所在仓库的设置页面,点击 Pages,在 Custom domain 处修改域名为你之前买的域名,并勾选 Enforce HTTPS,然后点击 Save。如图
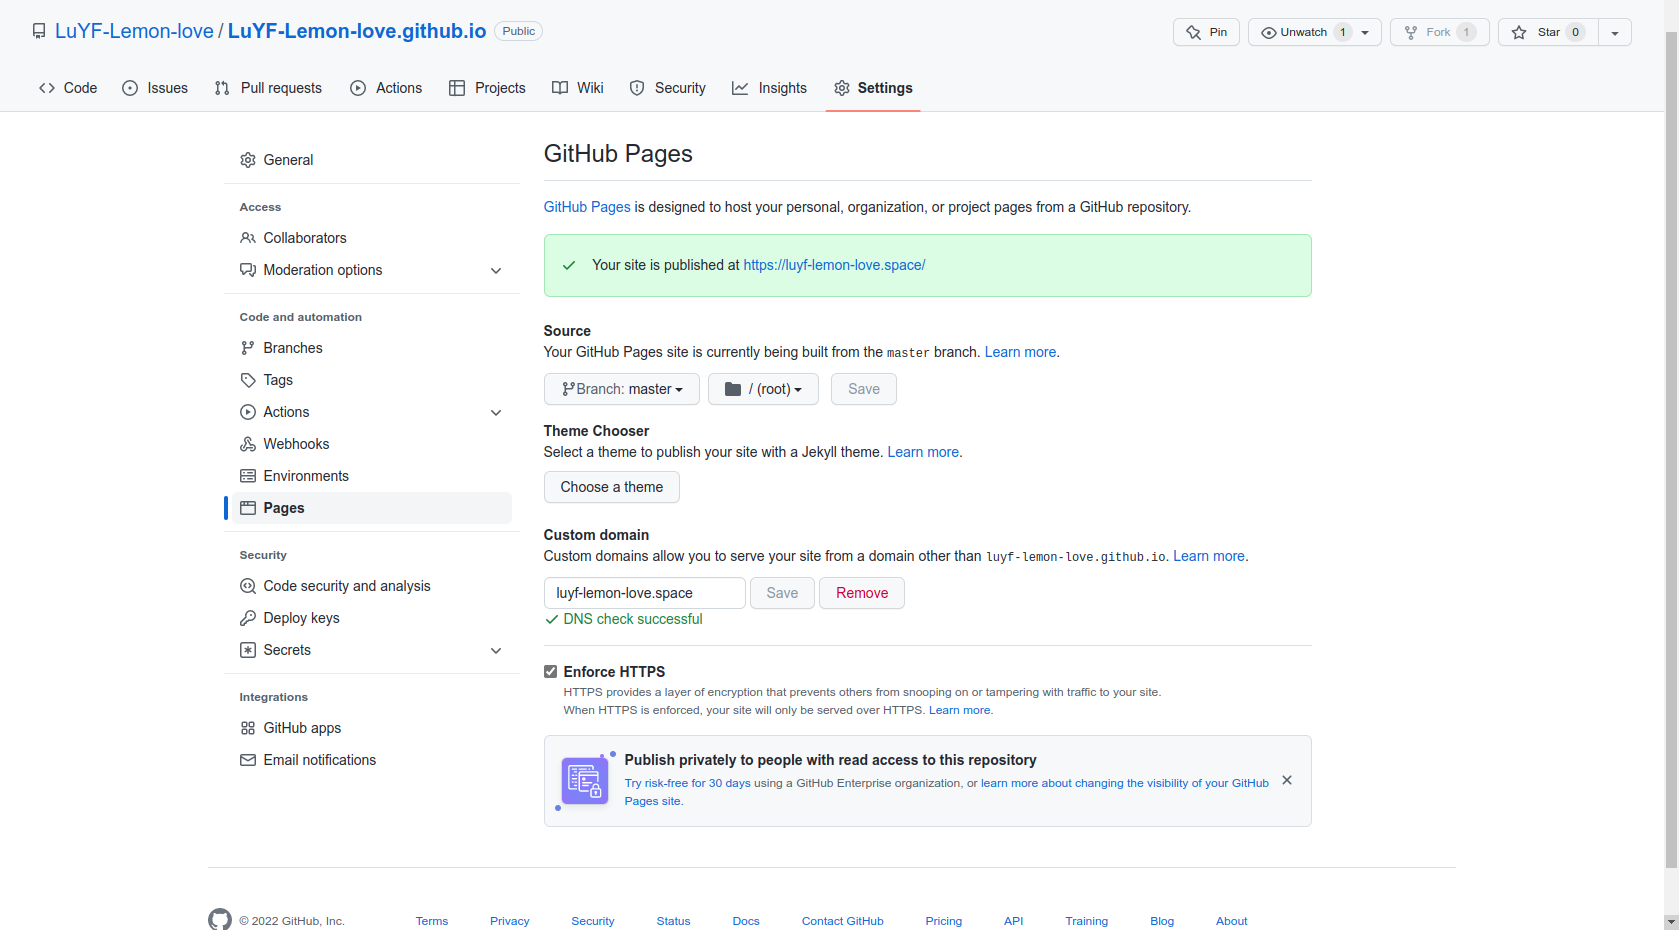

- 在 blog/source 目录下新建一个 CNAME 文件,填入你的域名。
luyf-lemon-love.space- 然后一键三连,过不了多久,再打开你的浏览器,输入你自己的域名,就可以看到搭建的网站啦!
hexo clean
hexo g
hexo dGit 分支进行多终端工作 | 更换电脑
默认情况下 hexo d上传部署到github的其实是hexo编译后的文件,是用来生成网页的,不包含源文件。
可以利用 Git 分支实现快速的切换工作环境(不同的电脑撰写博客)和备份源文件。
Git 分支进行多终端工作
- 在 LuYF-Lemon-love.github.io 仓库的主页新建一个 hexo 分支。

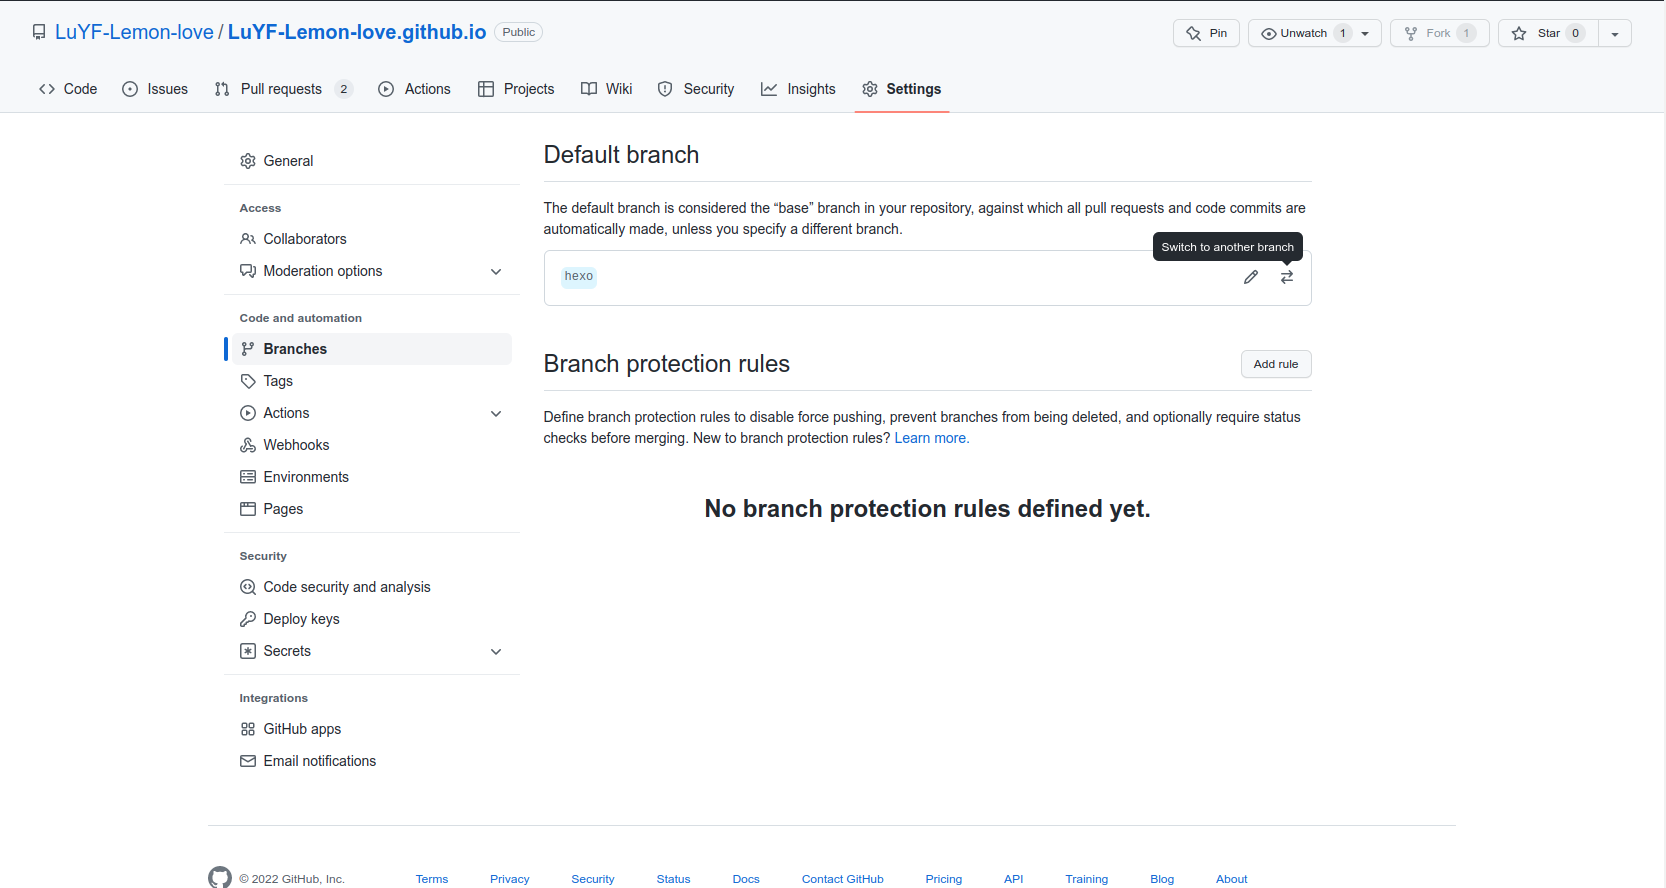
- 在 LuYF-Lemon-love.github.io 仓库的设置页面 > Branches > Default branch 处修改默认分支为 hexo 。
- 在本地任意目录下运行下面命令,将你的仓库克隆到本地
git clone git@github.com:LuYF-Lemon-love/LuYF-Lemon-love.github.io.git进入到 LuYF-Lemon-love.github.io 目录里面,把除了 .git 目录以外,其他所有文件都删掉。
将之前的 blog 目录里面的文件都复制到 LuYF-Lemon-love.github.io 目录中,由于 Git 不能嵌套上传,你应该把各个主题目录里面的 .git 目录删掉(由于之前用过 yilia 主题,因此我需要删掉 butterfly 和 yilia 两个主题目录里的 .git 文件)。由于之前进阶版看板娘的克隆过一个 live2d-widget 目录,因此您应该删掉 LuYF-Lemon-love.github.io/themes/butterfly/source/live2d-widget 目录里面的 .git 目录。
然后在 LuYF-Lemon-love.github.io 目录下运行下面的命令将博客的源文件上传到 Github 上。
git add .
git commit -m "add branch"
git push更换电脑
# 安装 git
sudo apt-get install git
# 设置 git
git config --global user.name "yourgithubname"
git config --global user.email "yourgithubemail"
# 设置 ssh key
ssh-keygen -t rsa -C "youremail"
#生成后填到 github上,由于我还有 gitee,coding 和 轻量应用服务器,因此我需要为上面四个平台都填上 ssh 的公钥,并验证每一个平台的公钥是否上传成功
#验证 github
ssh -T git@github.com
# 安装 nodejs
sudo apt-get install nodejs
sudo apt-get install npm
# 安装 hexo,不需要运行 hexo init
sudo npm install hexo-cli -g
# 克隆
git clone git@github.com:LuYF-Lemon-love/LuYF-Lemon-love.github.io.git
cd LuYF-Lemon-love.github.io/
npm install
npm install hexo-deployer-git --save
# 撰写博客
# 部署
hexo cl
hexo g
hexo d
# 上传源文件
git add .
git commit -m "新电脑测试"
git push
# 每次编写的时候获取新版本
# git pull 命令用于从远程获取代码并合并本地的版本
git pull百度收录博客
由于 Github 拒绝百度爬虫的访问,因此百度不会收录 Github Pages 上的博客的。
但是部署在 Vercel 上的博客,百度时可以抓取的。因此,我们是可以利用 Vercel 让百度收录我们的博客。
由于之前已经我们已经介绍了在 Vervel 部署博客的方法,所以这里就不重复了。
向百度添加站点
登录 百度站长。
点击添加网站,安装步骤添加网站。
1. 输入网站,协议头选择 https://,域名填写 Vercel 的域名如:lu-yf-lemon-love-github-io.vercel.app

2. 站点属性:信息技术

3. 验证网站有三种,我们选择 **文件验证**
文件验证:按照指引下载 验证文件如:baidu_verify_code-BpOQH6T9DQ.html,将验证文件放入到博客根目录的 source 目录下,如 LuYF-Lemon-love.github.io/source。
然后在 _config.yml 文件中设置以下内容
skip_render:
  - baidu_verify_code-BpOQH6T9DQ.html
然后重新部署
hexo cl
hexo g
hexo d
访问 https://lu-yf-lemon-love-github-io.vercel.app/baidu_verify_code-BpOQH6T9DQ.html 看是否能访问,如果能够,点击验证按钮完成验证。
向百度推送网站资源
登录 百度普通收录
可以发现普通收录方式有:API提交、sitemap、手动提交,我们选择 sitemap 方式,点击 sitemap。
安装插件
npm install hexo-generator-sitemap --save
npm install hexo-generator-baidu-sitemap --save

hexo cl
hexo g
运行上面命令后,会发现在 LuYF-Lemon-love.github.io/public 目录下有了 baidusitemap.xml 和 sitemap.xml
在 _config.yml 文件设置以下内容
# URL
## Set your site url here. For example, if you use GitHub Page, set url as 'https://username.github.io/project'
url: https://lu-yf-lemon-love-github-io.vercel.app/
# 通用站点地图
sitemap:
  path: sitemap.xml
# 百度站点地图
baidusitemap:
path: baidusitemap.xml- 在百度的普通收录页面的 sitemap 处填写下面内容(每天只能填一条),完成后点击提交。
https://lu-yf-lemon-love-github-io.vercel.app/baidusitemap.xml
https://lu-yf-lemon-love-github-io.vercel.app/sitemap.xml- 第二天和第三天的结果


- 百度收录很慢,一般至少要半个月,你可以半个月后到百度搜索引擎中输入 site:<域名>(site:lu-yf-lemon-love-github-io.vercel.app)看看又没有收录。
向百度推送网站资源 2
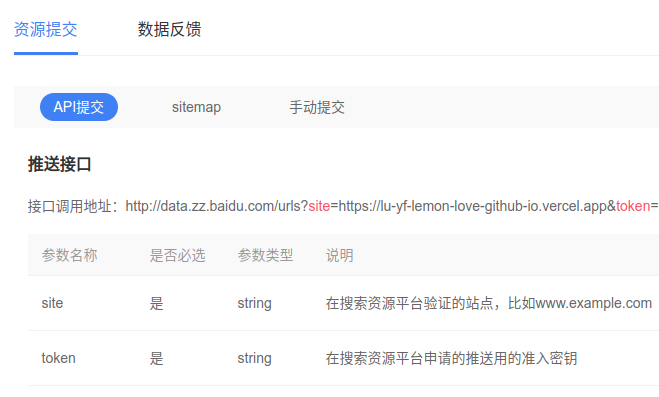
- 登录 百度普通收录,获取到 token。
- 安装插件
npm install hexo-baidu-url-submit --save- 在 _config.yml 文件中增添下面设置
baidu_url_submit:
  count: 5 ## 提交最新的一个链接
  host: lu-yf-lemon-love-github-io.vercel.app ## 在百度站长平台中注册的域名
  token: your_token ## 请注意这是您的秘钥, 所以请不要把博客源代码发布在公众仓库里!
path: baidu_urls.txt ## 文本文档的地址, 新链接会保存在此文本文档里- 修改 _config.yml 的设置
# URL
## Set your site url here. For example, if you use GitHub Page, set url as 'https://username.github.io/project'
url: https://lu-yf-lemon-love-github-io.vercel.app

# Deployment
## Docs: https://hexo.io/docs/one-command-deployment
deploy:
  - type: git
    repo:
      github: git@github.com:LuYF-Lemon-love/LuYF-Lemon-love.github.io.git
      gitee: git@gitee.com:LuYF-Lemon-love/LuYF-Lemon-love.git
      coding: git@e.coding.net:luyanfeng-nlp/luyf-lemon-love/LuYF-Lemon-love.git
      baota: git@43.142.31.247:/www/wwwroot/repo/hexo.git
    branch: master
- type: baidu_url_submitter ## 这是新加的- 重新部署
hexo cl
hexo g
hexo d
结语
第四篇博文写完,开心!!!!
今天,也是充满希望的一天。


