
00018-Hexo博客进一步补充-ubuntu
前言
前两篇搭建博客的博文—— 00004-Hexo快速搭建一个博客-ubuntu 和 00012-Hexo博客补充-ubuntu,虽然已经介绍了方方面面,但是还有一些遗漏之处,并且它们包含的内容过多,导致它的加载很缓慢,影响观看。因此本篇博文将作为它们的补充为大家介绍其他内容。
操作系统:Ubuntu 20.04.4 LTS
参考文档
环境版本
1 | git 2.25.1 |
Google | Bing | Baidu
Google 收录和 Bing 收录的流程与百度收录的流程一样,先使用文件验证添加网站,然后添加博客的 sitemap。收录流程请参考 00004-Hexo快速搭建一个博客-ubuntu 的 百度收录博客。
注:有可能注册谷歌账号的时候会出现问题,请参考下面这篇文章,也可以直接花 10 多元买一个谷歌账号。
灰色养鱼
本节是在 00004-Hexo快速搭建一个博客-ubuntu 中养鱼的基础——5.6 页脚养鱼 和 11.2 页脚养鱼 上实现的。
原教程链接:Hexo页脚养鱼效果
- 新建 blog/themes/butterfly/source/js/fish.js 文件,粘贴下面代码。
1 | var RENDERER = { |
- 修改 _config.butterfly.yml 文件的 inject 的 bottom 处。
1 | - - <script defer src="/js/colorfishes.js"></script> # 页脚养鱼(彩色) |
- 修改 _config.butterfly.yml 文件。
1 | # Footer Background |
网站背景
默认显示白色,可设置图片或者颜色。
修改 _config.butterfly.yml 文件。
1 | # Website Background (設置網站背景) |
代码框展开/关闭
在默认情况下,代码框自动展开,可设置是否所有代码框都关闭状态,点击 > 可展开代码
- true: 全部代码框不展开,需点击 > 打开
- false: 代码框展开,有 > 点击按钮
- none: 不显示 > 按钮
修改 _config.butterfly.yml 文件。
1 | highlight_shrink: true # true: shrink the code blocks / false: expand the code blocks | none: expand code blocks and hide the button |
Hexo在顶部增加天气小部件
原教程链接:Hexo在顶部增加天气小部件
-
在和风天气插件中创建一个模板,点击生成代码。需要登录。
-
在 blog/themes/butterfly/source/js 目录下创建一个 weather.js 文件,将生成的代码写入。下面代码需要写入自己的 key 值。
1 | WIDGET = { |
- 修改 _config.butterfly.yml 文件,在 inject 的 bottom 处引入 js 文件。
1 | - <script defer src="https://widget.qweather.net/simple/static/js/he-simple-common.js?v=2.0"></script> |
- 修改 blog/themes/butterfly/layout/includes/header/nav.pug 文件。
1 | nav#nav |
- 修改 blog/themes/butterfly/source/css/_layout/head.styl 文件。
1 | - #blog_name |
Gitcalendar
原教程链接:Gitcalendar
- 安装插件。
1 | npm install hexo-filter-gitcalendar --save |
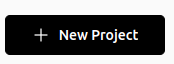
- 访问Vercel官网,注册登录。点击
New Project按钮。
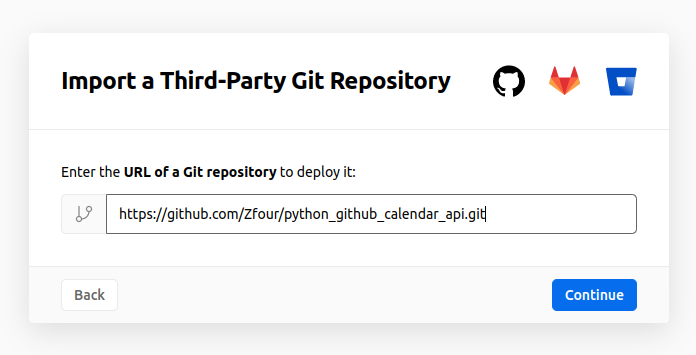
- 点击下图按钮,引入第三方 Git 仓库。

- 输入
https://github.com/Zfour/python_github_calendar_api.git,然后点击Continue按钮。
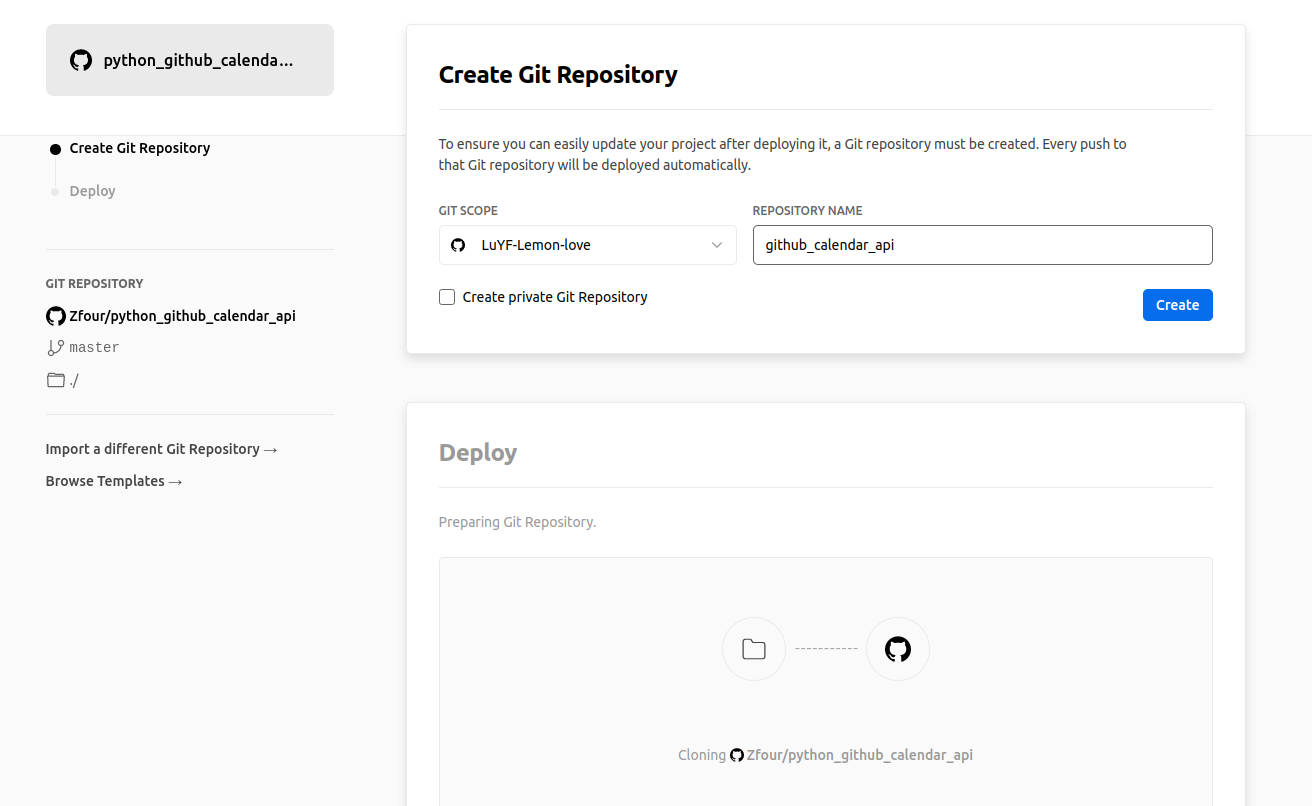
- 输入仓库名(任意),取消
Create private Git Repository的勾选,点击Create按钮。

-
点击
Go to Dashboard按钮。获得 API,如github-calendar-api-nine.vercel.app。 -
在 _config.butterfly.yml 文件中,添加下面的代码。
user:自己的 Github 用户名,apiurl:上面的获得的 API。
1 | # hexo-filter-gitcalendar |
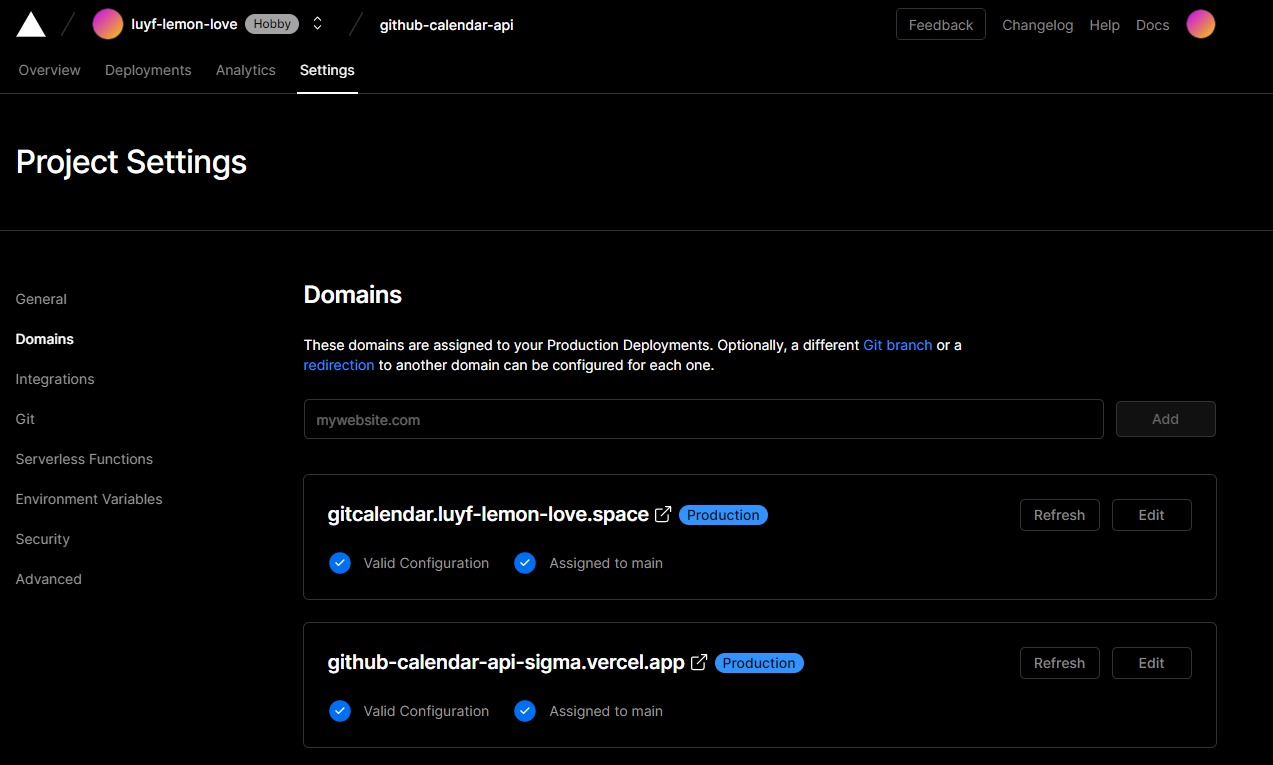
注意,2022 年 8 月 27 日下午,中国大陆
IP不能使用Vercel自动生成的域名,需要自定义域名,如gitcalendar.luyf-lemon-love.space。首先,登录Vercel,进入你的github-calendar-api项目,然后点击Setting->Domains,输入你的自定义域名。Vercel会给出你的需要解析的CNAME记录,最后登录你的域名解析平台(如 DNSPod )解析域名。Vercel自定义域名可以参考00012-Hexo博客补充-ubuntu。
Sidebar Card Clock
原教程链接:Sidebar Card Clock
- 安装插件。
1 | npm install hexo-butterfly-clock --save |
- 在 _config.butterfly.yml 文件中,添加如下代码。
1 | # electric_clock |
Hexo侧边栏添加微博热搜
原教程链接:Hexo侧边栏添加微博热搜
- 在 blog/themes/butterfly/layout/includes/widget 目录下新建
card_weibo.pug文件,并写入如下代码。
1 | if theme.aside.card_weibo.enable |
- 修改 blog/themes/butterfly/layout/includes/widget/index.pug 文件中的 page 项代码。
1 | else |
- 在 blog/themes/butterfly/source/js 目录中,新建
weibo.js文件,并写入如下代码。
1 | fetch('https://weibo-9qsvnblo6-pc-study.vercel.app/api').then(data=>data.json()).then(data=>{ |
- 在 _config.butterfly.yml 文件 inject 的 bottom 处引入上面的脚本。
1 | - <script defer src="/js/weibo.js"></script> |
- 在 blog/themes/butterfly/source/css/_custom 亩下创建
weibo.css文件,写入下面代码。
1 | #weibo-container{ |
- 在 _config.butterfly.yml 文件的 aside 处添加如下配置。
1 | card_webinfo: |
星空背景和流星特效
原教程链接:如何让你的博客拥有星空背景和流星特效
- 在 blog/themes/butterfly/source/js 目录下,新建 universe.js 文件,粘贴下面代码。
1 | function dark() {window.requestAnimationFrame=window.requestAnimationFrame||window.mozRequestAnimationFrame||window.webkitRequestAnimationFrame||window.msRequestAnimationFrame;var n,e,i,h,t=.05,s=document.getElementById("universe"),o=!0,a="180,184,240",r="226,225,142",d="226,225,224",c=[];function f(){n=window.innerWidth,e=window.innerHeight,i=.216*n,s.setAttribute("width",n),s.setAttribute("height",e)}function u(){h.clearRect(0,0,n,e);for(var t=c.length,i=0;i<t;i++){var s=c[i];s.move(),s.fadeIn(),s.fadeOut(),s.draw()}}function y(){this.reset=function(){this.giant=m(3),this.comet=!this.giant&&!o&&m(10),this.x=l(0,n-10),this.y=l(0,e),this.r=l(1.1,2.6),this.dx=l(t,6*t)+(this.comet+1-1)*t*l(50,120)+2*t,this.dy=-l(t,6*t)-(this.comet+1-1)*t*l(50,120),this.fadingOut=null,this.fadingIn=!0,this.opacity=0,this.opacityTresh=l(.2,1-.4*(this.comet+1-1)),this.do=l(5e-4,.002)+.001*(this.comet+1-1)},this.fadeIn=function(){this.fadingIn&&(this.fadingIn=!(this.opacity>this.opacityTresh),this.opacity+=this.do)},this.fadeOut=function(){this.fadingOut&&(this.fadingOut=!(this.opacity<0),this.opacity-=this.do/2,(this.x>n||this.y<0)&&(this.fadingOut=!1,this.reset()))},this.draw=function(){if(h.beginPath(),this.giant)h.fillStyle="rgba("+a+","+this.opacity+")",h.arc(this.x,this.y,2,0,2*Math.PI,!1);else if(this.comet){h.fillStyle="rgba("+d+","+this.opacity+")",h.arc(this.x,this.y,1.5,0,2*Math.PI,!1);for(var t=0;t<30;t++)h.fillStyle="rgba("+d+","+(this.opacity-this.opacity/20*t)+")",h.rect(this.x-this.dx/4*t,this.y-this.dy/4*t-2,2,2),h.fill()}else h.fillStyle="rgba("+r+","+this.opacity+")",h.rect(this.x,this.y,this.r,this.r);h.closePath(),h.fill()},this.move=function(){this.x+=this.dx,this.y+=this.dy,!1===this.fadingOut&&this.reset(),(this.x>n-n/4||this.y<0)&&(this.fadingOut=!0)},setTimeout(function(){o=!1},50)}function m(t){return Math.floor(1e3*Math.random())+1<10*t}function l(t,i){return Math.random()*(i-t)+t}f(),window.addEventListener("resize",f,!1),function(){h=s.getContext("2d");for(var t=0;t<i;t++)c[t]=new y,c[t].reset();u()}(),function t(){document.getElementsByTagName('html')[0].getAttribute('data-theme')=='dark'&&u(),window.requestAnimationFrame(t)}()}; |
- 在 blog/themes/butterfly/source/css/_custom 目录下,新建 universe.css 文件,粘贴下面代码。
1 | /* 背景宇宙星光 */ |
- 修改 _config.butterfly.yml 文件,在 inject 的 bottom 处引入 js 文件。
1 | - <canvas id="universe"></canvas> |
- 只有夜间模式生效。
插入 PDF
- 安装
hexo-pdf插件:
hexo-pdf 代码仓库: https://github.com/superalsrk/hexo-pdf .
1 | npm install --save hexo-pdf |
- 使用方法:
1 | {% pdf http://7xov2f.com1.z0.glb.clouddn.com/bash_freshman.pdf %} |
1 | {% pdf https://gcore.jsdelivr.net/gh/LuYF-Lemon-love/susu-book/read/pybind11-230218.pdf %} |
jsDelivr 域名
jsDelivr 域名:
cdn.jsdelivr.netjsDelivr 有很多的 CDN 赞助商共同支持,每一个服务商都会有自己的专有子域名:
CloudFlare:test1.jsdelivr.net
CloudFlare:testingcf.jsdelivr.net
Fastly:fastly.jsdelivr.net
GCORE:gcore.jsdelivr.net
1 |  |

基于腾讯云 COS 对象存储部署 hexo 博客
源教程地址: https://www.jianshu.com/p/3d796ec56160 .
插件地址: https://github.com/wertycn/hexo-deployer-qcloud-cos .
腾讯云官方设置静态网站教程: https://cloud.tencent.com/document/product/436/14984#.E6.93.8D.E4.BD.9C.E6.AD.A5.E9.AA.A4 .
使用 CDN 域名无法访问配置好的静态网站怎么办?: https://cloud.tencent.com/document/product/436/56555#.E4.BD.BF.E7.94.A8-cdn-.E5.9F.9F.E5.90.8D.E6.97.A0.E6.B3.95.E8.AE.BF.E9.97.AE.E9.85.8D.E7.BD.AE.E5.A5.BD.E7.9A.84.E9.9D.99.E6.80.81.E7.BD.91.E7.AB.99.E6.80.8E.E4.B9.88.E5.8A.9E.EF.BC.9F .
- 安装
hexo-deployer-qcloud-cos插件:
1 | npm install hexo-deployer-qcloud-cos --save |
- 在
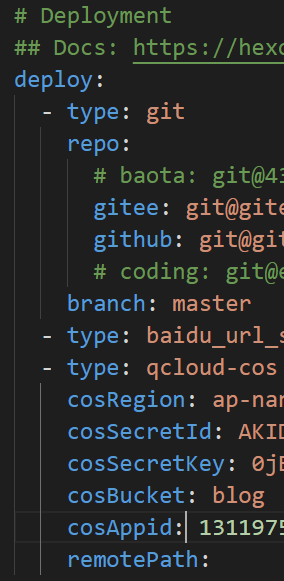
hexo项目配置文件_config.yml中添加如下部署配置:
1 | deploy: |
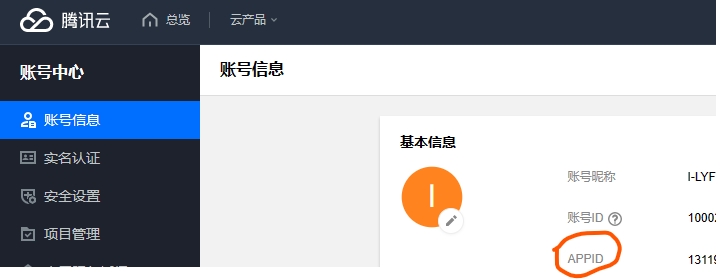
- 获取
APPID.
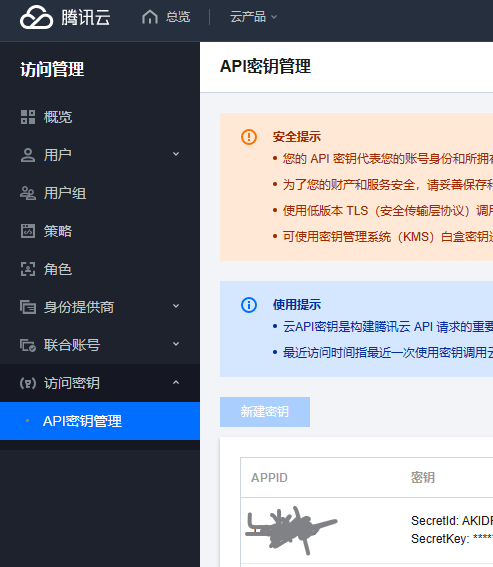
- 获取
SecretId和SecretKey.
- 获取
bucket和region.
首先从地域和访问域名中选择距离自己较近或者自己喜欢的区域.
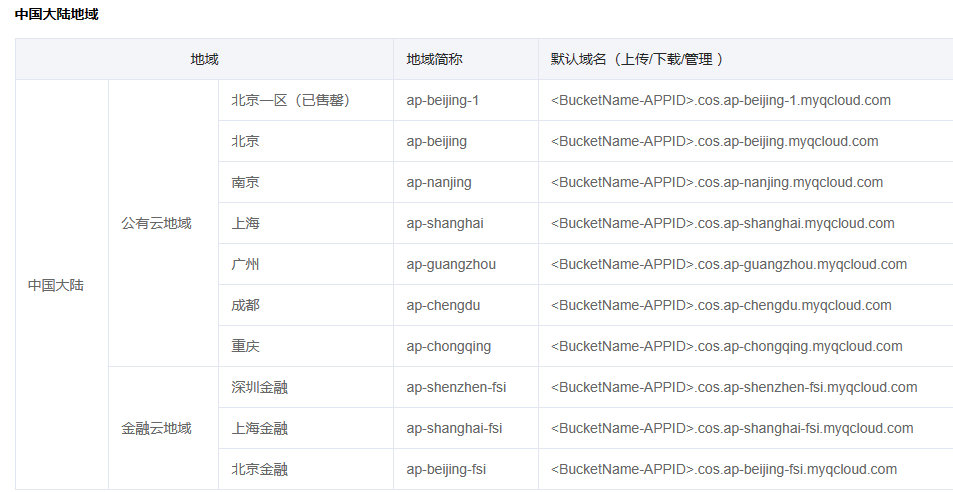
bucket是我们创建的对象存储的空间名称.
- 将上面的键值填入配置文件
_config.yml中.
1 | deploy: |
- 部署(将自动创建存储桶):
1 | hexo cl |
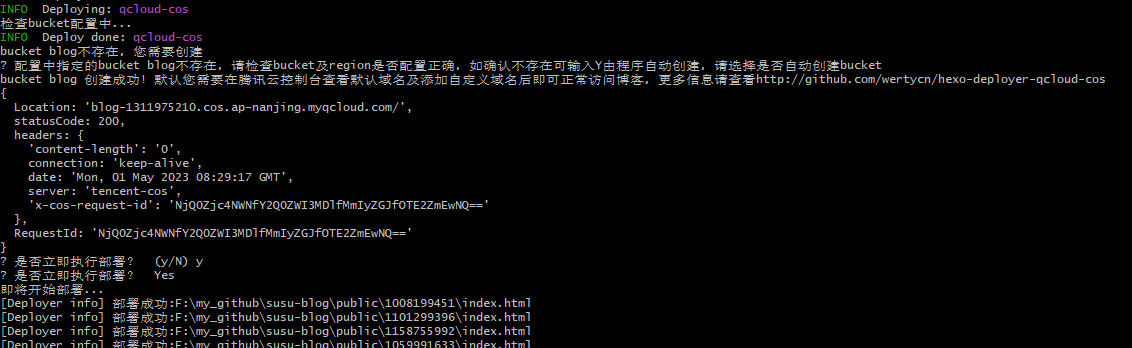

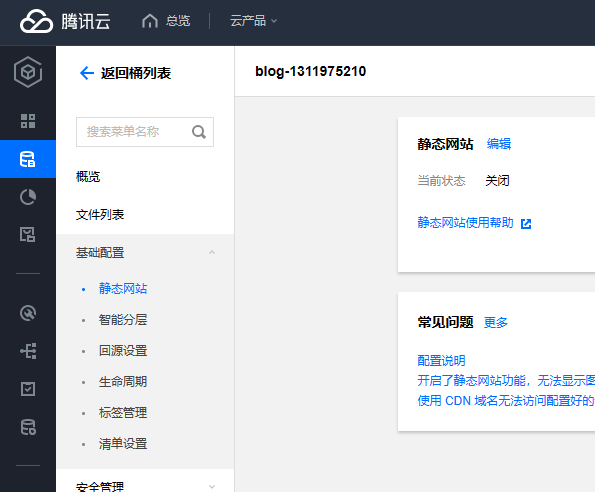
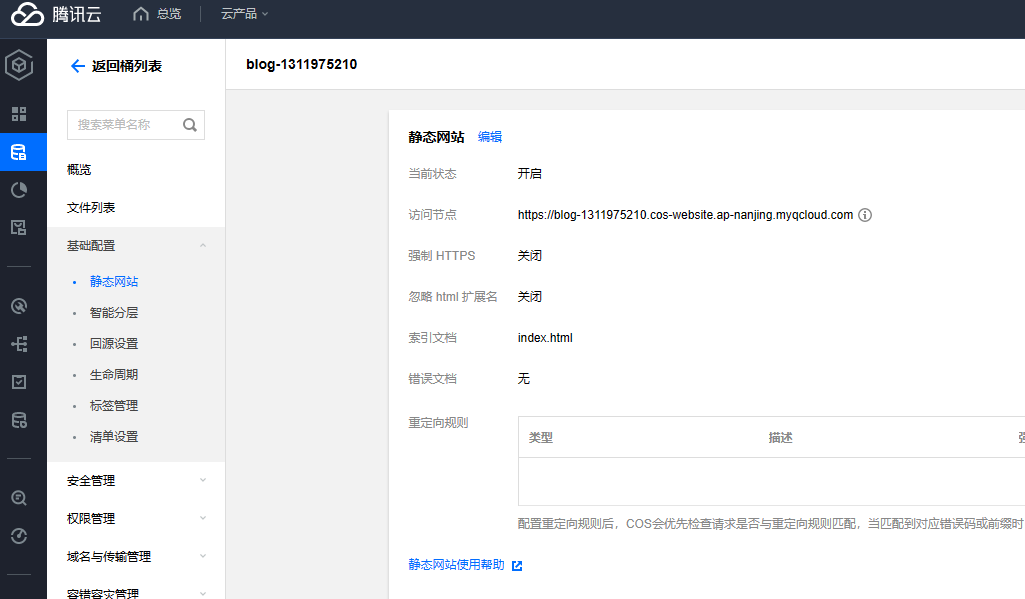
- 修改存储桶 bucket 设置. 进入控制台对象存储管理页面, 点击刚刚创建的存储桶名称, 进入存储桶详情页面. 开启
静态网站. 之后访问 https://blog-1311975210.cos-website.ap-nanjing.myqcloud.com 即可访问我们刚才部署的博客.
设置自定义域名
点击存储桶详情页面的域名管理选项卡,在自定义源站域名栏目下点击添加域名,源站类型选择【静态网站源站】,在域名位置输入博客要解析的域名,点击保存,复制CNAME值,到域名服务商处设置解析,此处需要设置的域名必须时已经备案过的域名,若域名尚未备案,则不能设置。
-
登录 对象存储控制台 。 在左侧导航栏中,单击存储桶列表,进入存储桶列表页面。
-
单击需要配置域名的存储桶,进入存储桶配置页面。
-
单击左侧的域名与传输管理 >
自定义 CDN 加速域名配置项,单击添加域名,配置如下选项。若您之前在老版本 COS 控制台使用过“自定义域名”,则在新版控制台不显示“自定义 CDN 加速域名”,仍显示“自定义域名”。 -
我们选择域名为
server.luyf-lemon-love.space,加速地域为 中国境内,源站类型为 静态网站源站,由于我们的 COS 为公有读私有写,因此不开启回源鉴权。 -
点击保存。点击 去 CDN 控制台配置进入 CDN 控制台,点击域名管理。

-
配置 CNAME,当您在腾讯云 CDN 内成功完成添加域名后,腾讯云 CDN 会为您的域名分配一个专属的 CNAME 地址,您还需要完成 CNAME 配置,才可以将用户的访问指向腾讯云 CDN 节点,使CDN加速生效。因为 DNS 变更解析到实际生效需要一段时间,期间可能会导致网站暂时不可访问,请您留意变更操作对业务的影响。请注意,CNAME 域名不可以直接作为访问域名使用。
-
如果您当前的域名已托管于腾讯云 DNSPod 内,且当前账号有该域名的解析权限,则可以在添加完域名后,使用一键配置完成域名配置。您可后续前往 dnspod 控制台 管理解析记录。
-
在域名管理列表内,鼠标悬浮在 CNAME 前的图标上,即可看到相关提示,
单击一键配置进入 CNAME 配置界面。

- 腾讯云 CDN 将默认为您在 DNSPod 内针对该域名增加一条 CNAME 解析记录值,TTL 默认值为600。如果您的域名内已有一条 CNAME 解析记录值,为了防止 CNAME 解析冲突,将会为您自动删除原有的 CNAME 解析记录并增加一条新的 CNAME 解析记录值。

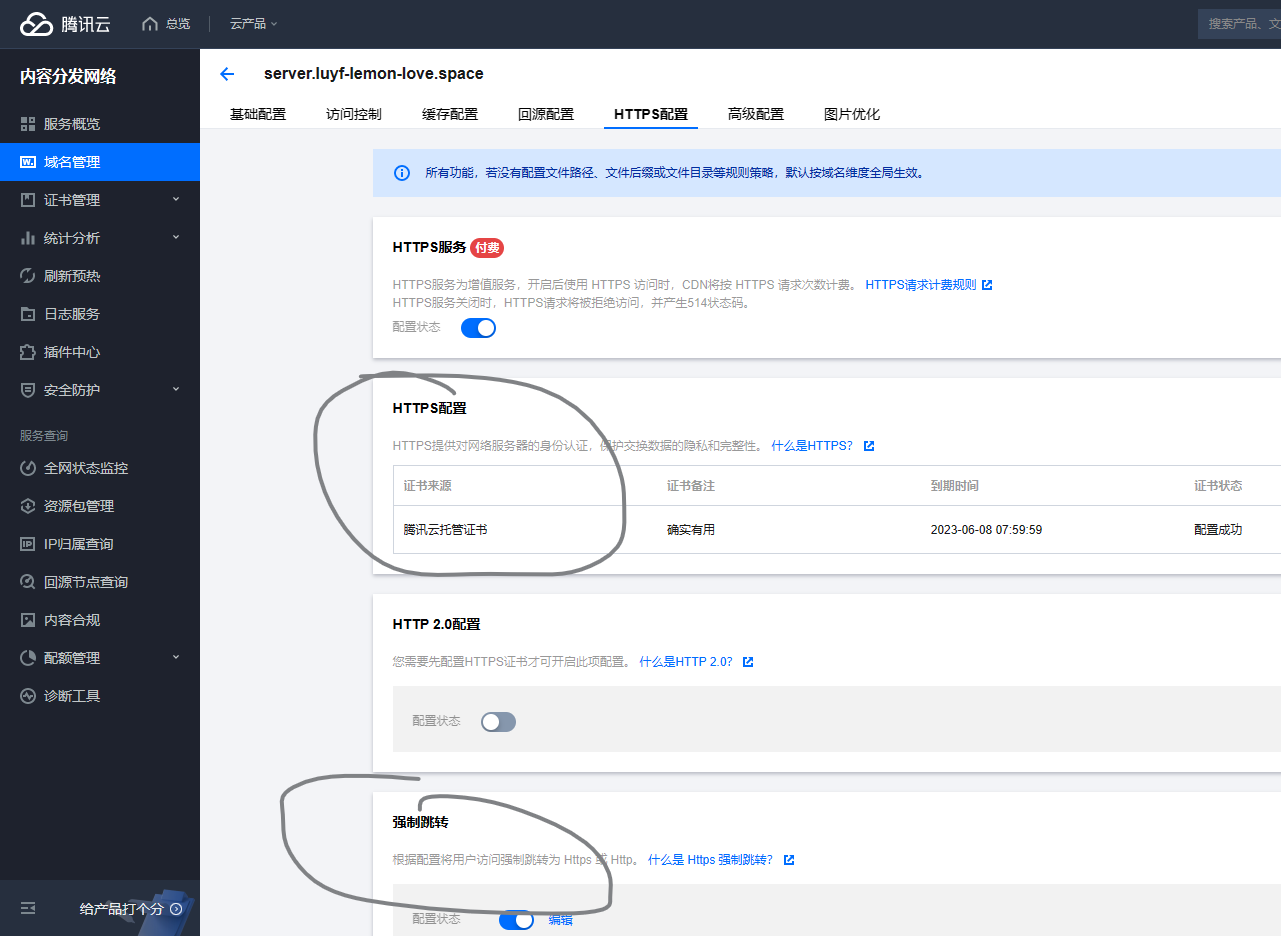
- 点击 去 CDN 控制台配置进入 CDN 控制台,进行
HTTPS配置,并开启强制跳转。
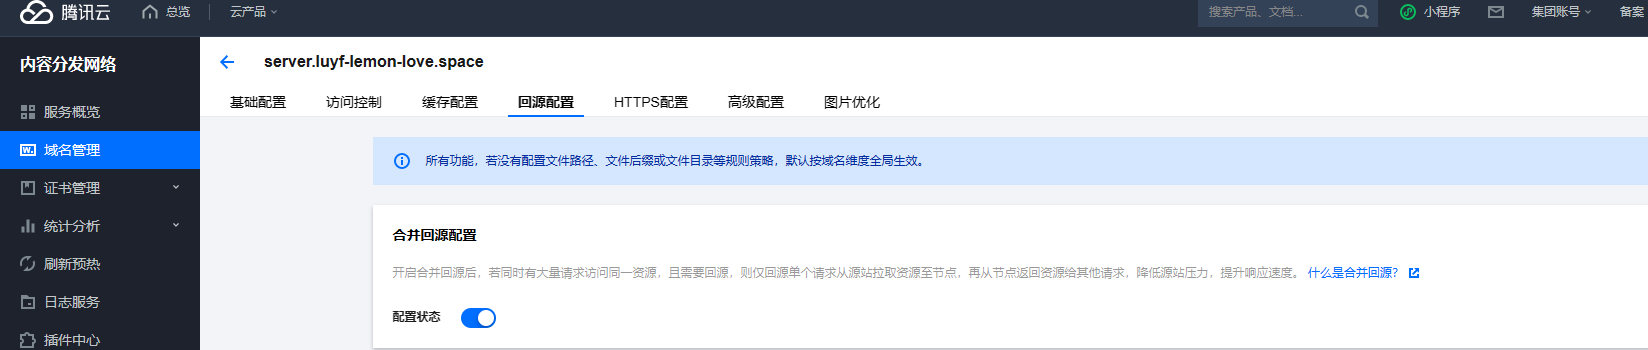
- 合并回源配置.
文章置顶
源教程地址:https://blog.csdn.net/weixin_43372529/article/details/114176470 。
- 运行下面命令安装插件:
1 | npm uninstall hexo-generator-index --save |
- 在需要置顶的文章的Front-matter中加上top: true/数字即可,数字越大,文章越靠前。

引用块
源教程地址:https://hexo.io/zh-cn/docs/tag-plugins 。
在文章中插入引言,可包含作者、来源和标题。语法如下:
1 | {% blockquote [author[, source]] [link] [source_link_title] %} |
没有提供参数,则只输出普通的 blockquote
1 | {% blockquote %} |
Lorem ipsum dolor sit amet, consectetur adipiscing elit. Pellentesque hendrerit lacus ut purus iaculis feugiat. Sed nec tempor elit, quis aliquam neque. Curabitur sed diam eget dolor fermentum semper at eu lorem.
引用书上的句子
1 | {% blockquote David Levithan, Wide Awake %} |
Do not just seek happiness for yourself. Seek happiness for all. Through kindness. Through mercy.
引用 Twitter
1 | {% blockquote @DevDocs https://twitter.com/devdocs/status/356095192085962752 %} |
NEW: DevDocs now comes with syntax highlighting. http://devdocs.io
引用网络上的文章
1 | {% blockquote Seth Godin http://sethgodin.typepad.com/seths_blog/2009/07/welcome-to-island-marketing.html Welcome to Island Marketing %} |
Every interaction is both precious and an opportunity to delight.
B站视频
参考:http://www.87com.com/tag/bilibili嵌入代码禁止自动播放
1 | {% raw %} |
index_img 图片变亮
参考:
- http://www.manongjc.com/detail/32-aljnzxruwdmhmvc.html
- https://blog.csdn.net/m0_71172453/article/details/128977978
修改文件:themes\butterfly\source\css\_layout\head.styl
1 | #page-header |
结语
第十八篇博文写完,开心!!!!
今天,也是充满希望的一天。
 wechat
 alipay


.png)